Automation has become an essential strategy for optimizing business processes and driving productivity. In the realm of e-commerce, it simplifies critical tasks such as gathering and processing leads’ contact details, orchestrating advertising campaigns, and managing customer relationships. While Google Lead Form and ClickUp are individually powerful, their integration can take efficiency to new heights. By linking these platforms and ensuring a smooth data flow between them, you can achieve a fully automated workflow. In this article, we’ll walk you through an easy and effective way to implement Google Ads Lead Form and ClickUp integration using the SaveMyLeads online connector.
How ClickUp and Google Ads Lead Form Integration Can Revolutionize Your Workflows
Integrating ClickUp with Google Ads Lead Form is a game-changer for businesses in e-commerce and marketing. This integration enables more efficient workflows and reduces the likelihood of errors by automating routine tasks. With this connection in place, data from every submitted lead form is instantly transferred to ClickUp, where it automatically creates new tasks.
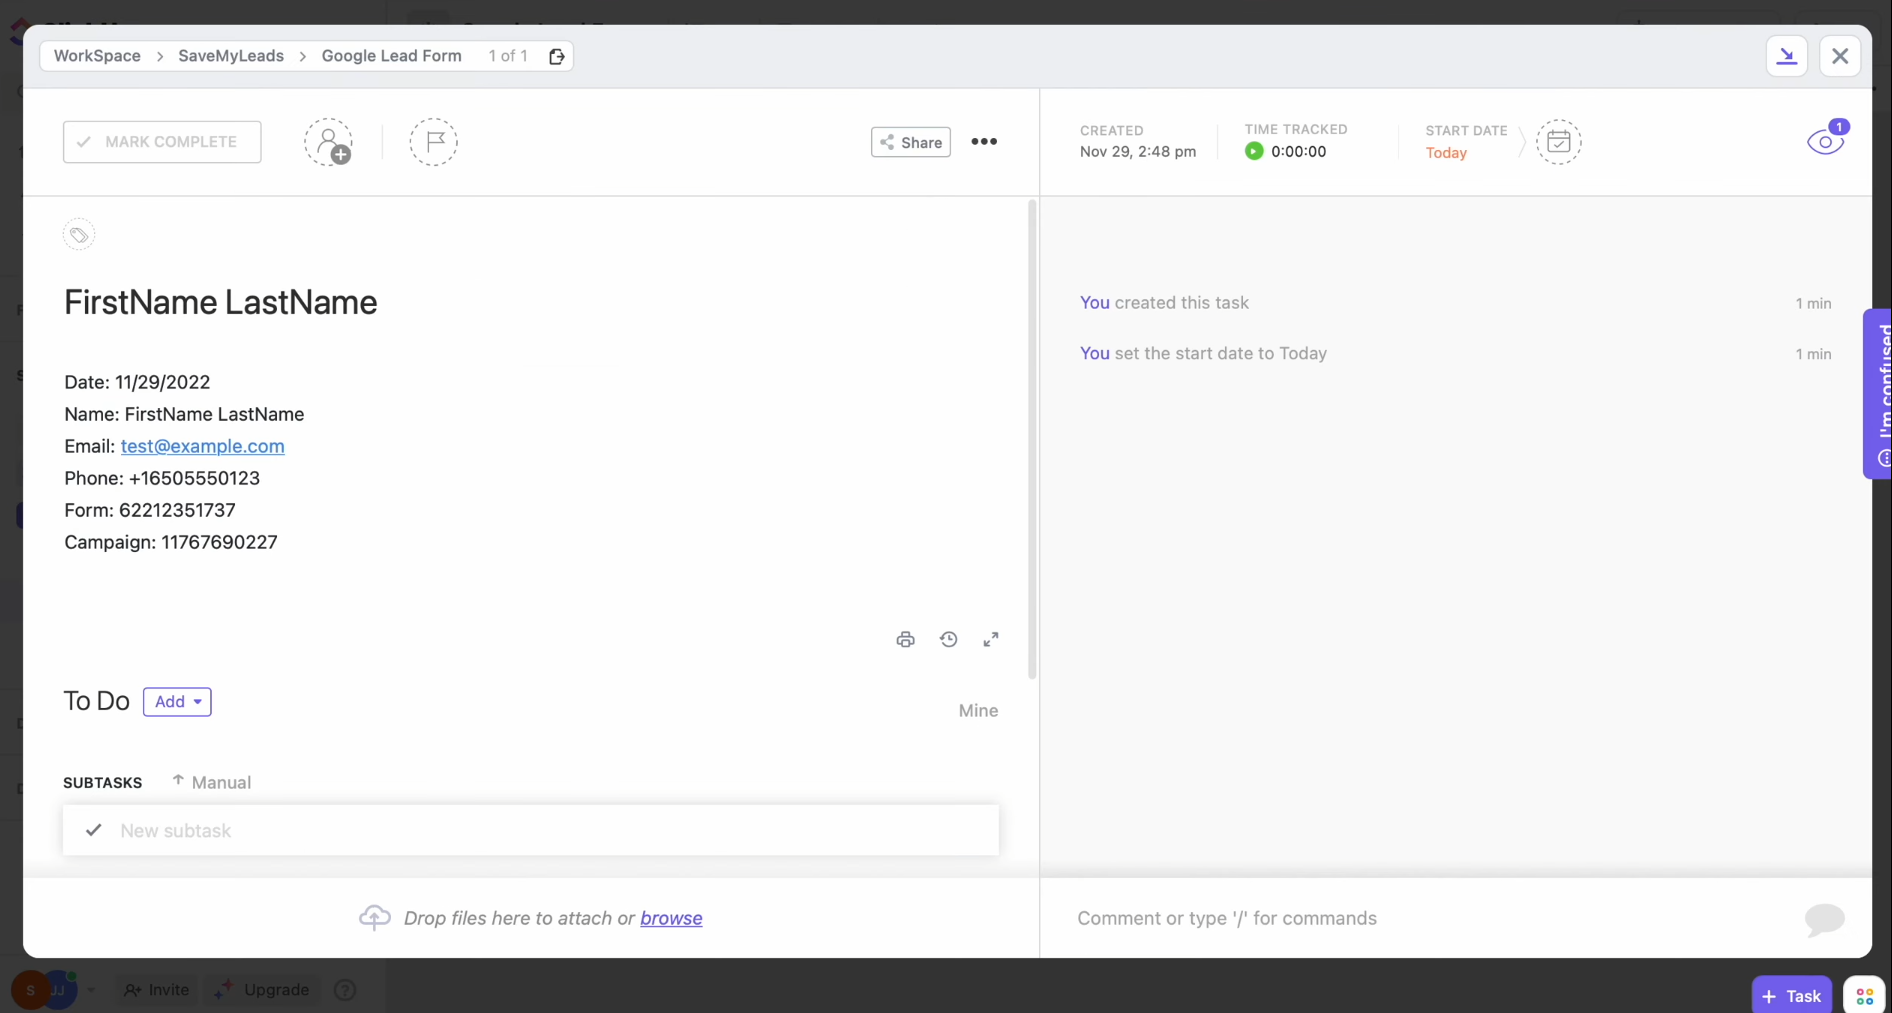
Let’s look at two fresh examples of
how this integration can deliver real-world benefits:
- Optimizing lead handling for a travel agency. A travel agency uses Google Lead Form to gather inquiries from potential travelers interested in vacation packages. Thanks to the integration, every completed form is automatically forwarded to ClickUp, where it generates a new task containing the traveler’s contact information. This allows agents to respond promptly with personalized offers, reducing turnaround time and increasing booking rates. By automating lead management, the agency not only saves time but also enhances customer satisfaction and loyalty.
- Boosting productivity for a fitness studio. A fitness studio leverages Google Lead Form to attract new members by offering free trial sessions. Each time a prospective client fills out the form, their information is transferred to ClickUp, creating a task that tracks their contact details for quick communication. The streamlined process improves lead conversion and frees up staff to focus on delivering excellent training experiences.
By integrating platforms, businesses can eliminate tedious manual tasks, accelerate operations, and focus on what truly matters: growth and client satisfaction. Ready to experience these benefits first-hand? Explore how to set up Google Ads Lead Form and ClickUp integration with the SaveMyLeads tool today!
How to Set Up Google Lead Form Ads and ClickUp Integration
You don’t need to be a programmer or have an in-depth understanding of APIs to connect Google Lead Form with ClickUp. No IT support is required either. SaveMyLeads, an online automation tool, takes care of all the technical work for you. Its user-friendly interface enables you to set up the integration swiftly, helping you save both time and effort. The entire setup process is designed to be simple and takes less than ten minutes to complete. To make it even easier, the SaveMyLeads team provides step-by-step written guides and video tutorials, ensuring a smooth setup without any errors.
Sign up on the SaveMyLeads website if you haven’t already. Once registered, you’re ready to configure ClickUp and Google Lead Form integration and streamline your workflow effortlessly.
Configuring the Data Source: Google Lead Form
Step 1: Begin by creating a new connection in the SaveMyLeads platform.
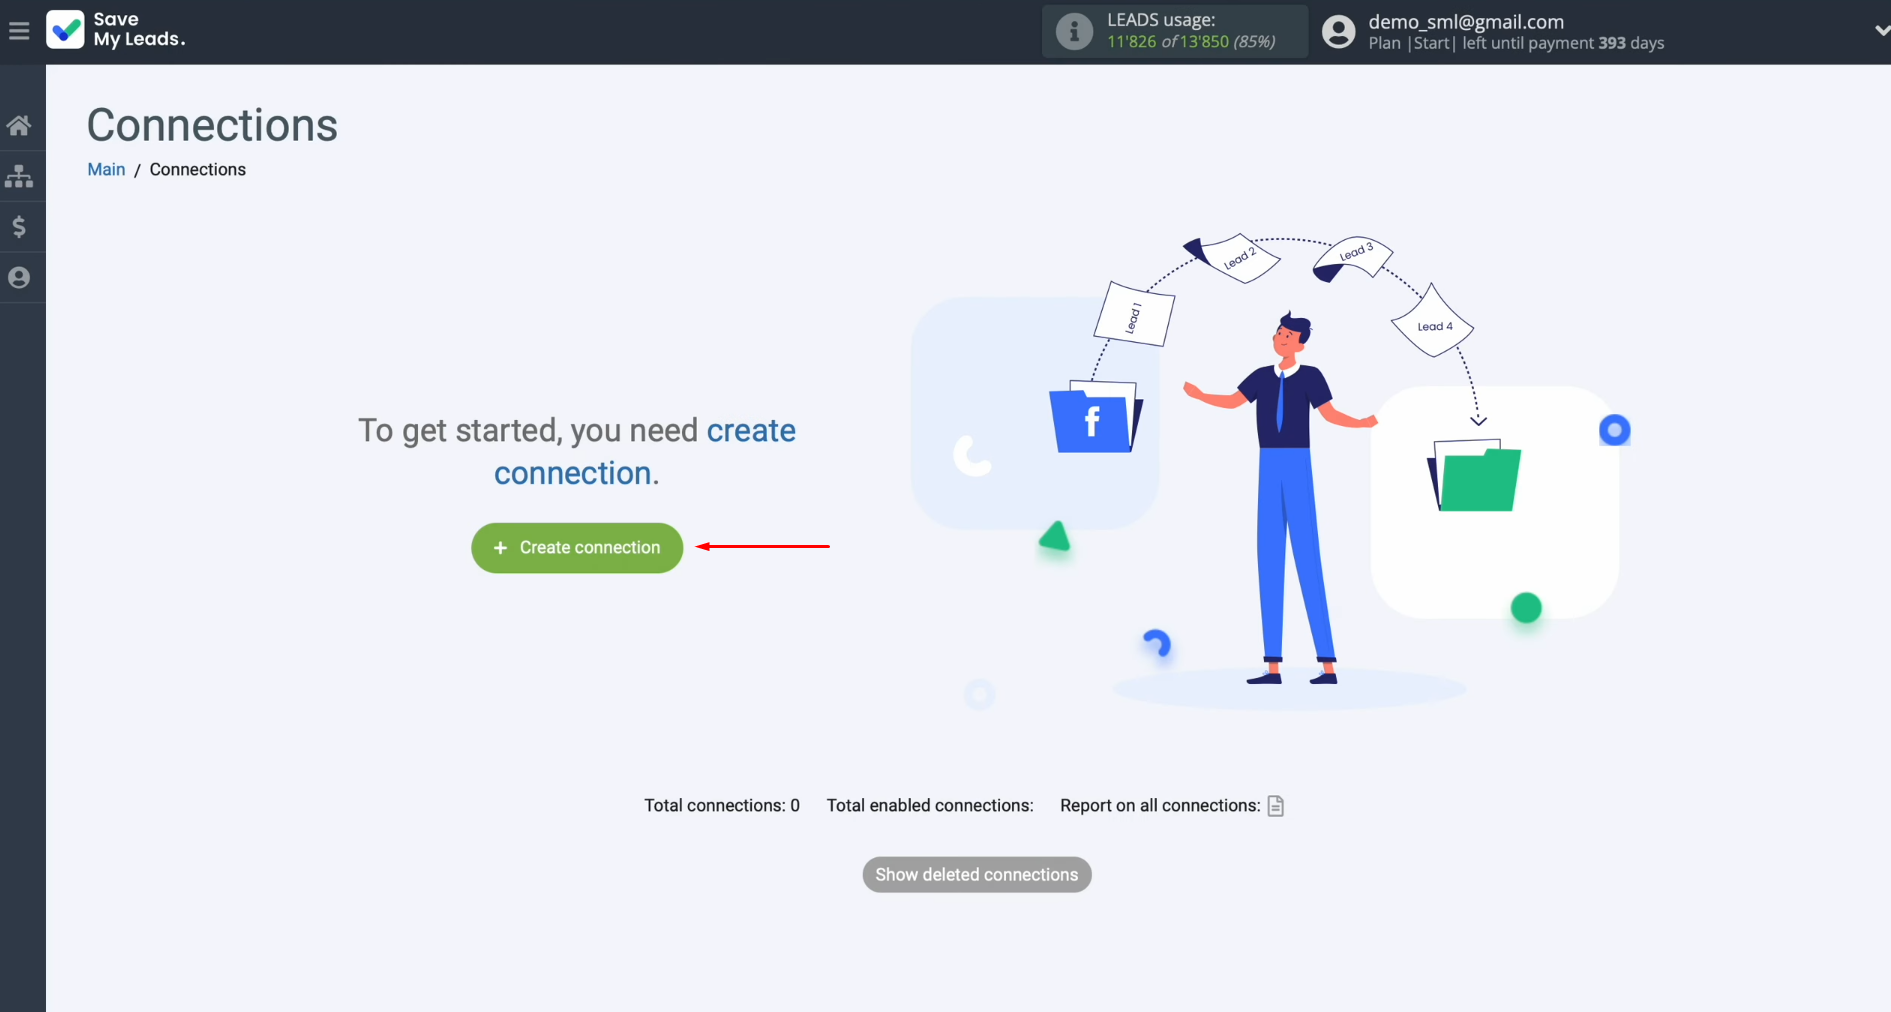
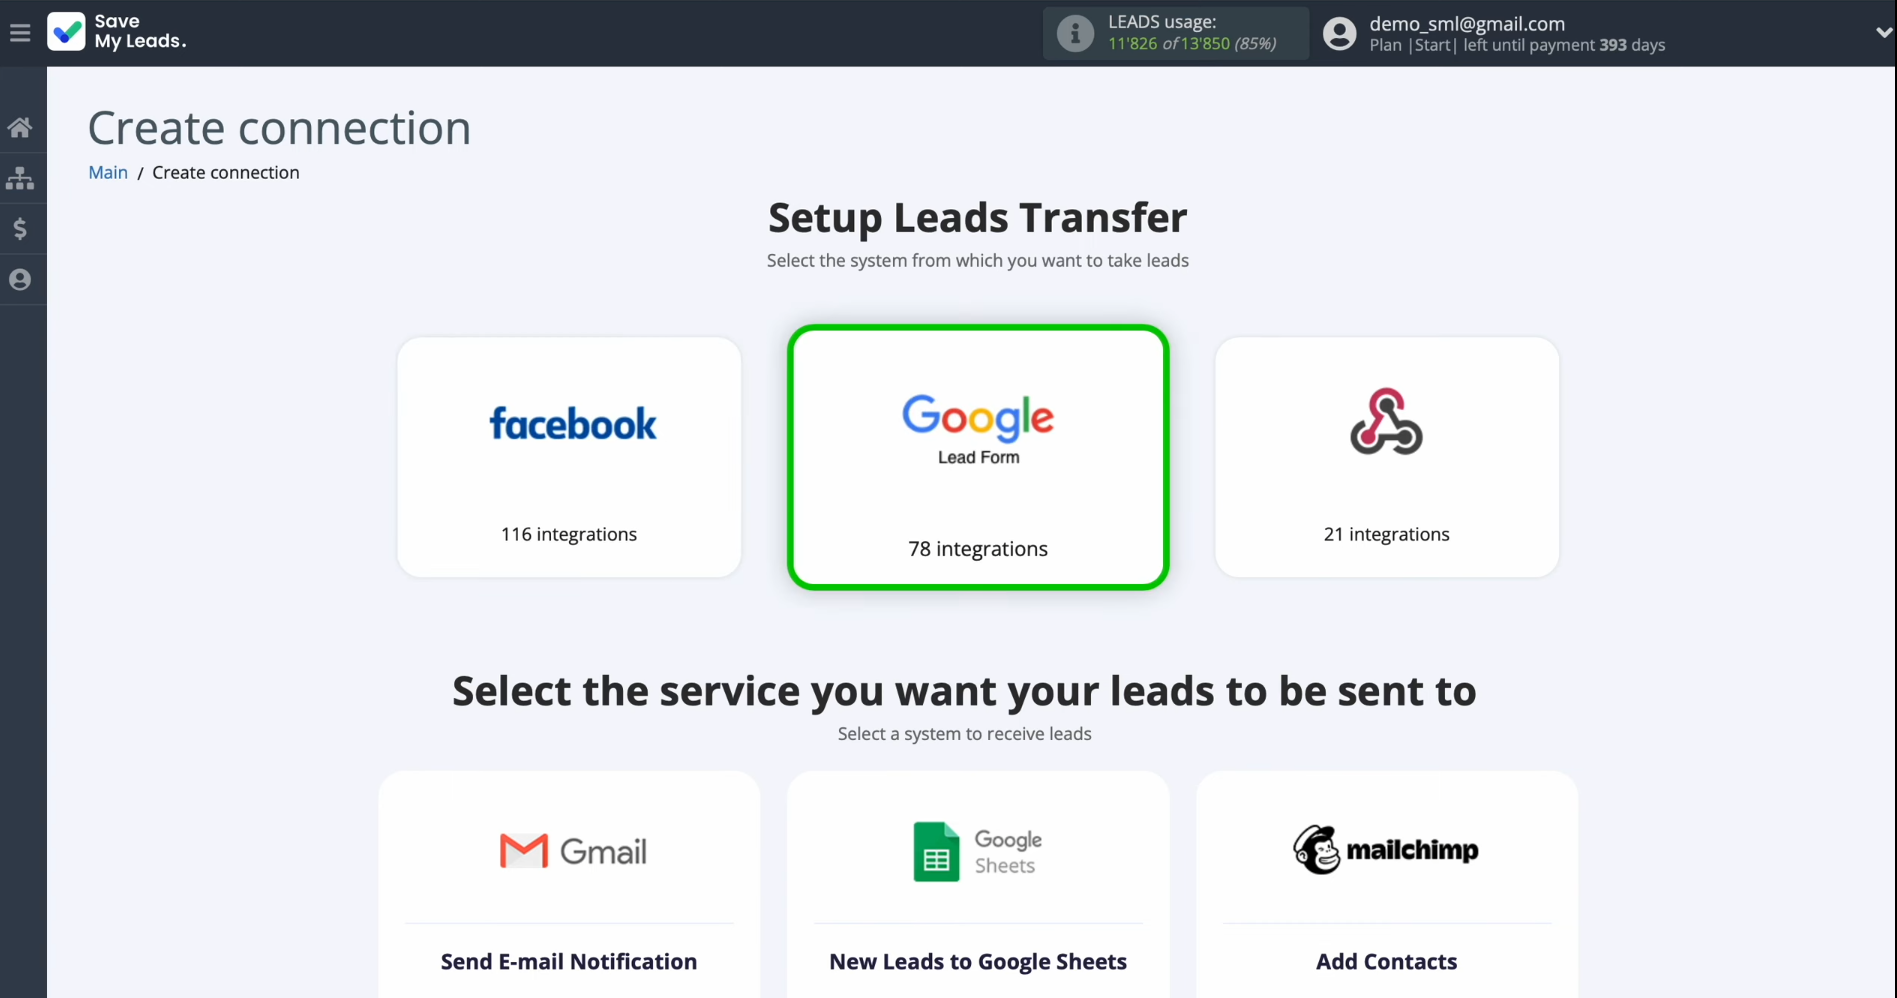
Step 2: Select the source system from
which you will transfer lead data. In this case, choose Google Lead Form.
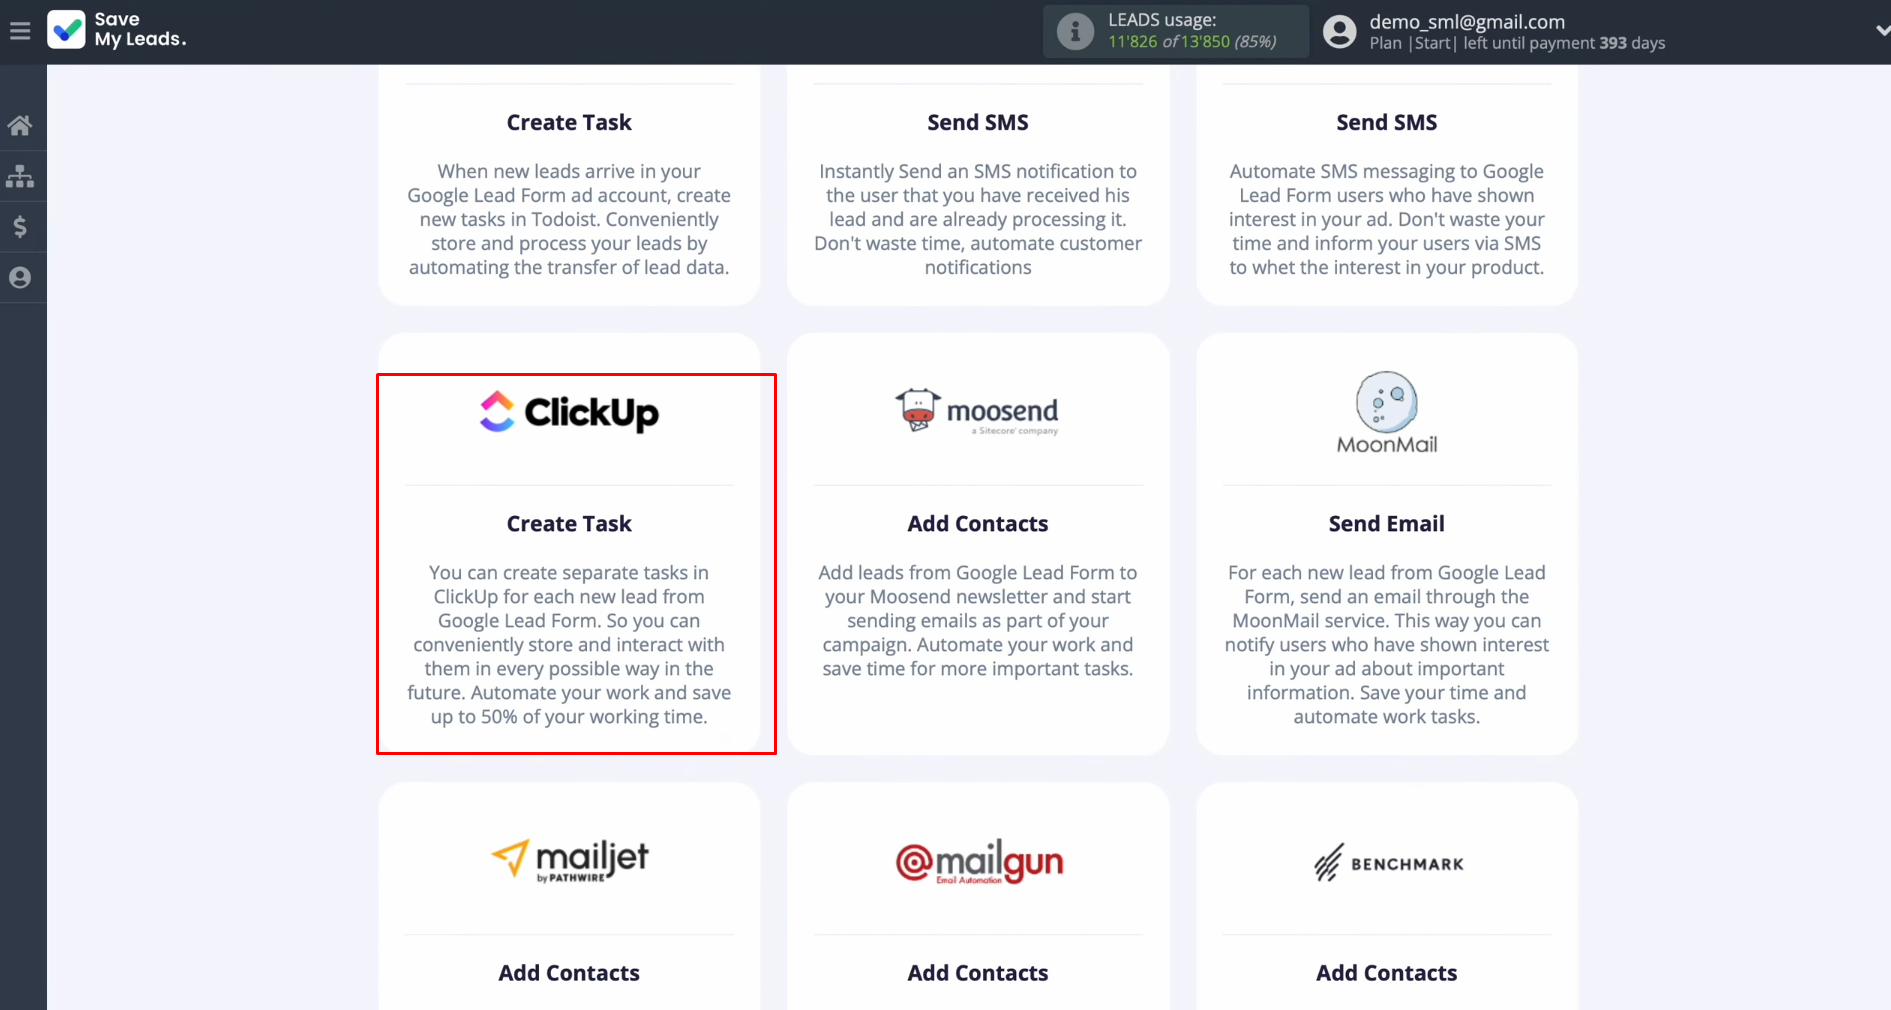
Step 3: Specify the destination system
where new leads will be sent. Select ClickUp as your receiver.
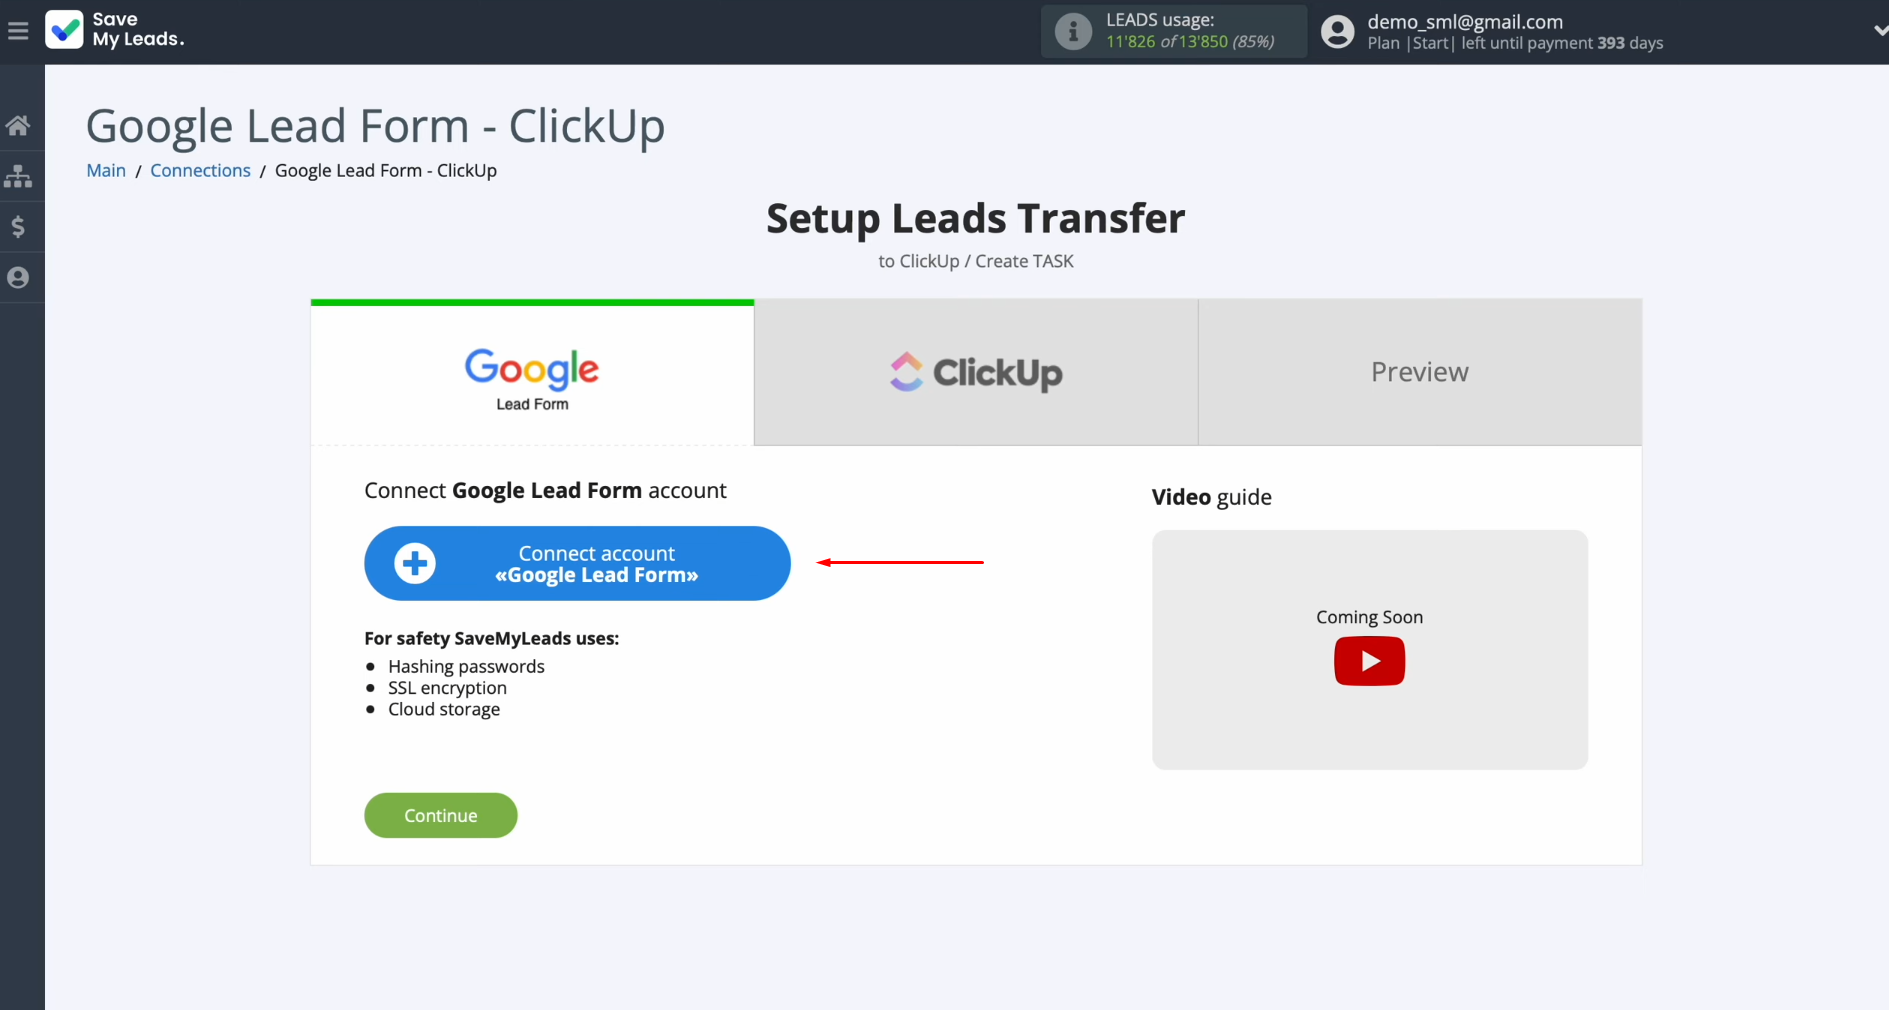
Step 4: Connect your Google Lead Form
account to SaveMyLeads.
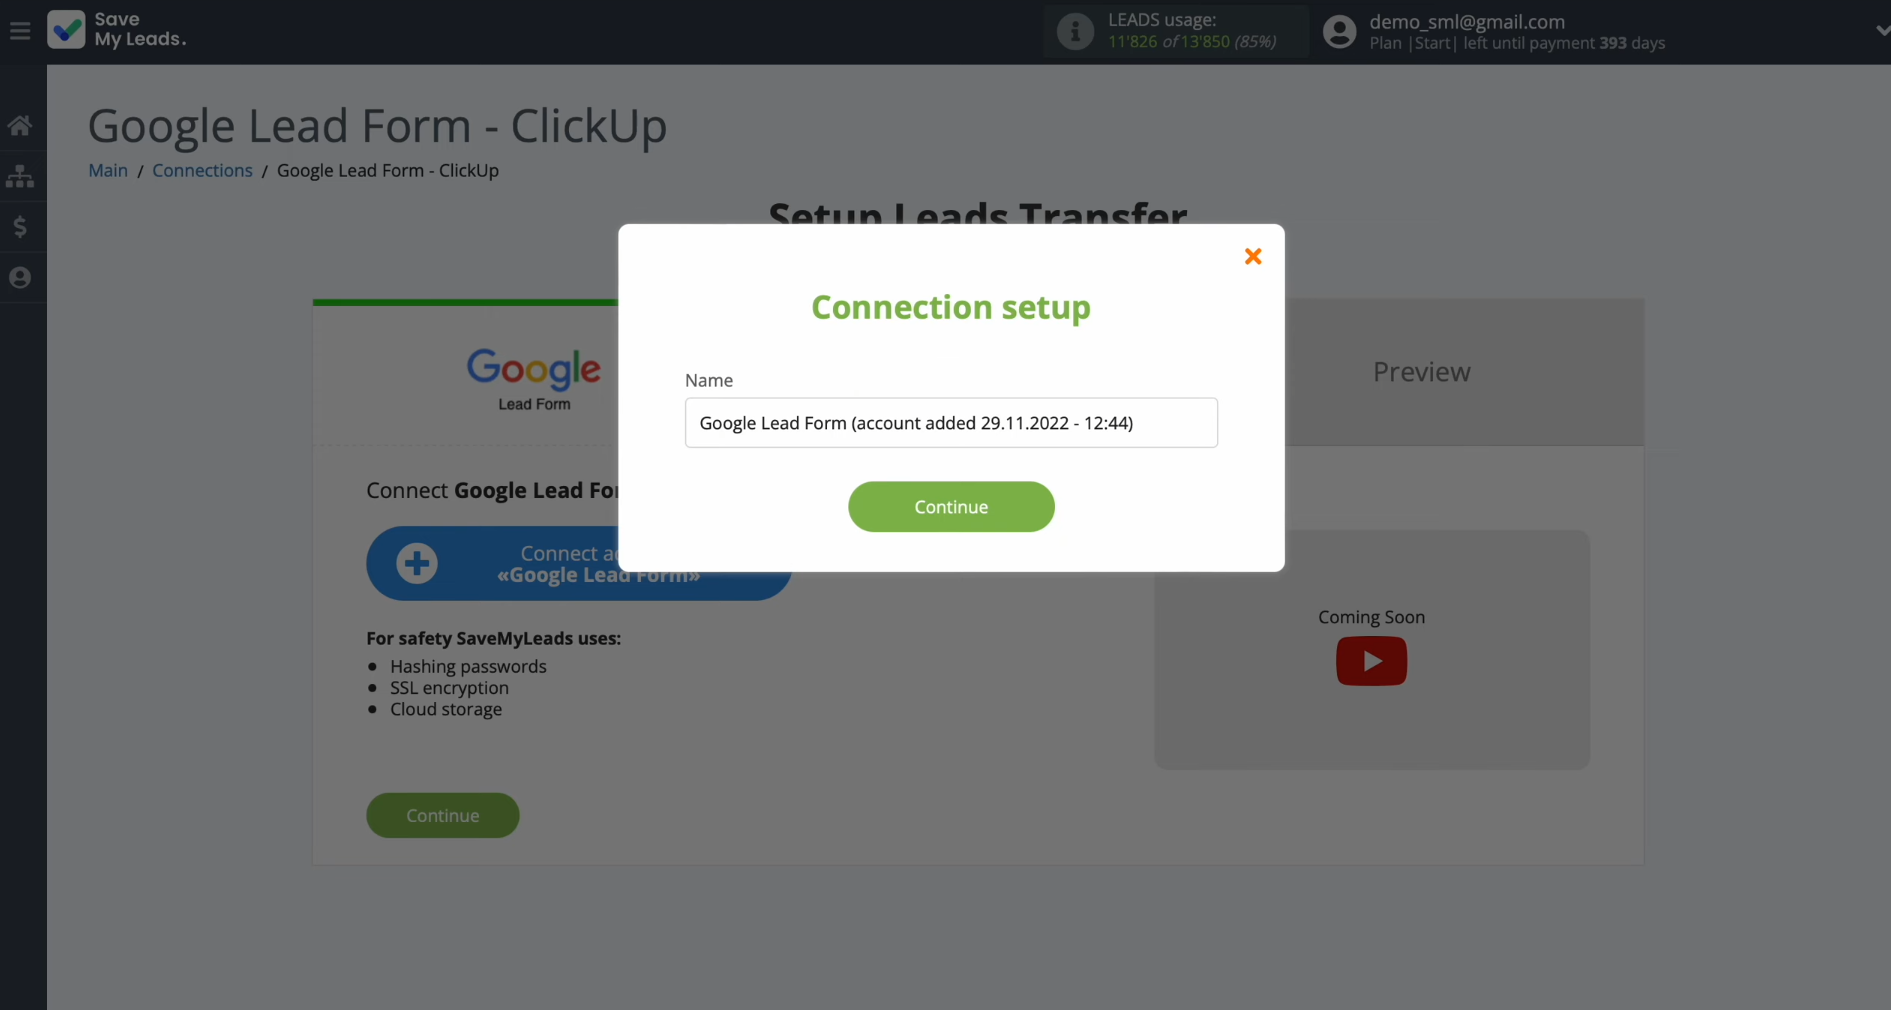
Step 5: Assign a name to the connected
account or simply click "Continue" to proceed without renaming.
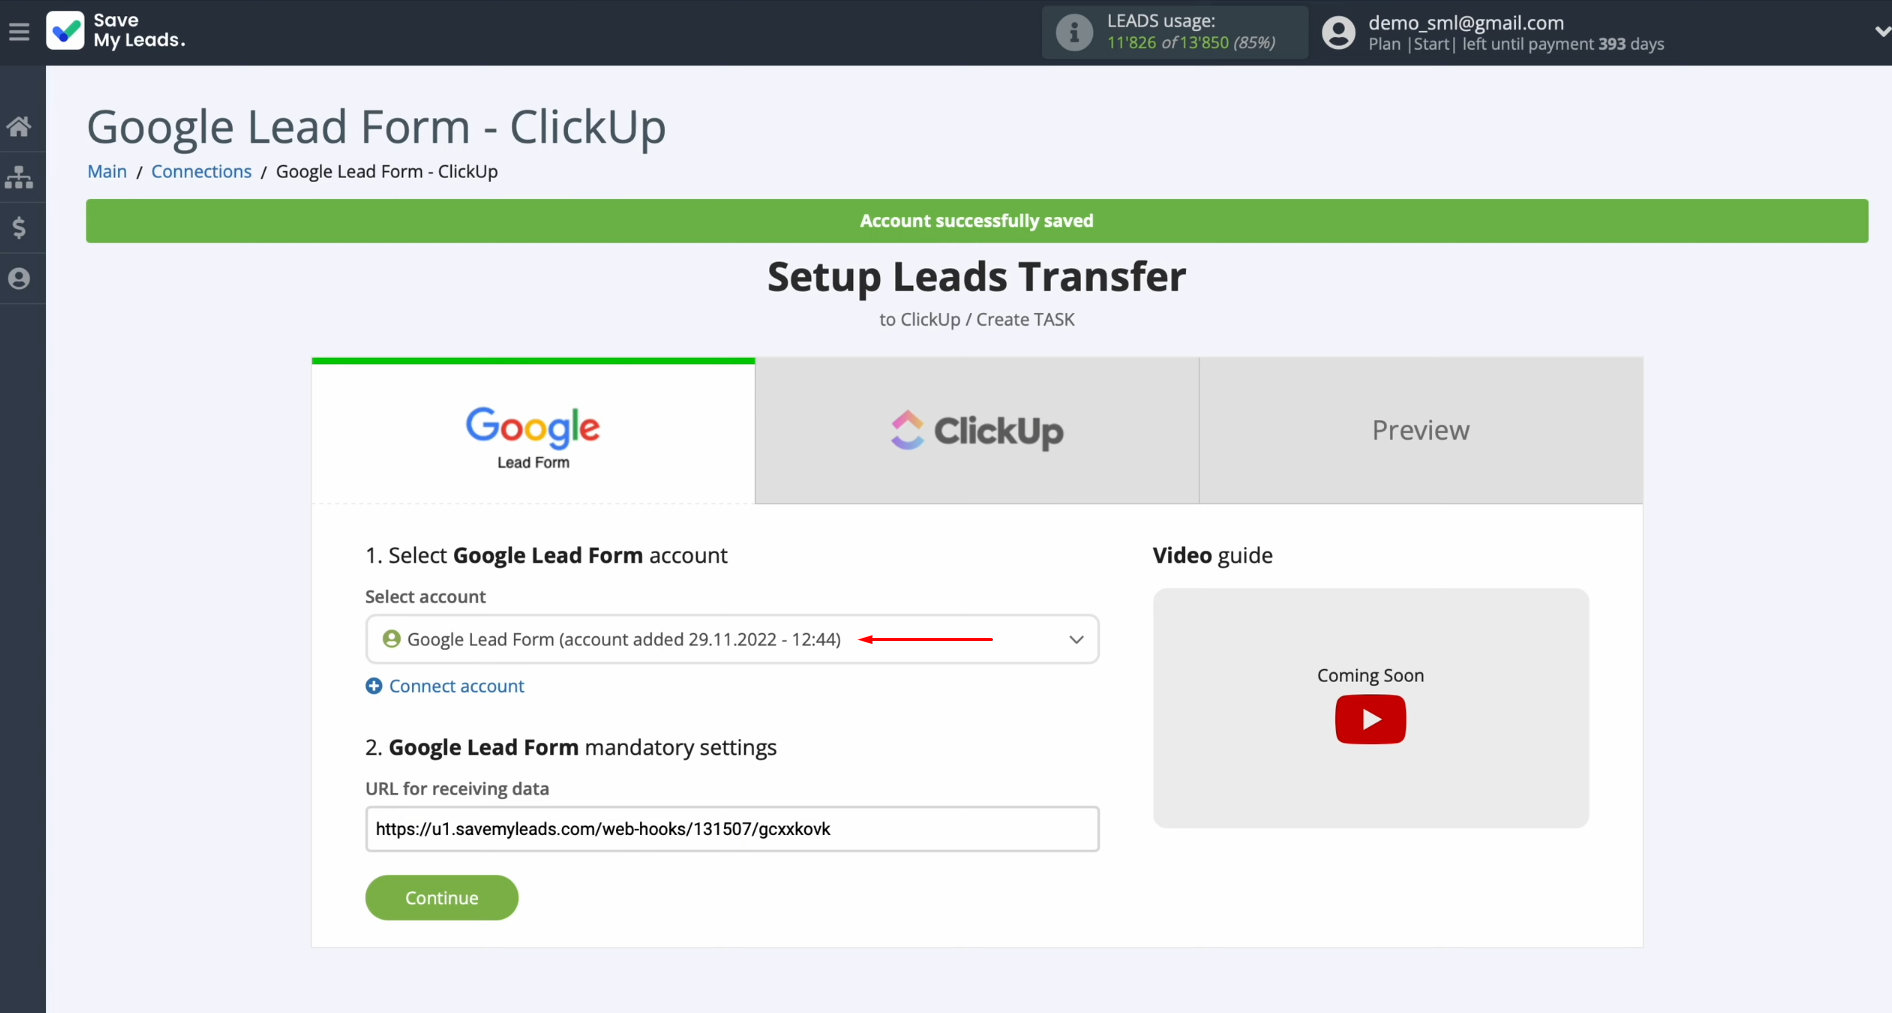
Step 6: Once the account appears in the
list of connected accounts, select it.
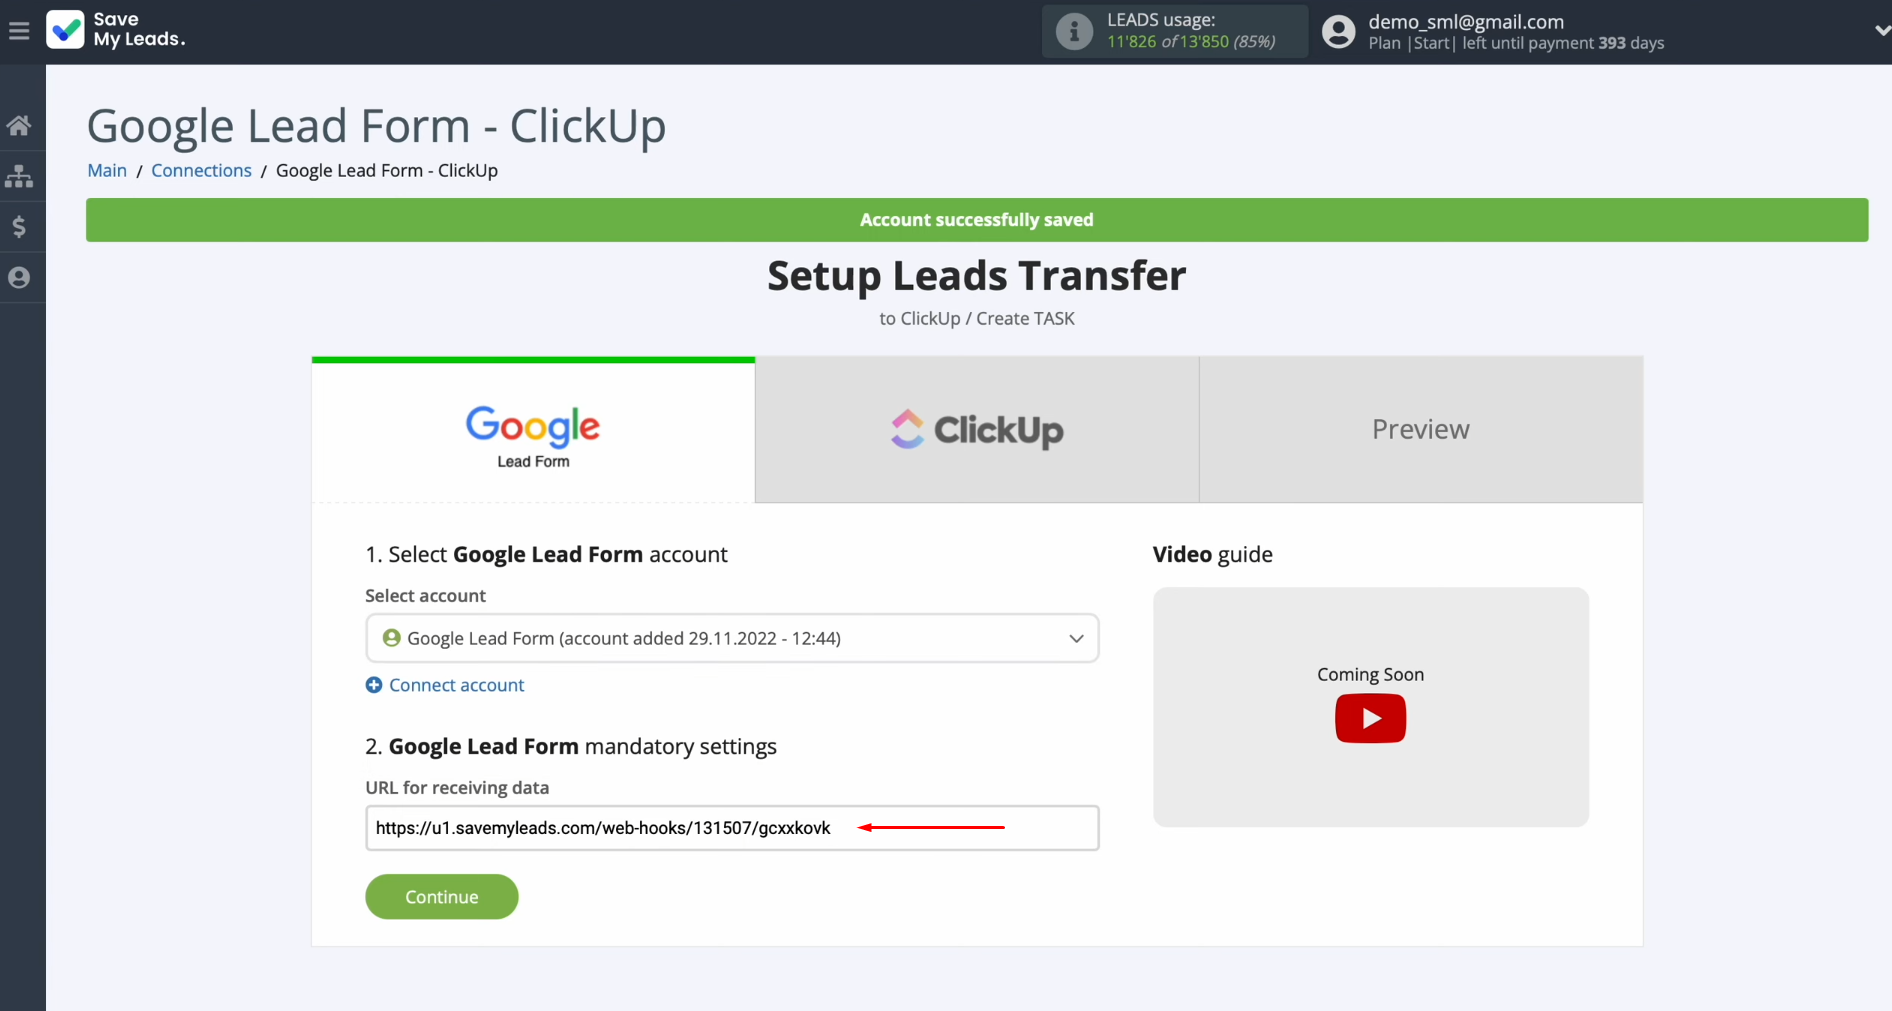
Step 7: Copy the provided URL for
receiving data, then go to your Google Ads account.
Step 8: Go to the Ads & Assets section, then open the Assets tab.
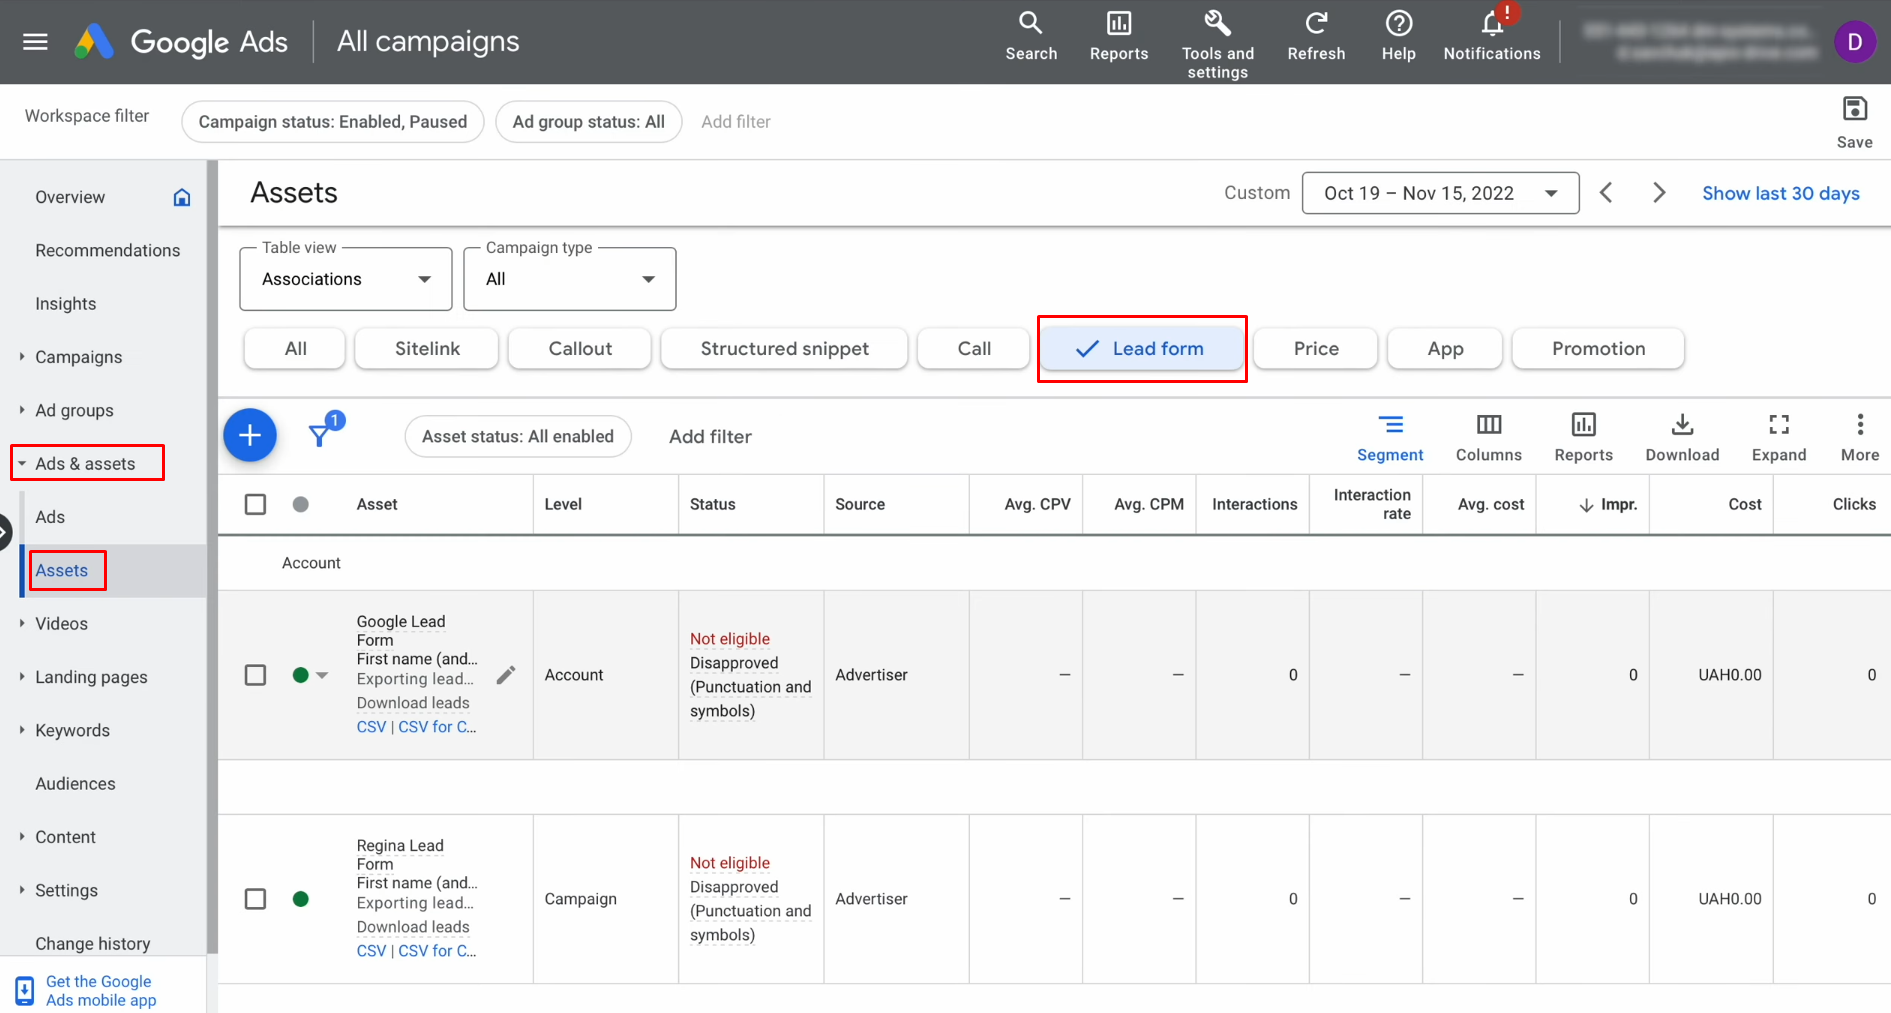
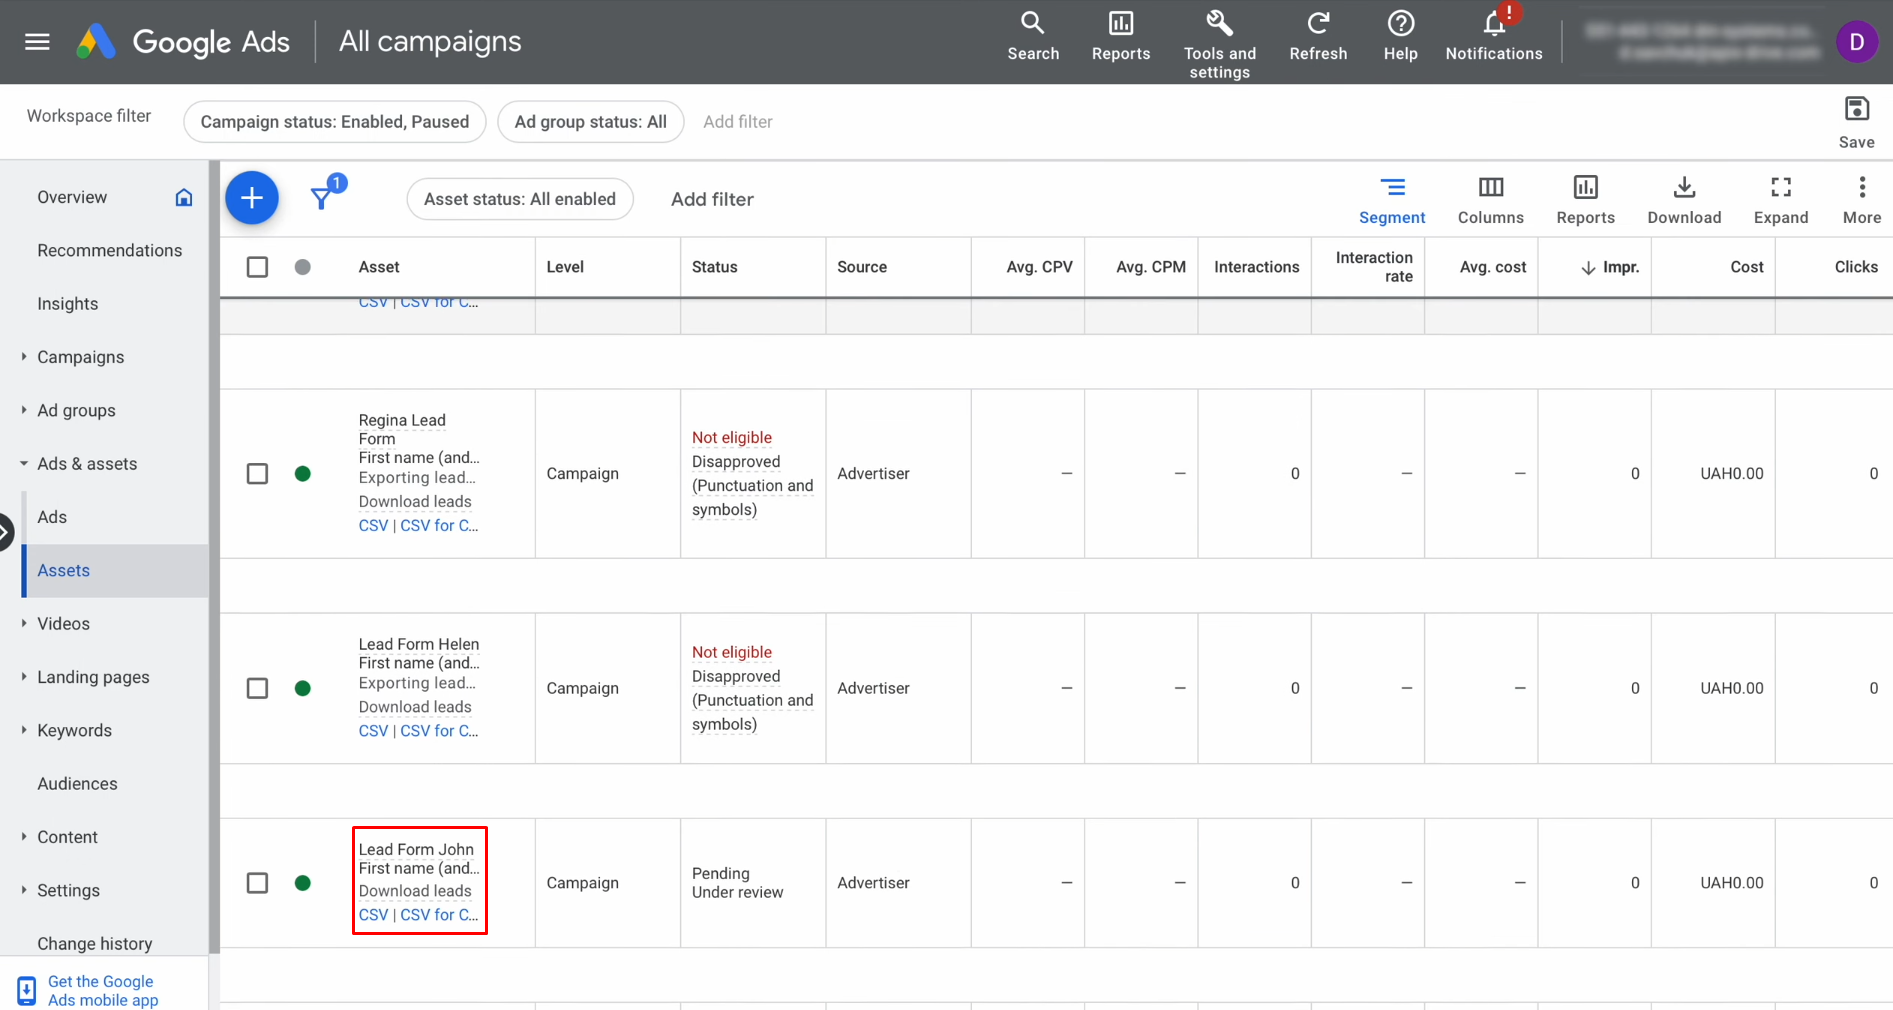
Step 9: Locate and select the lead form
you want to use.
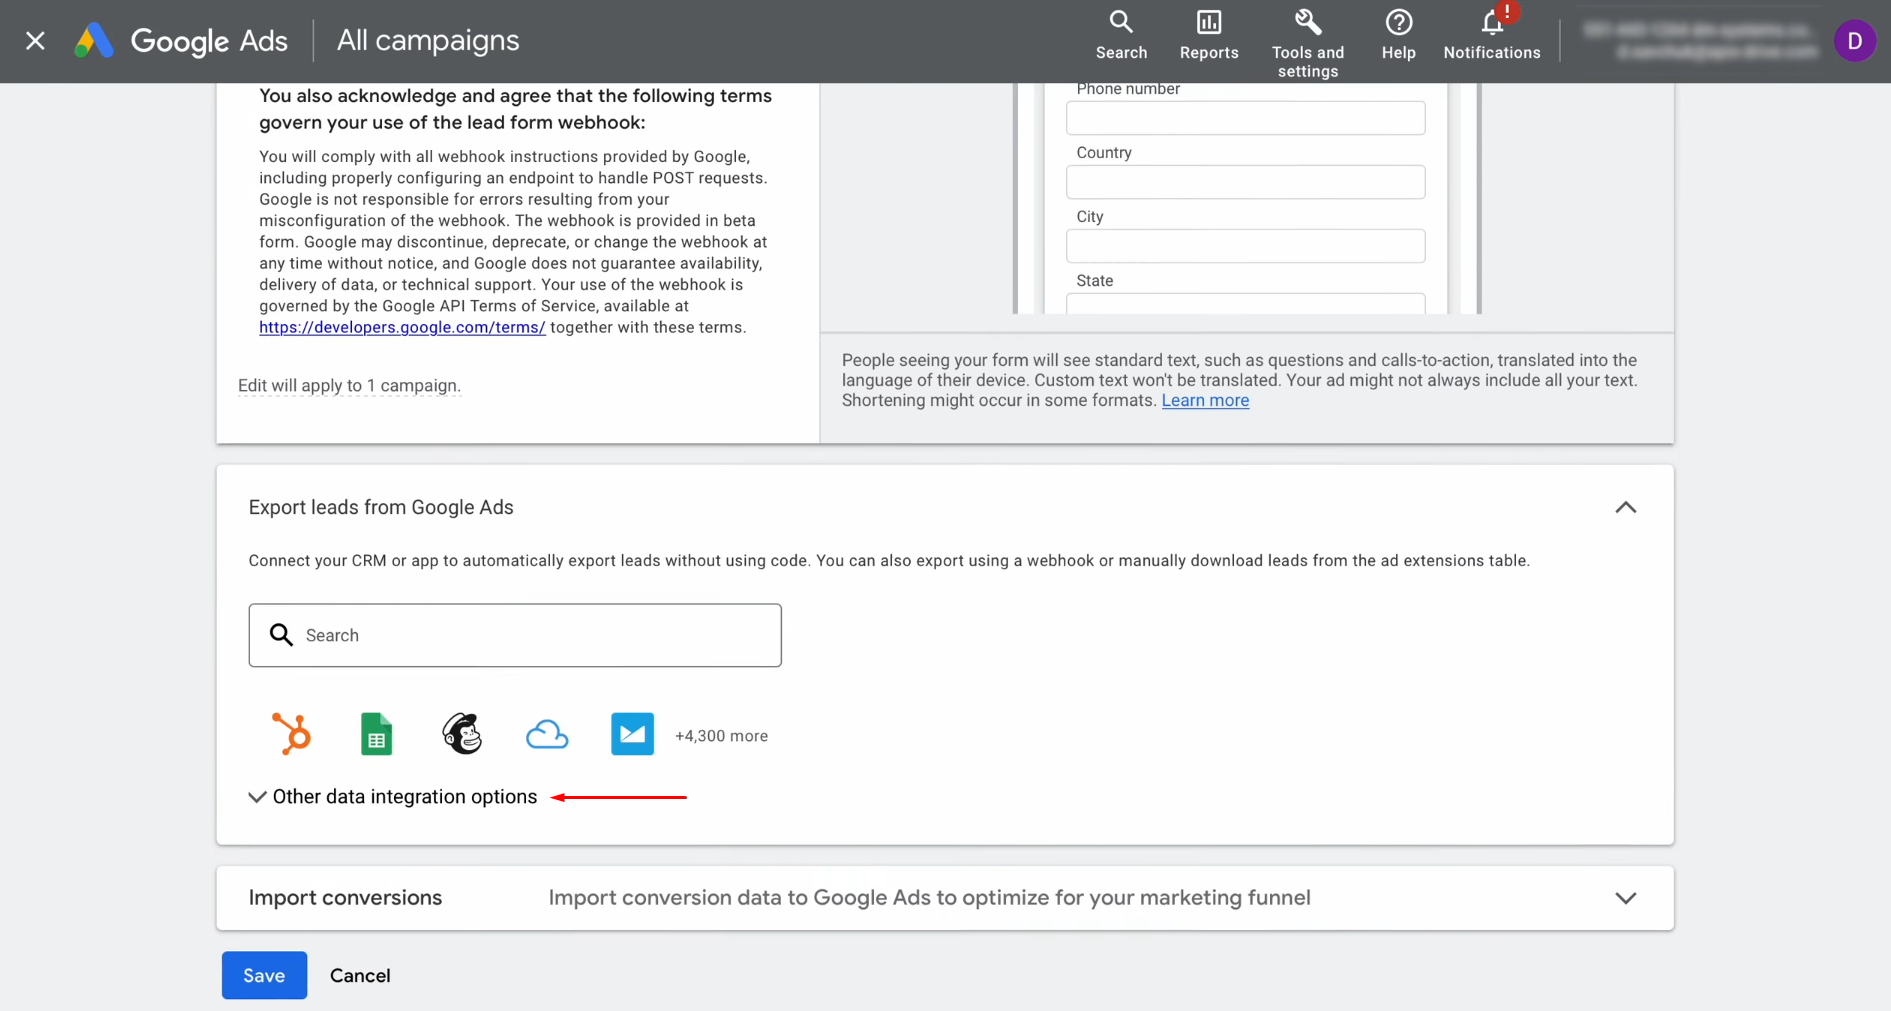
Step 10: Access the lead form settings and
navigate to the "Other Data Integration Options" section.
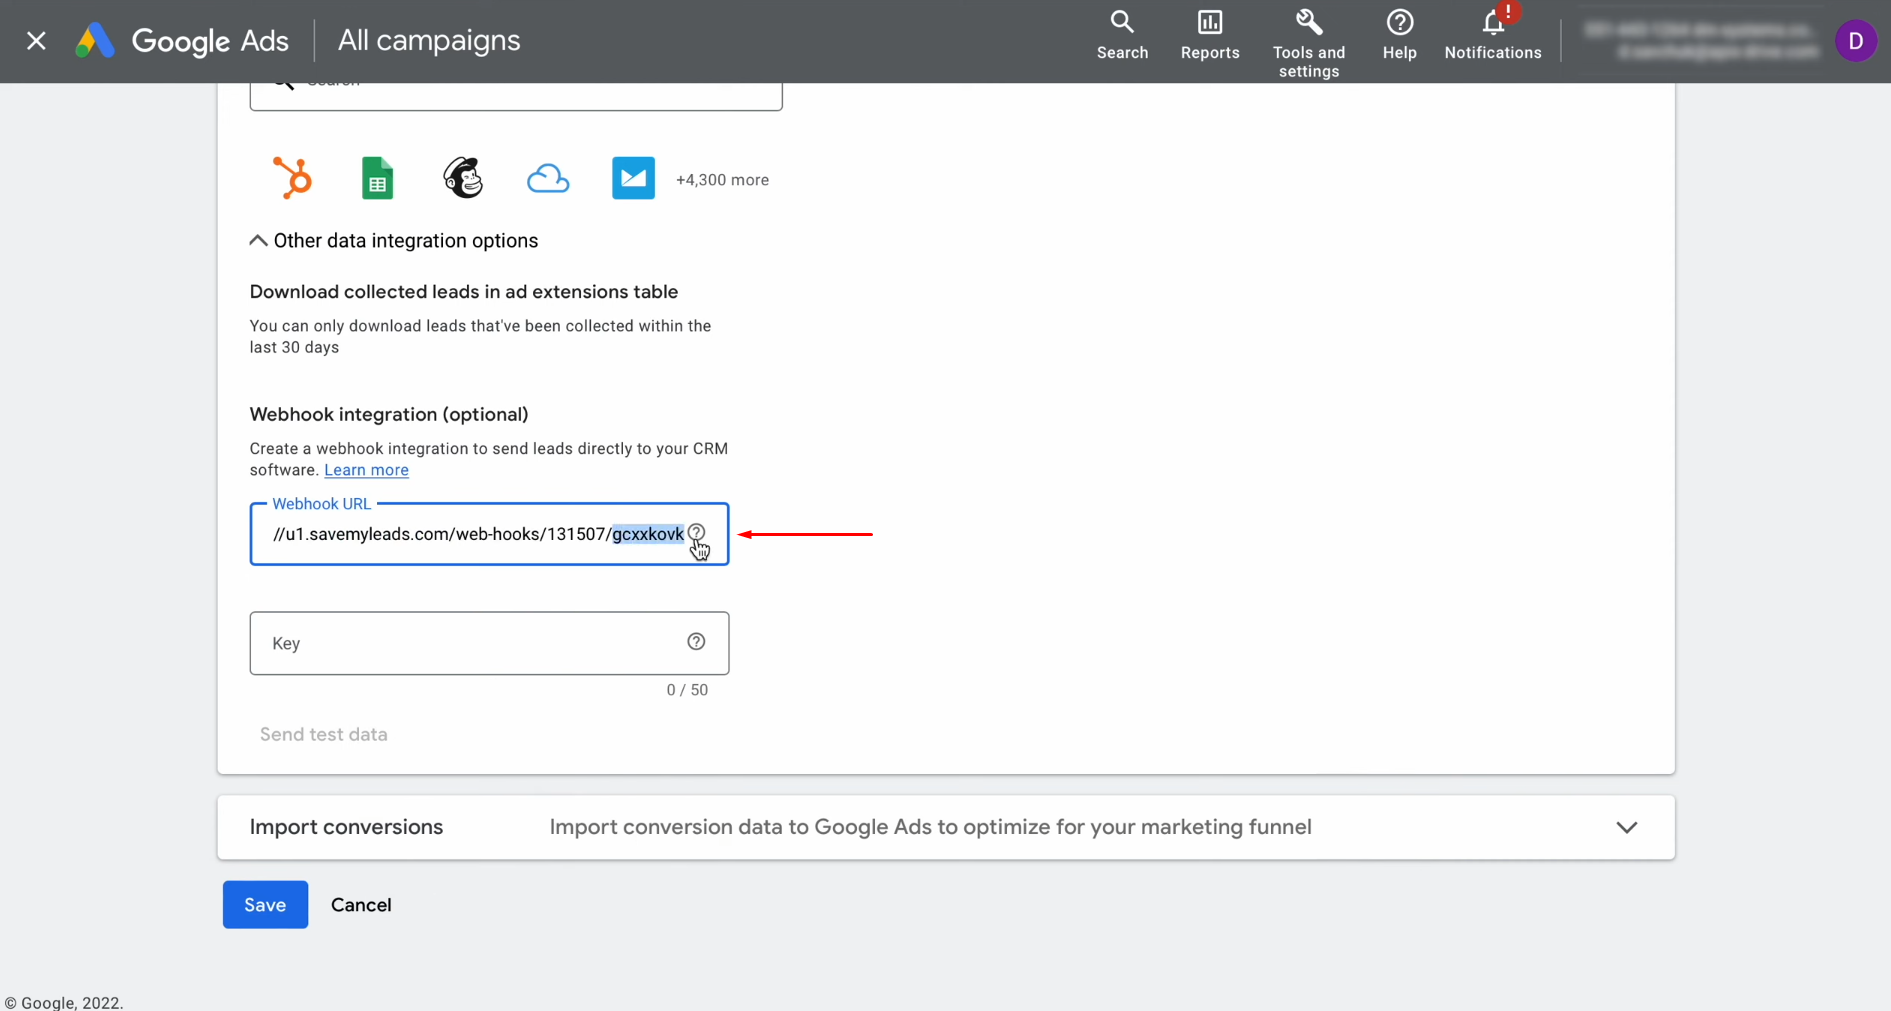
Step 11: Paste the copied URL into
the "Webhook URL" field.
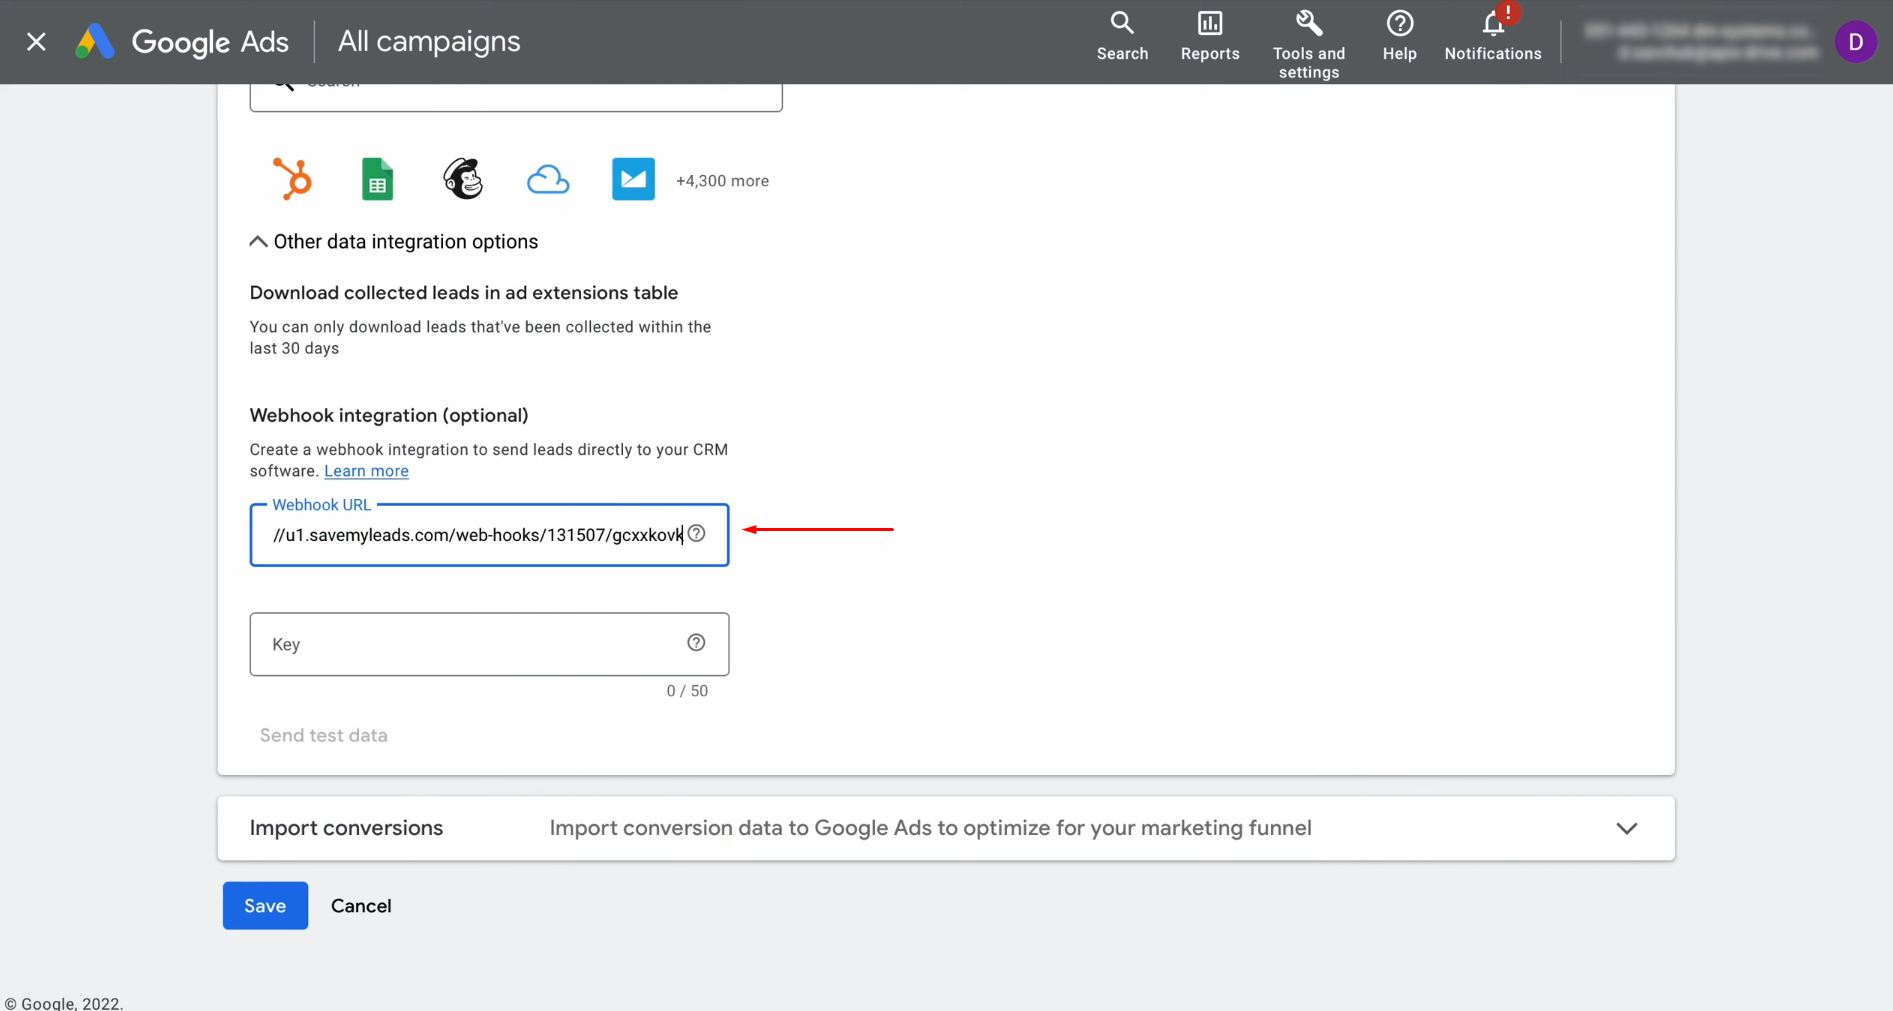
Step 12: Copy the last segment
of the URL.
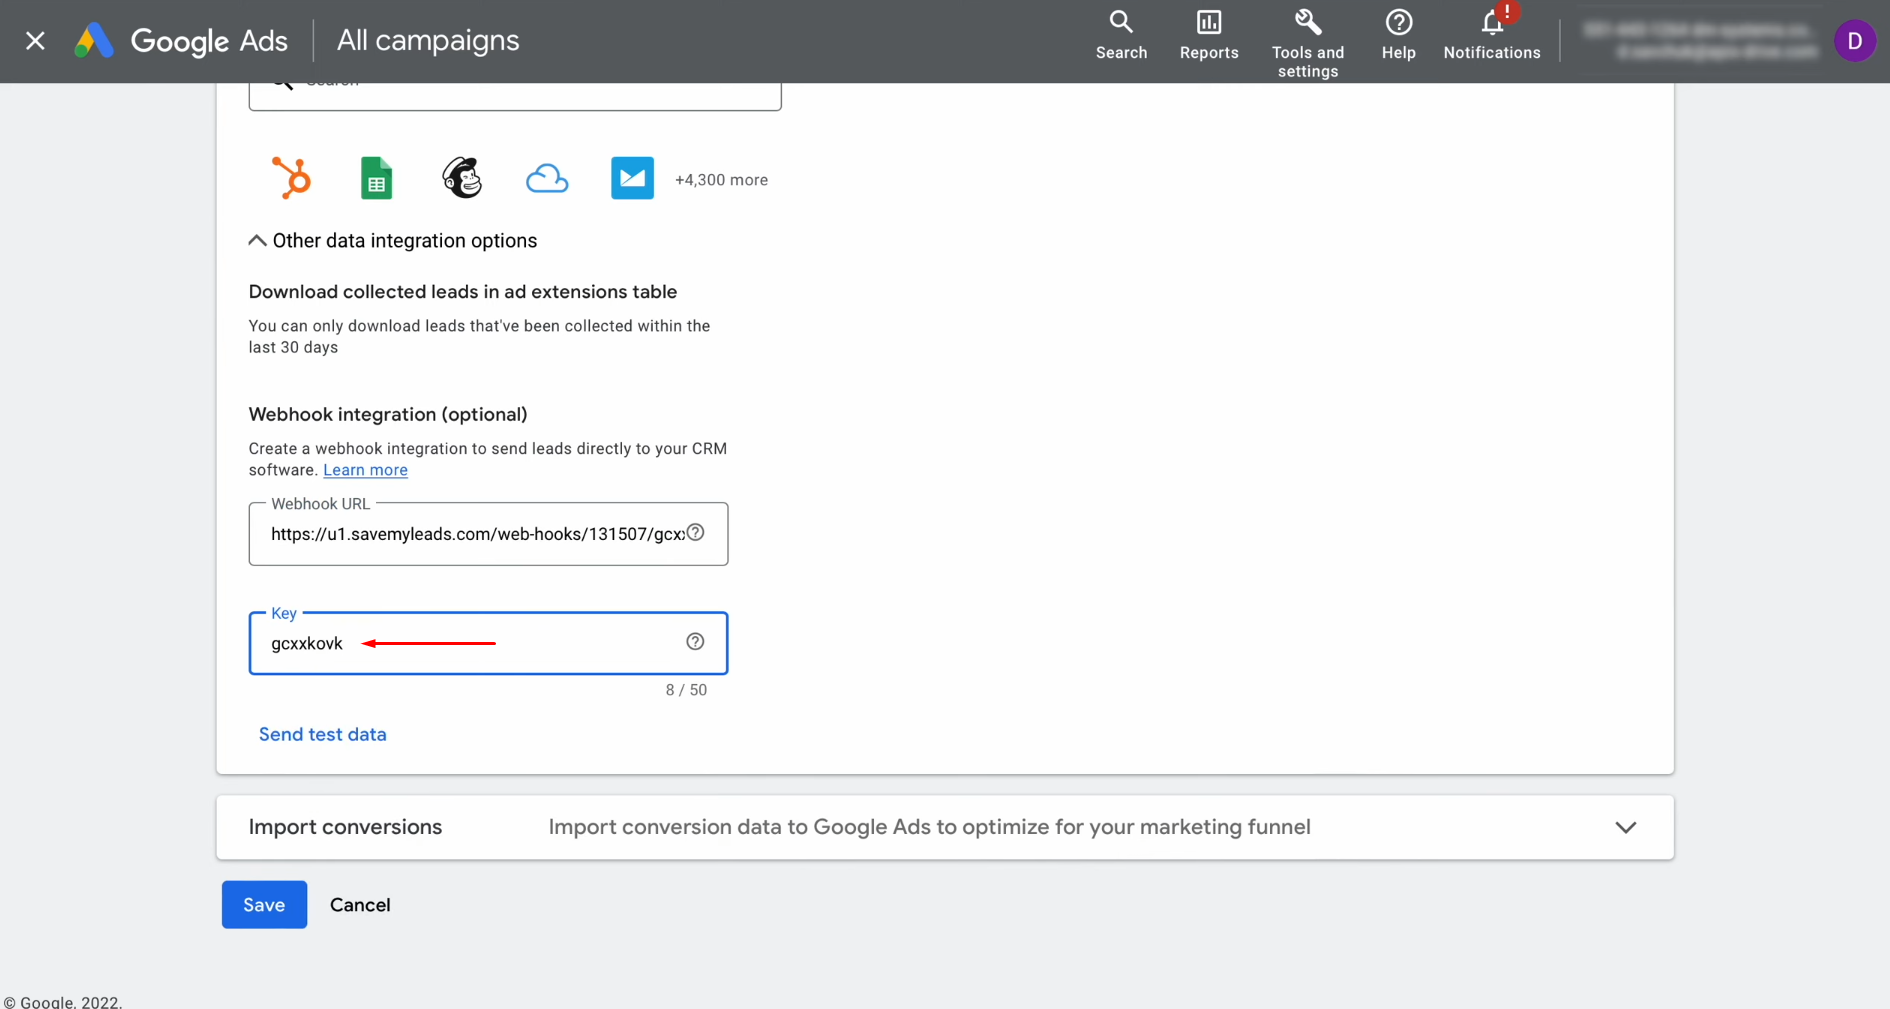
Step 13: Insert the extracted segment into
the "Key" field.
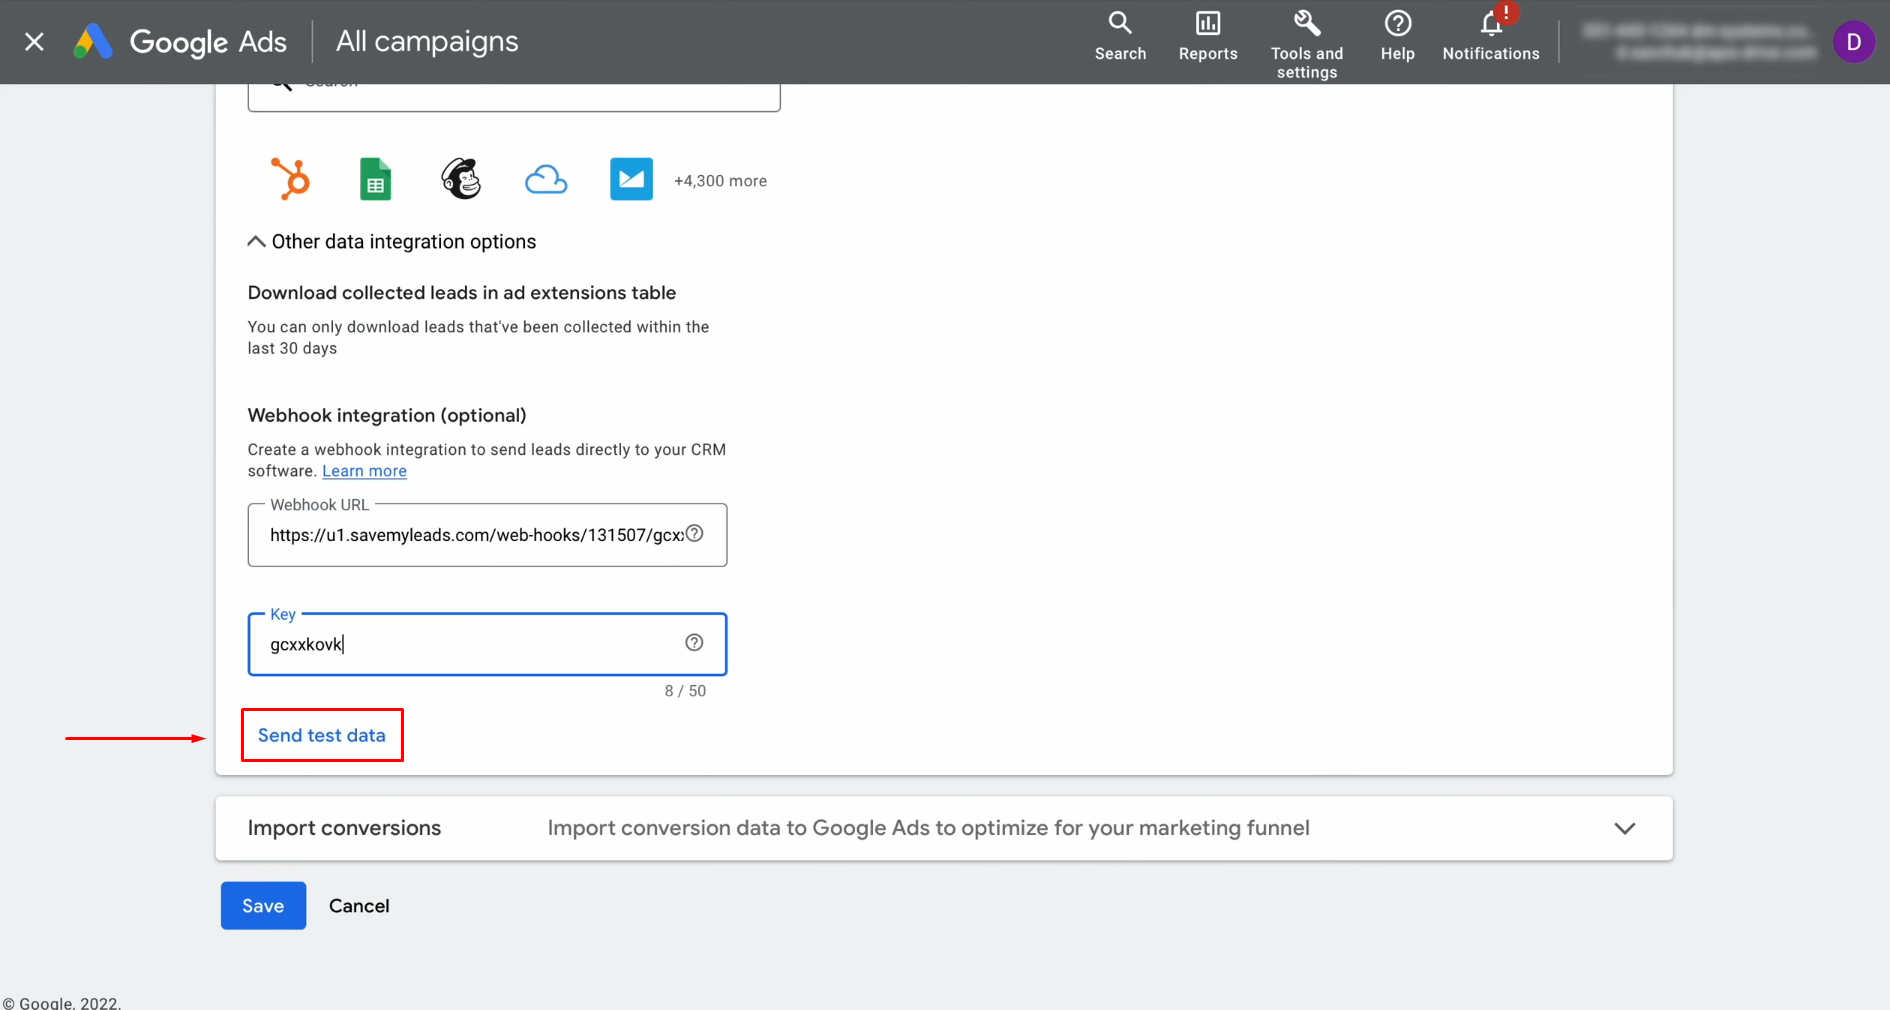
Step 14: Click on the "Send Test
Data" button to verify the connection.
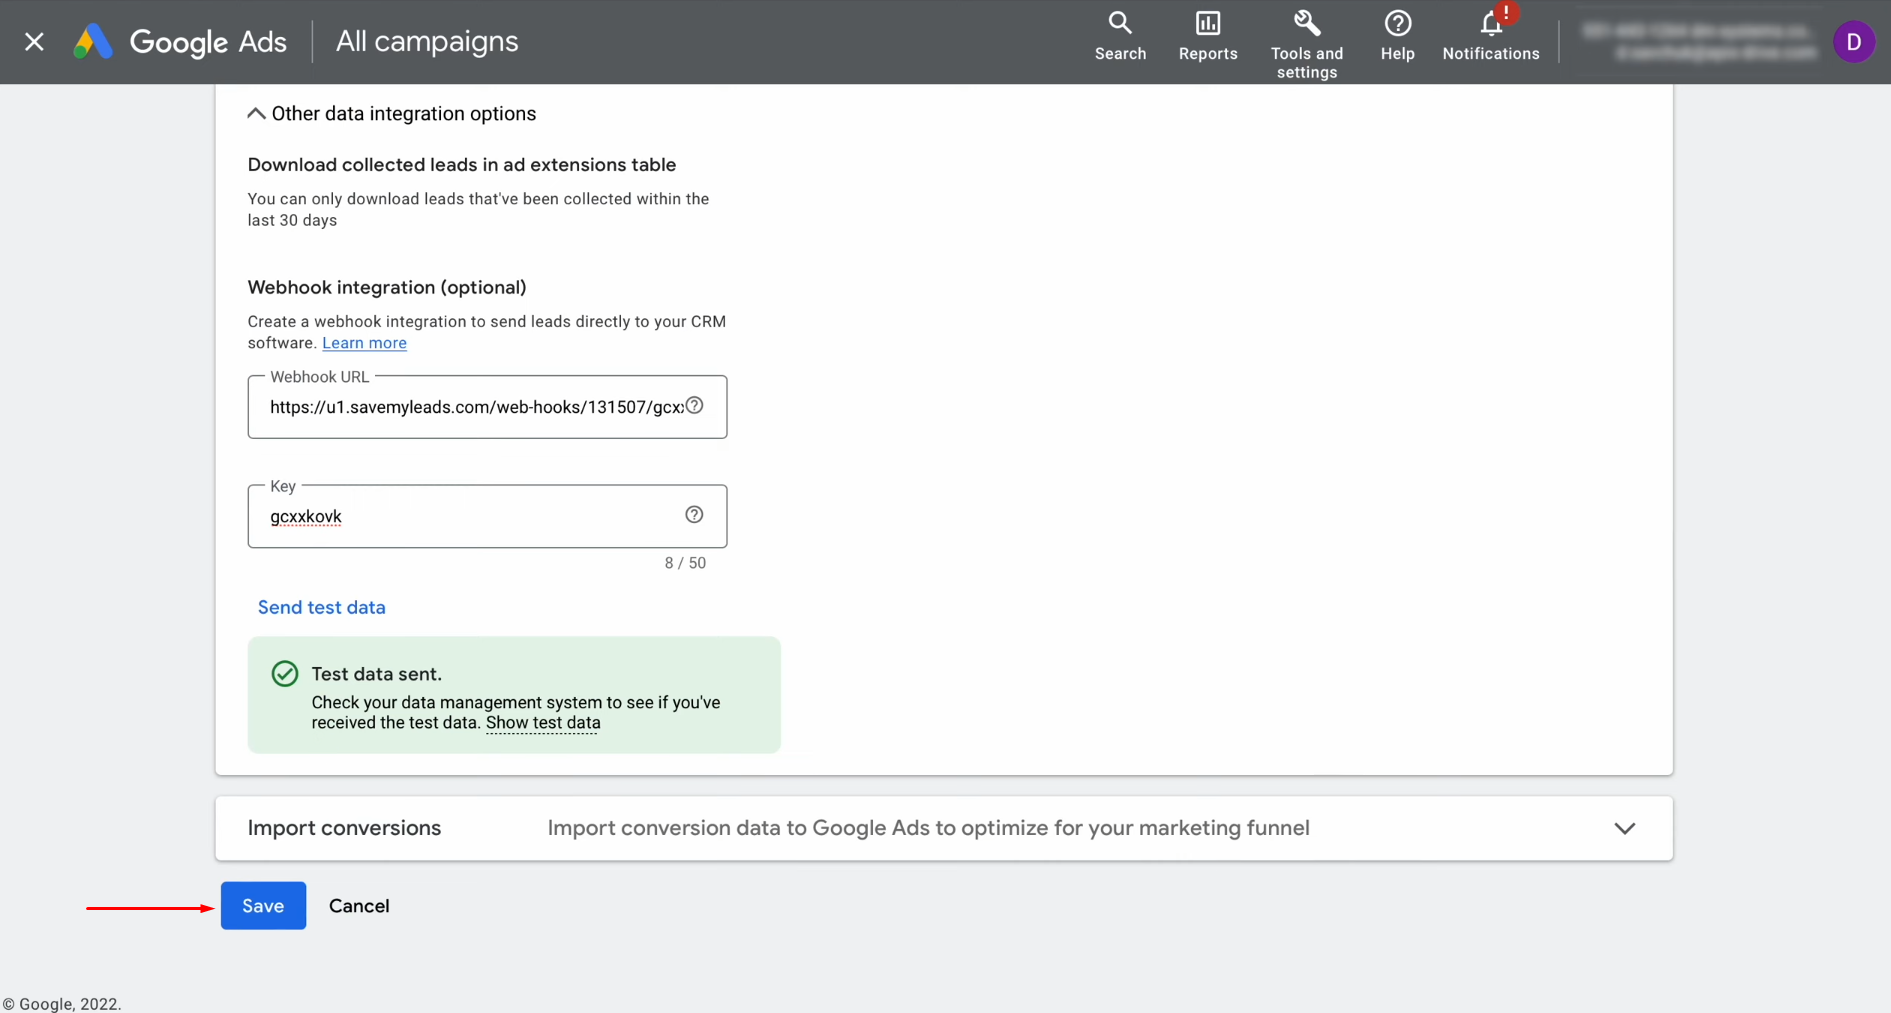
Step 15: Save the configuration by clicking
"Save."
Step 16: Return to your SaveMyLeads account
and click "Continue" to complete the process.
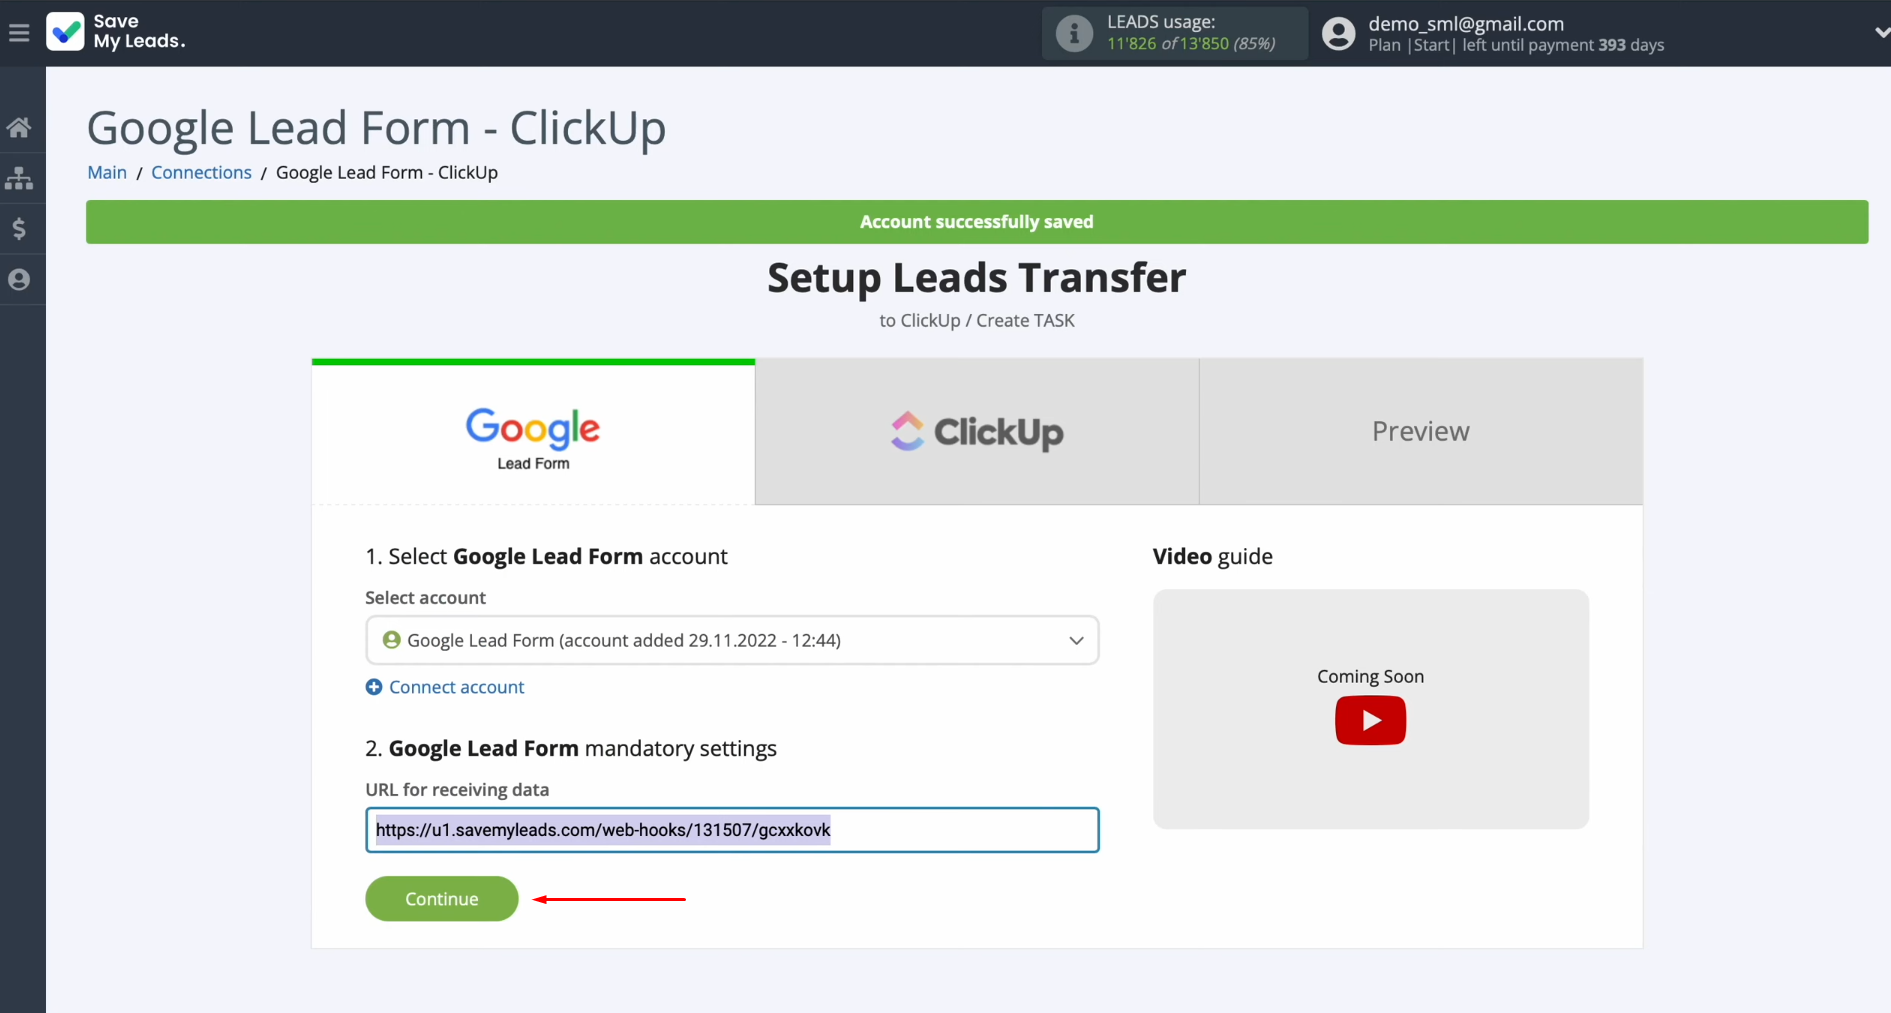
By following these steps, you’ll
successfully link Google Lead Form to SaveMyLeads, preparing the system for
seamless data transfers to ClickUp.
Configuring the Data Receiver: ClickUp
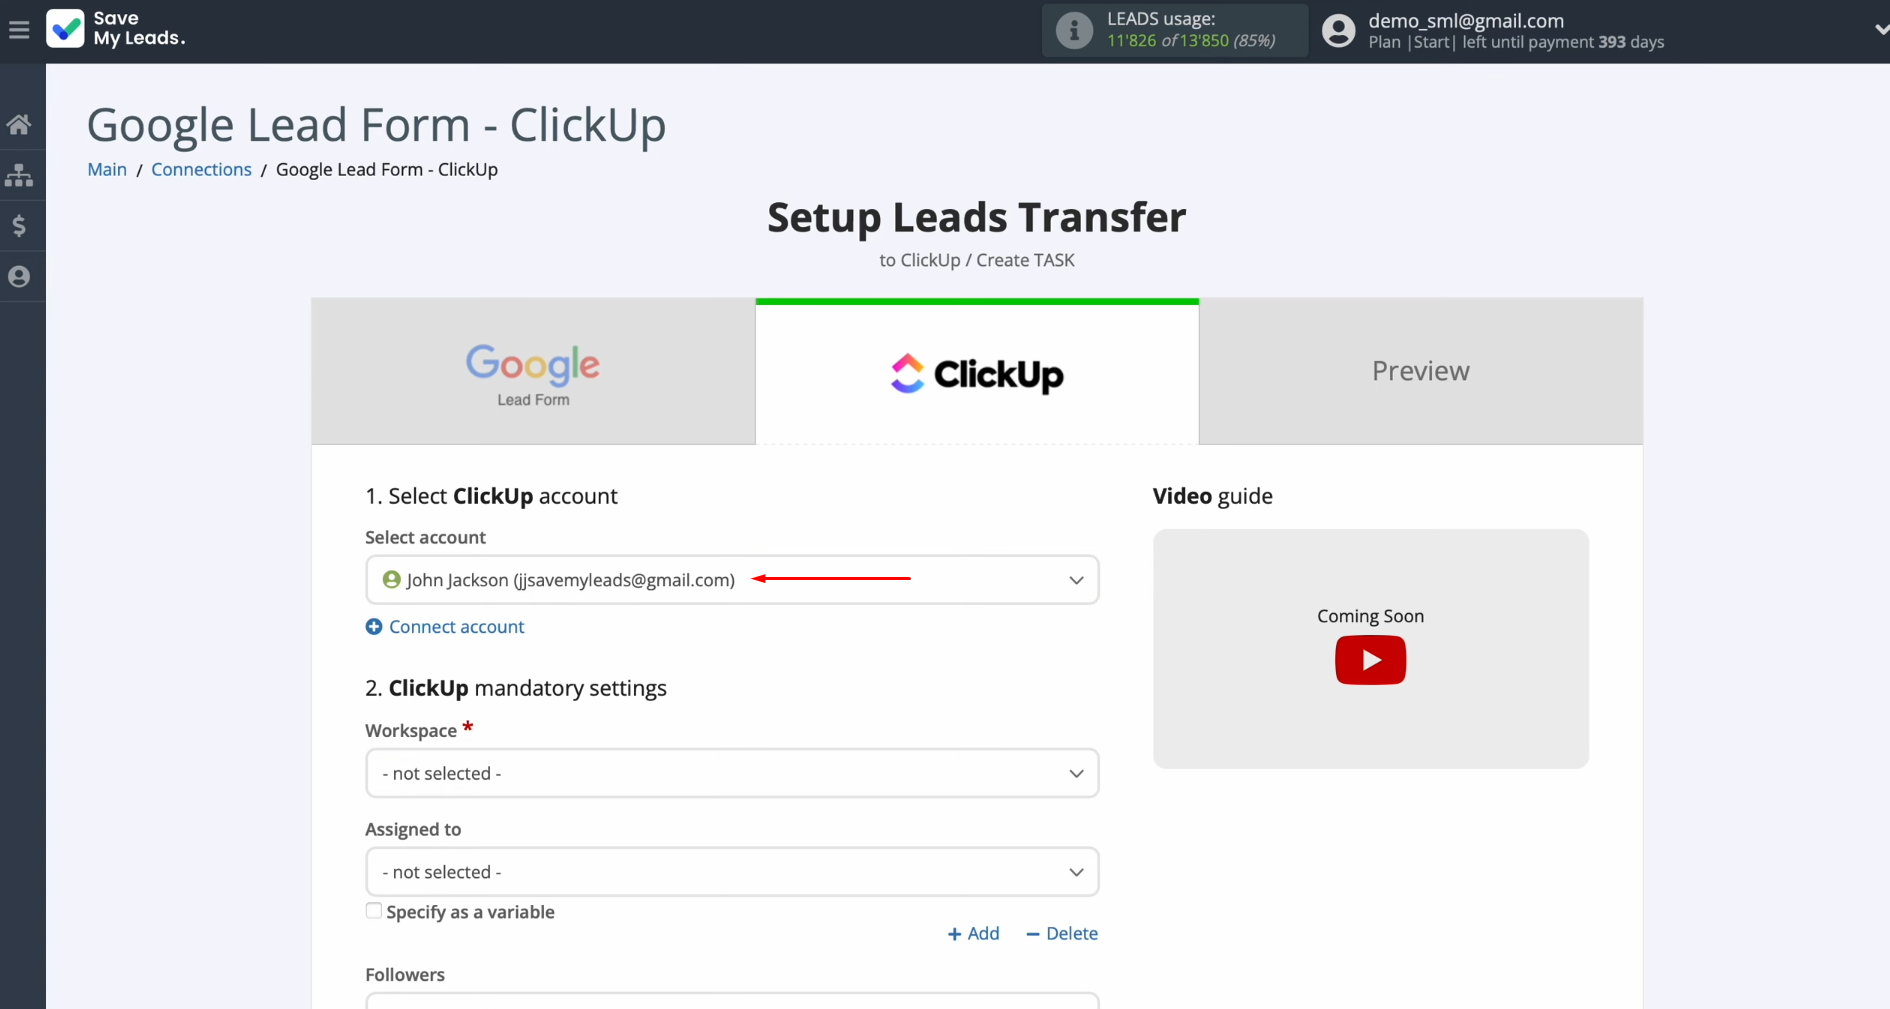
Step 1: Start by connecting your ClickUp account to the SaveMyLeads platform.
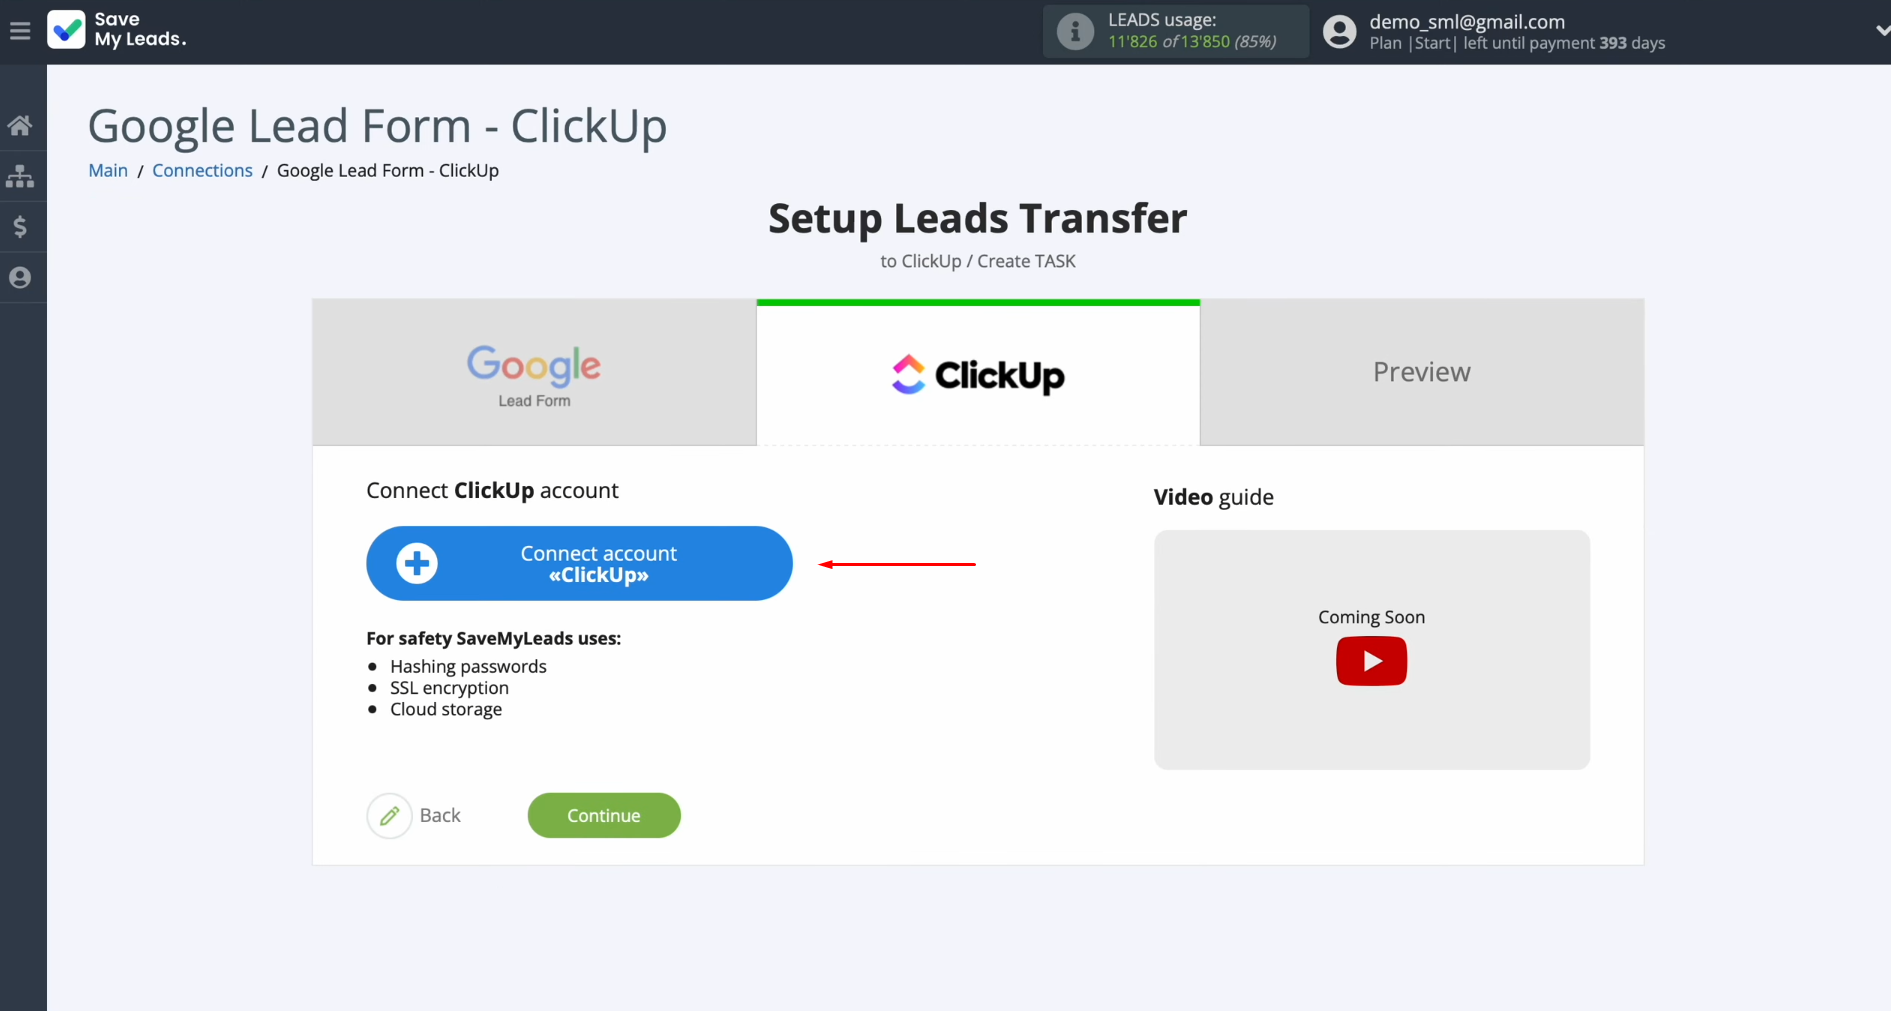
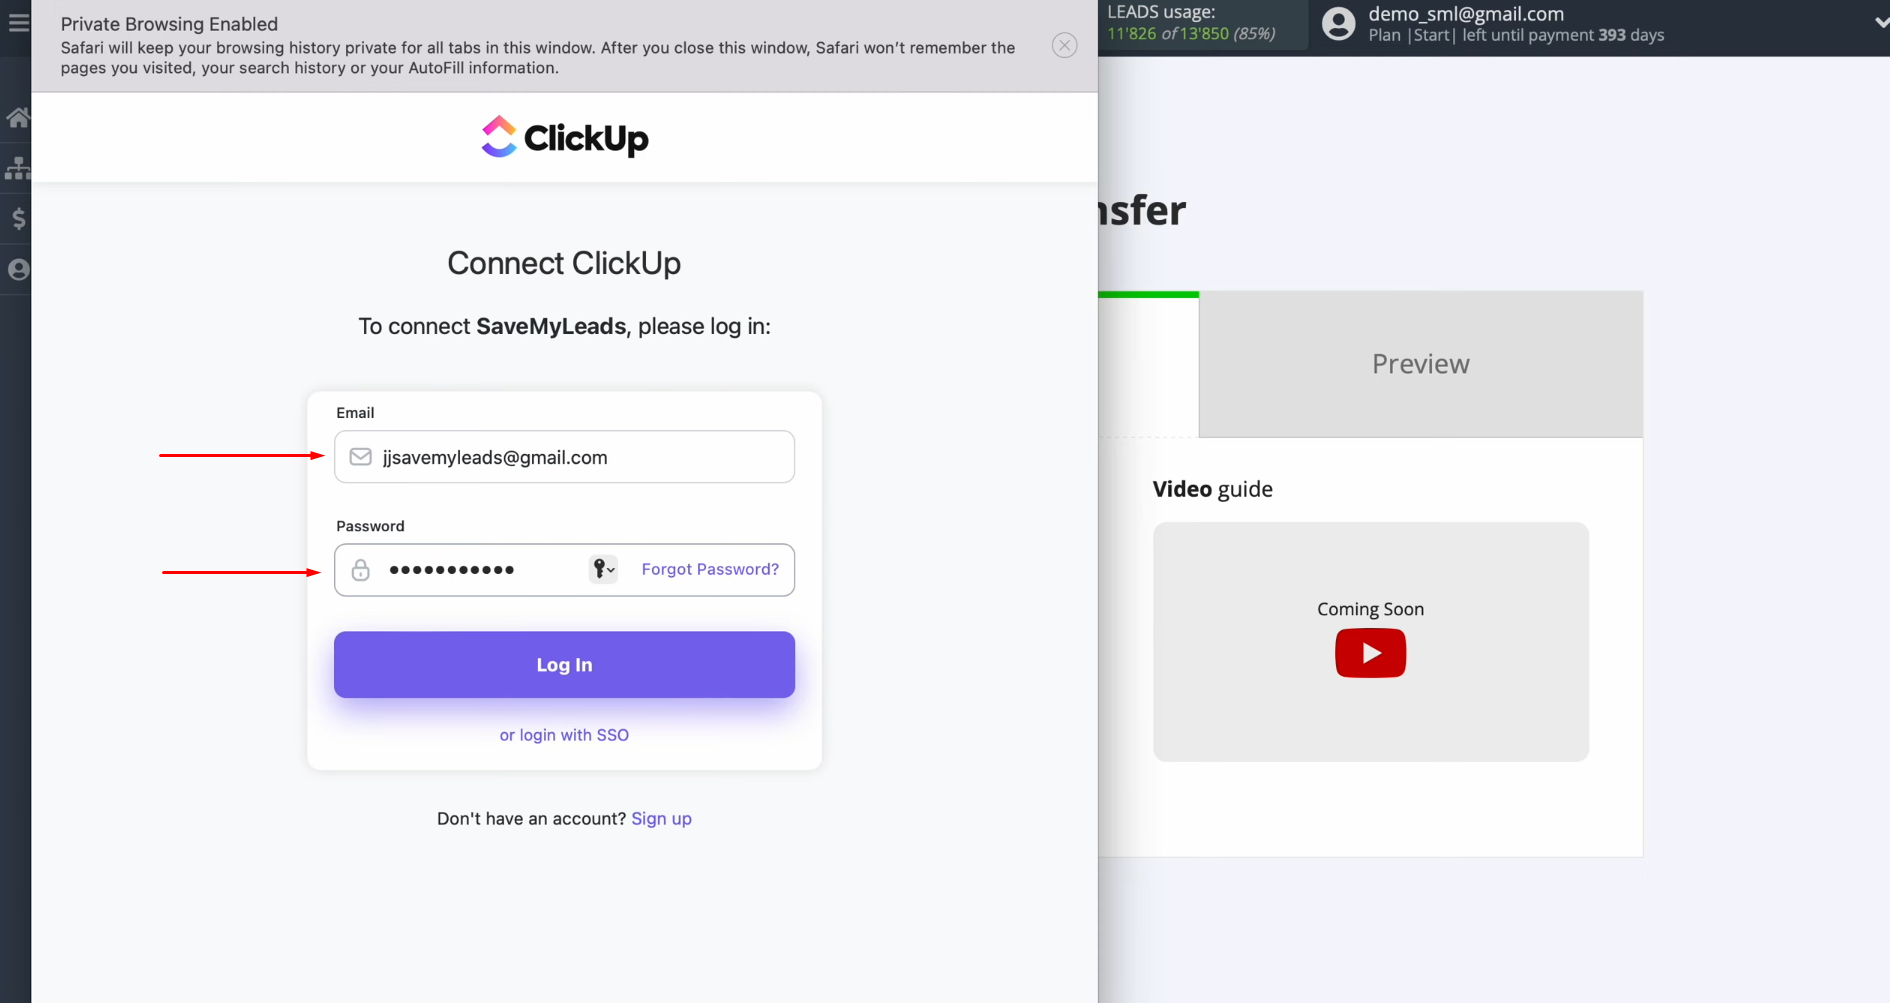
Step 2: Enter your ClickUp account
credentials. These are your username and password. Then, click “Log In” to proceed.
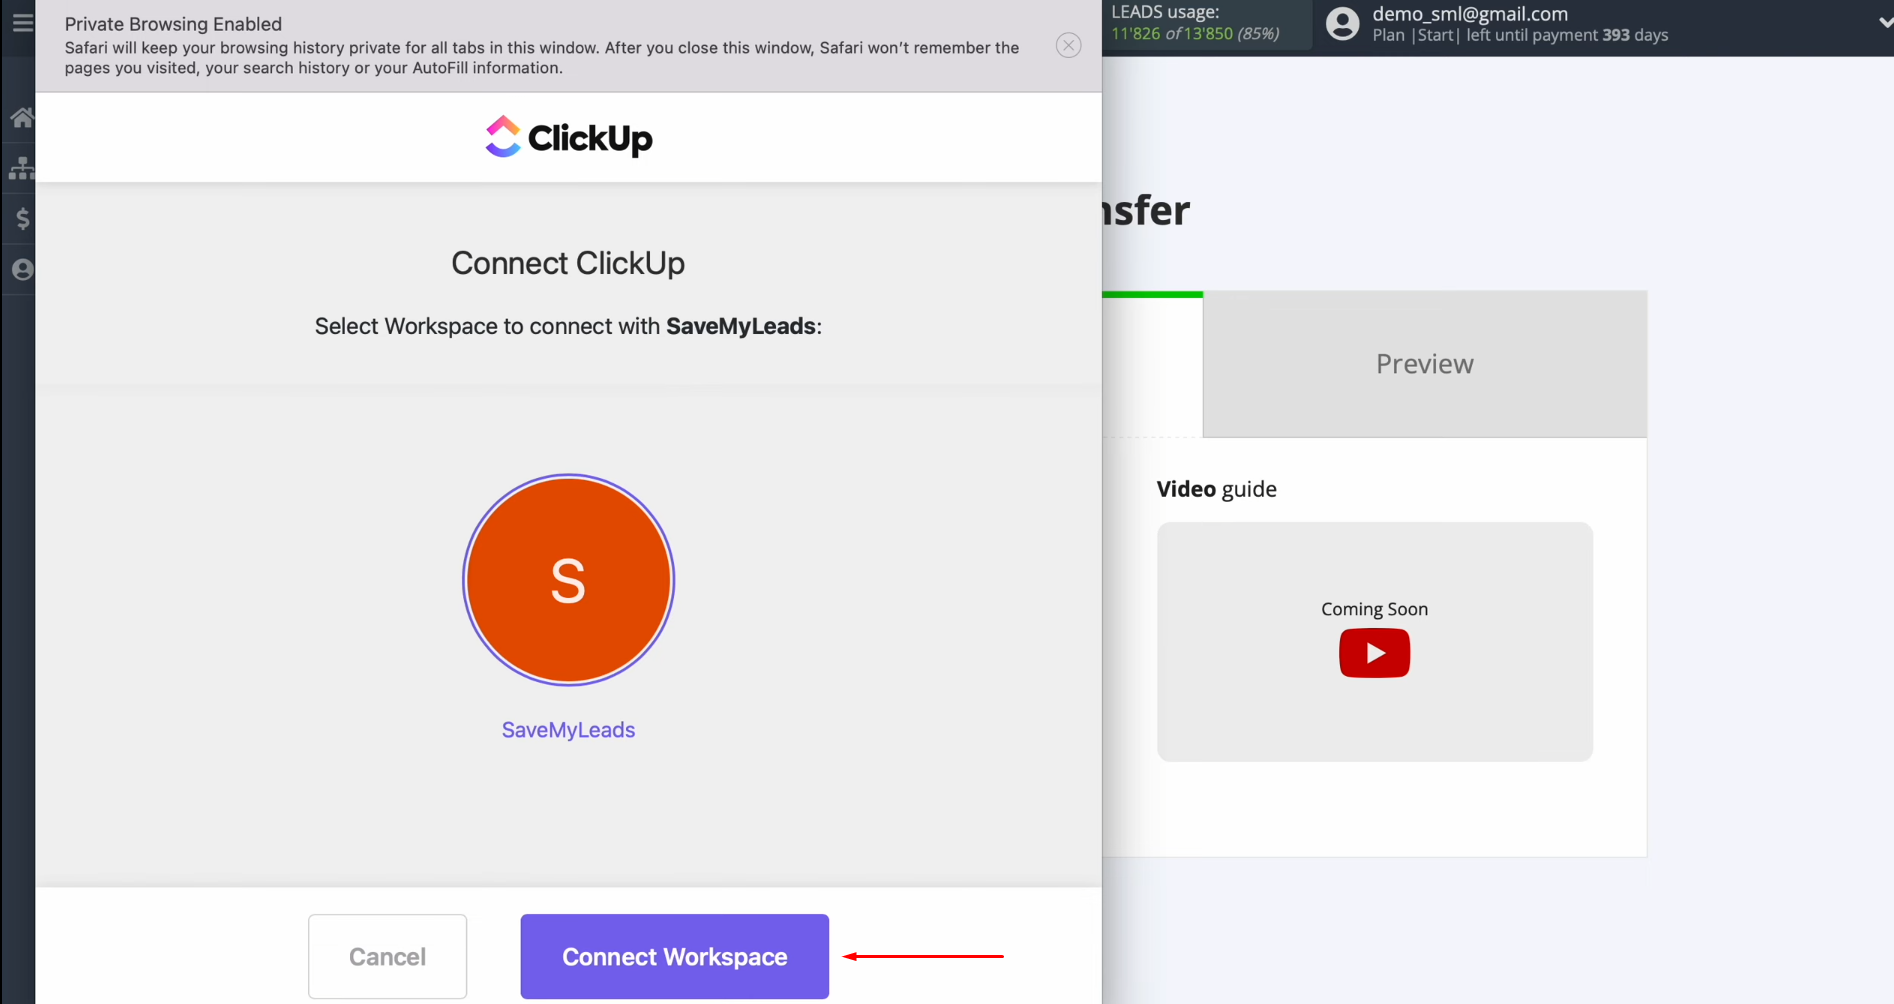
Step 3: Authorize SaveMyLeads to access
your ClickUp account by selecting “Connect Workspace.”
Step 4: Once your account is successfully
linked and appears in the list, choose it to confirm the connection.
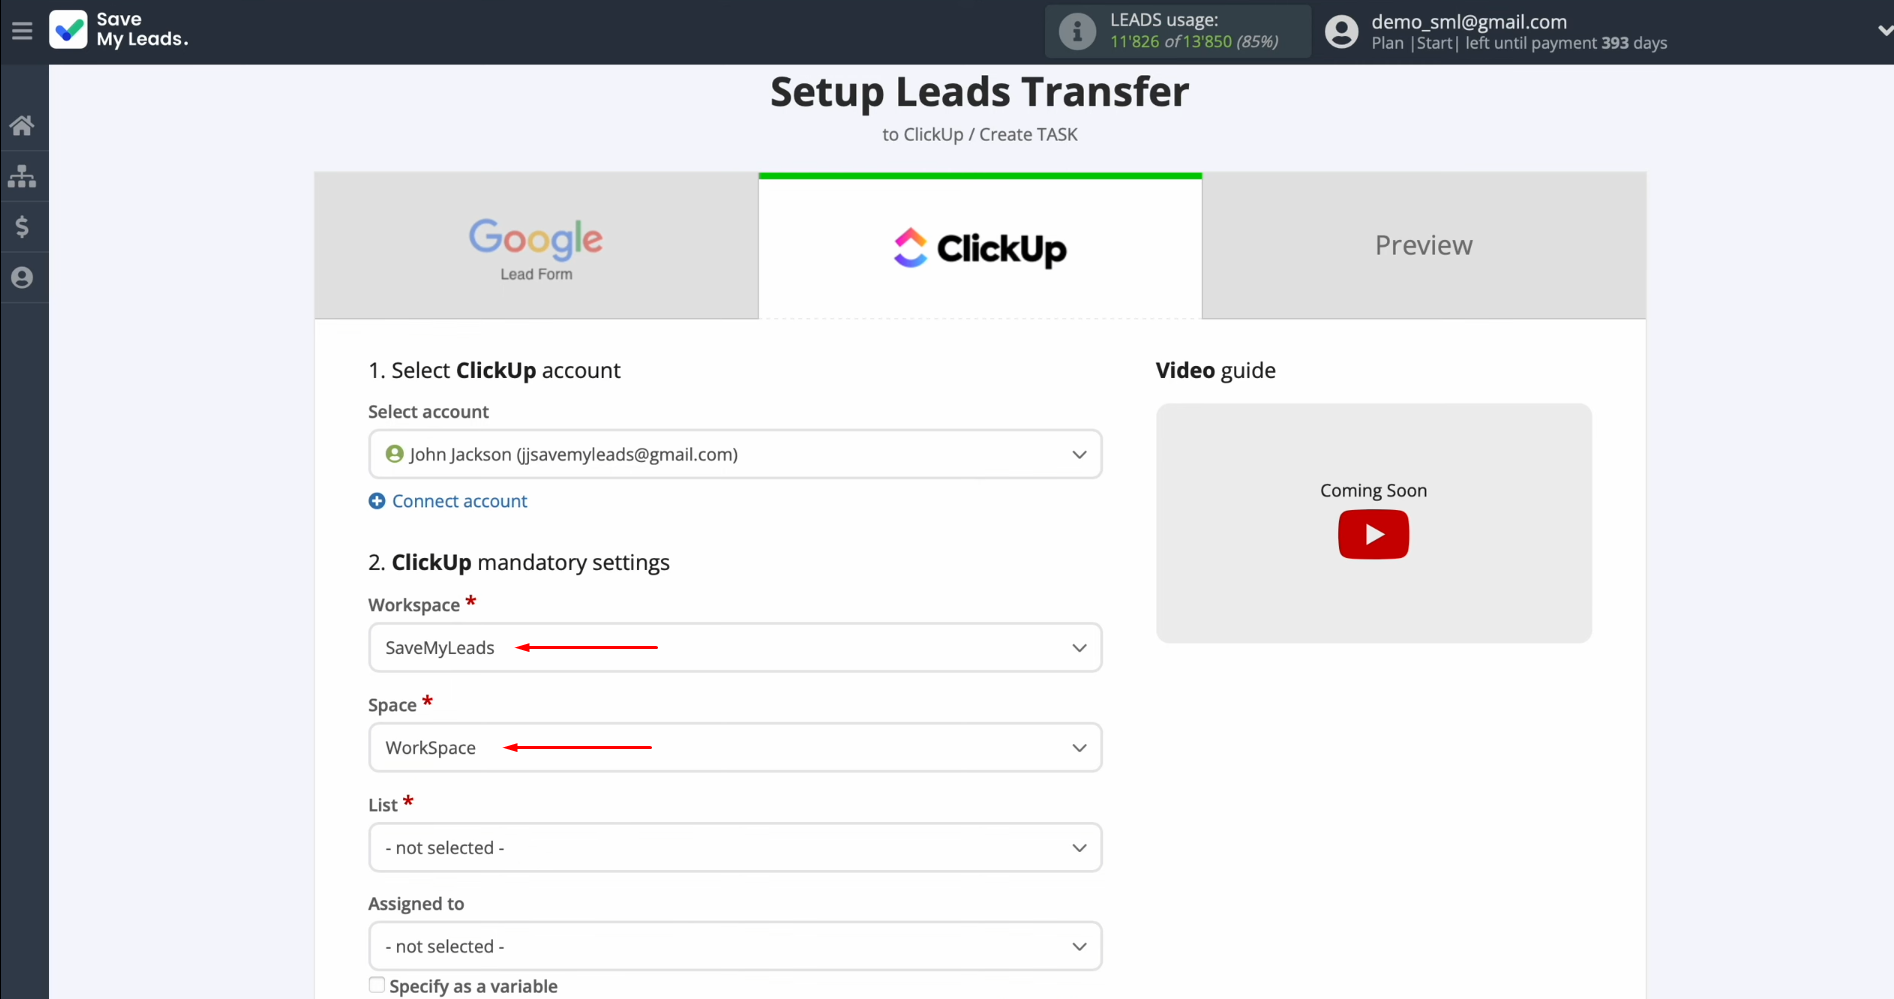
Step 5: Specify the workspace where new
tasks should be created for each lead imported from Google Lead Form.
Additionally, select the appropriate space within that workspace.
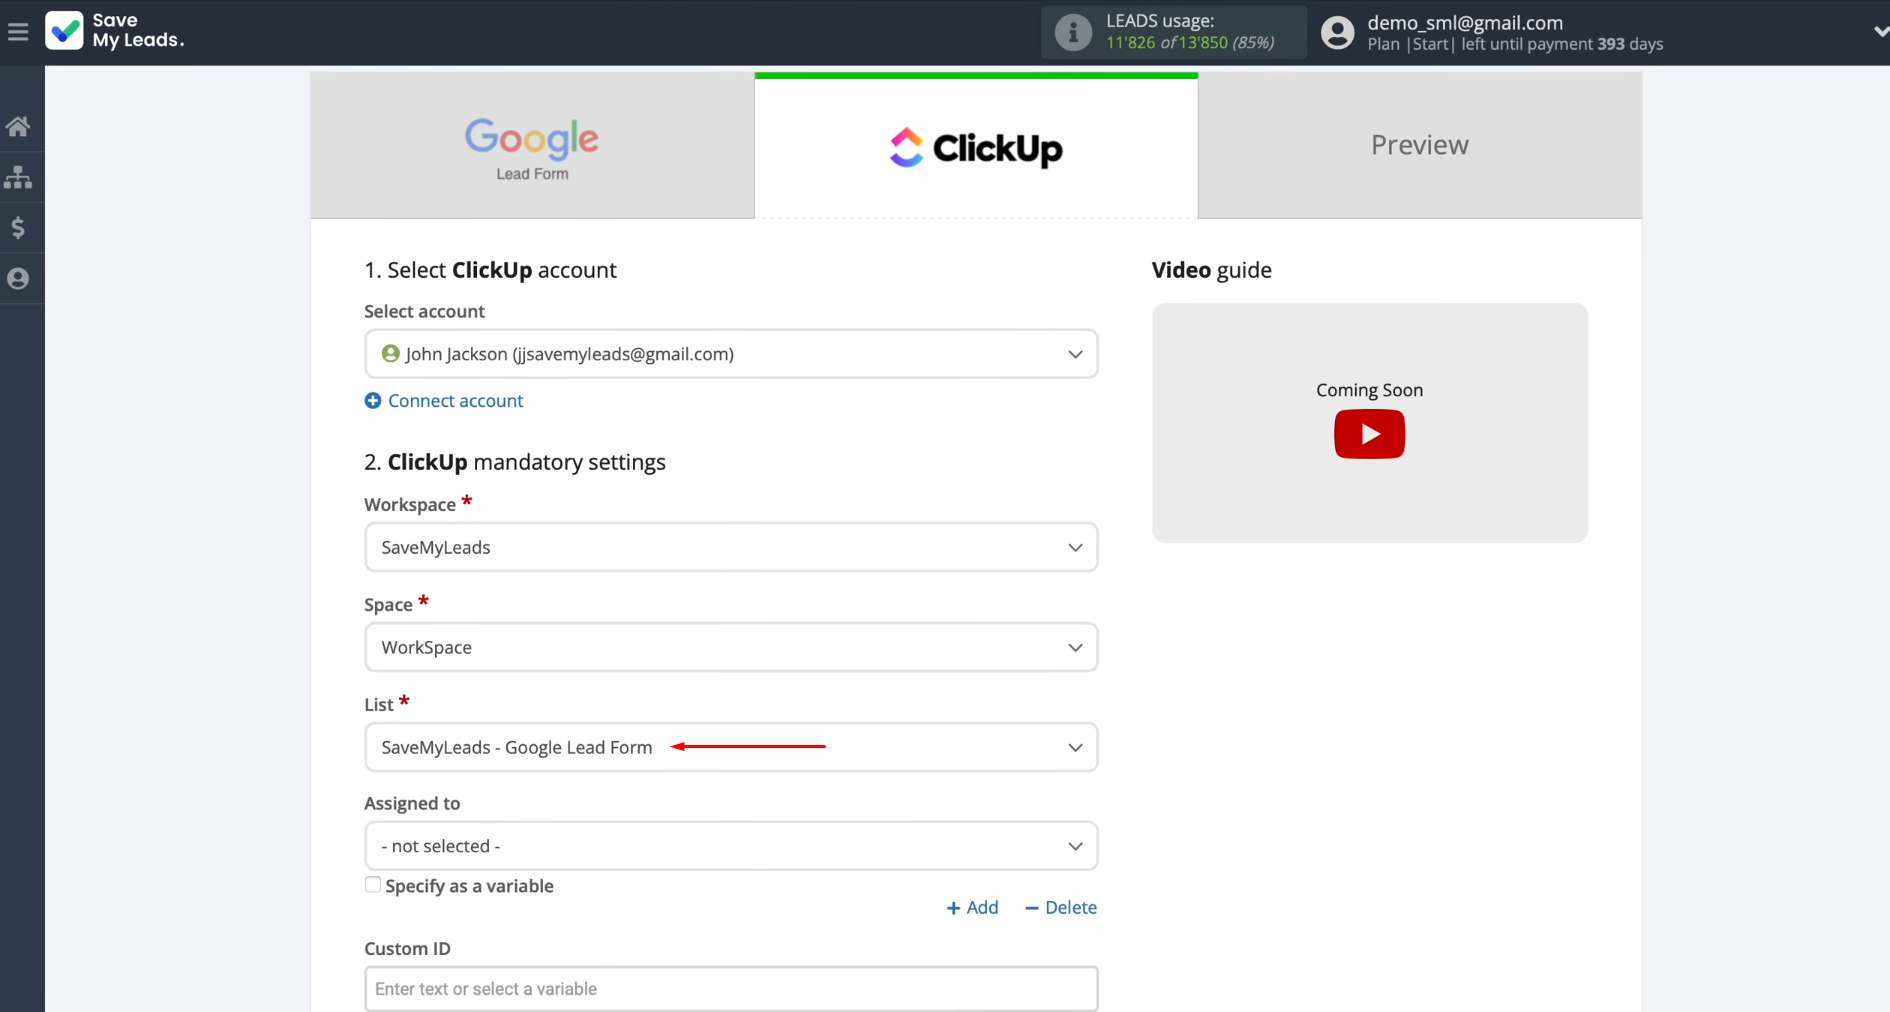
Step 6: Choose the specific list within
the selected space where tasks will be organized.
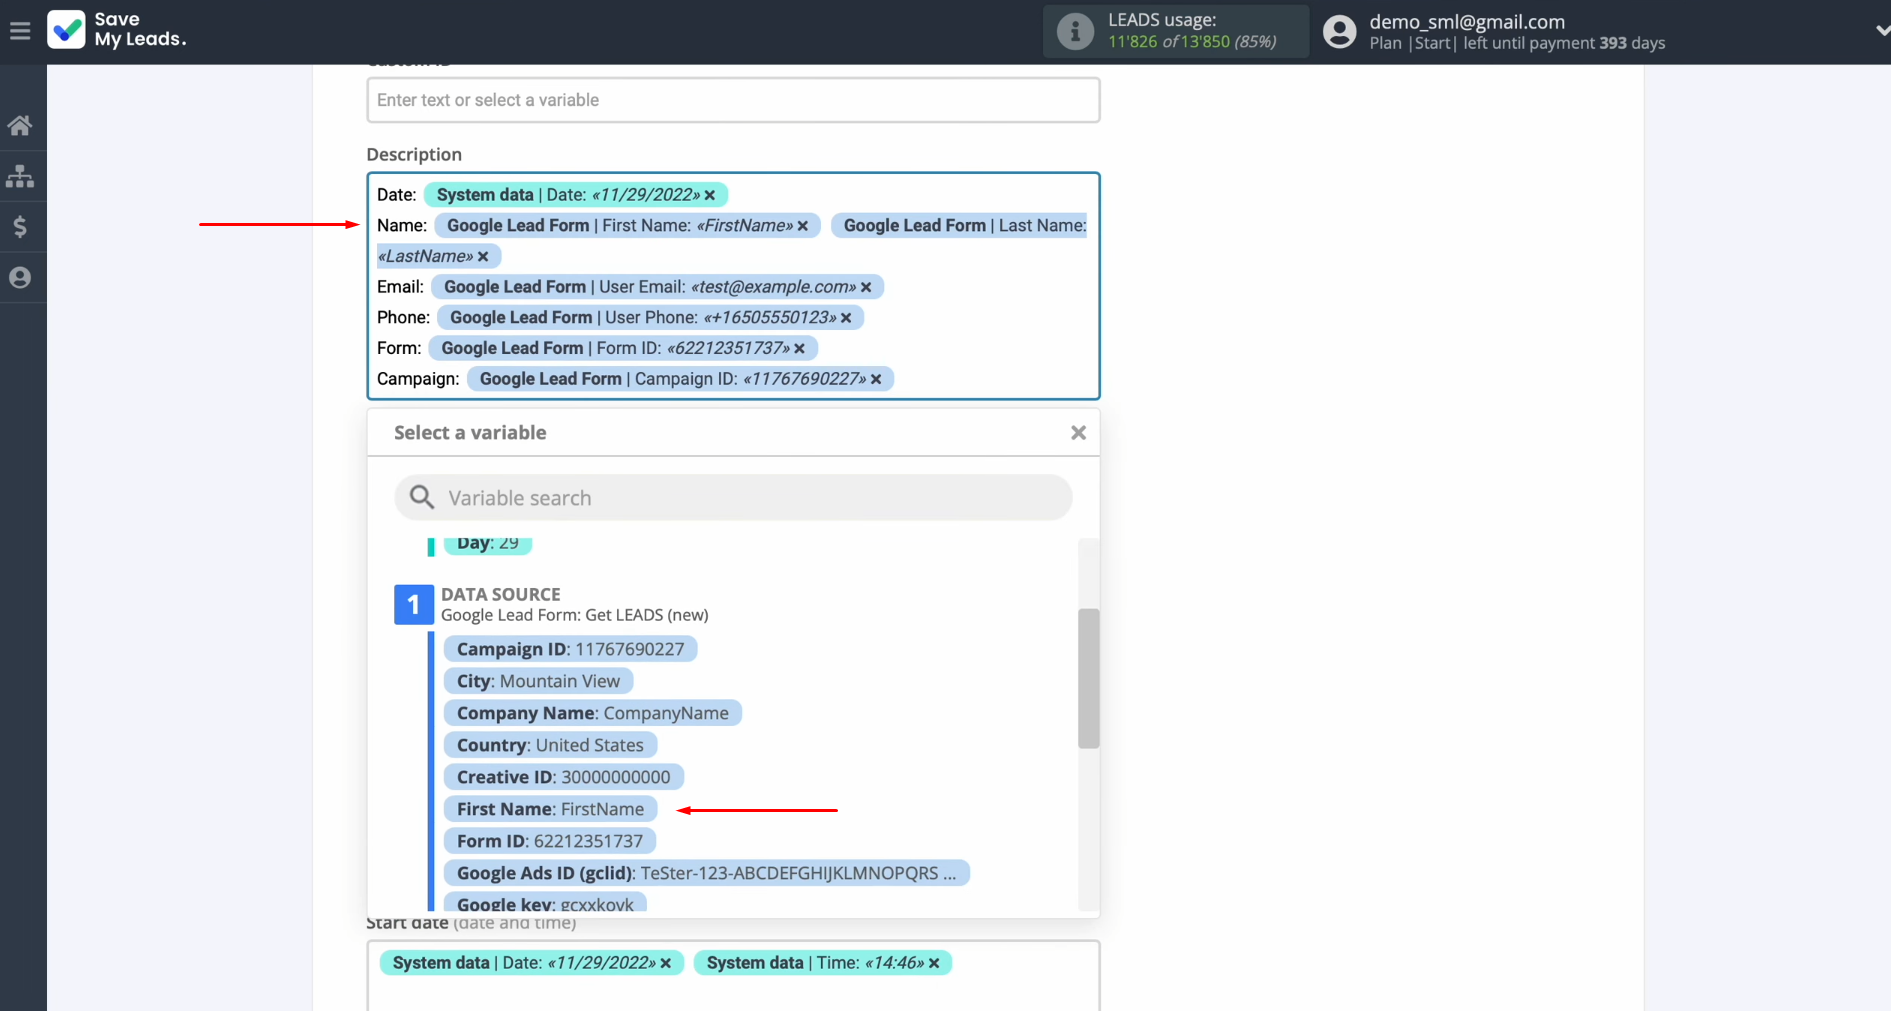
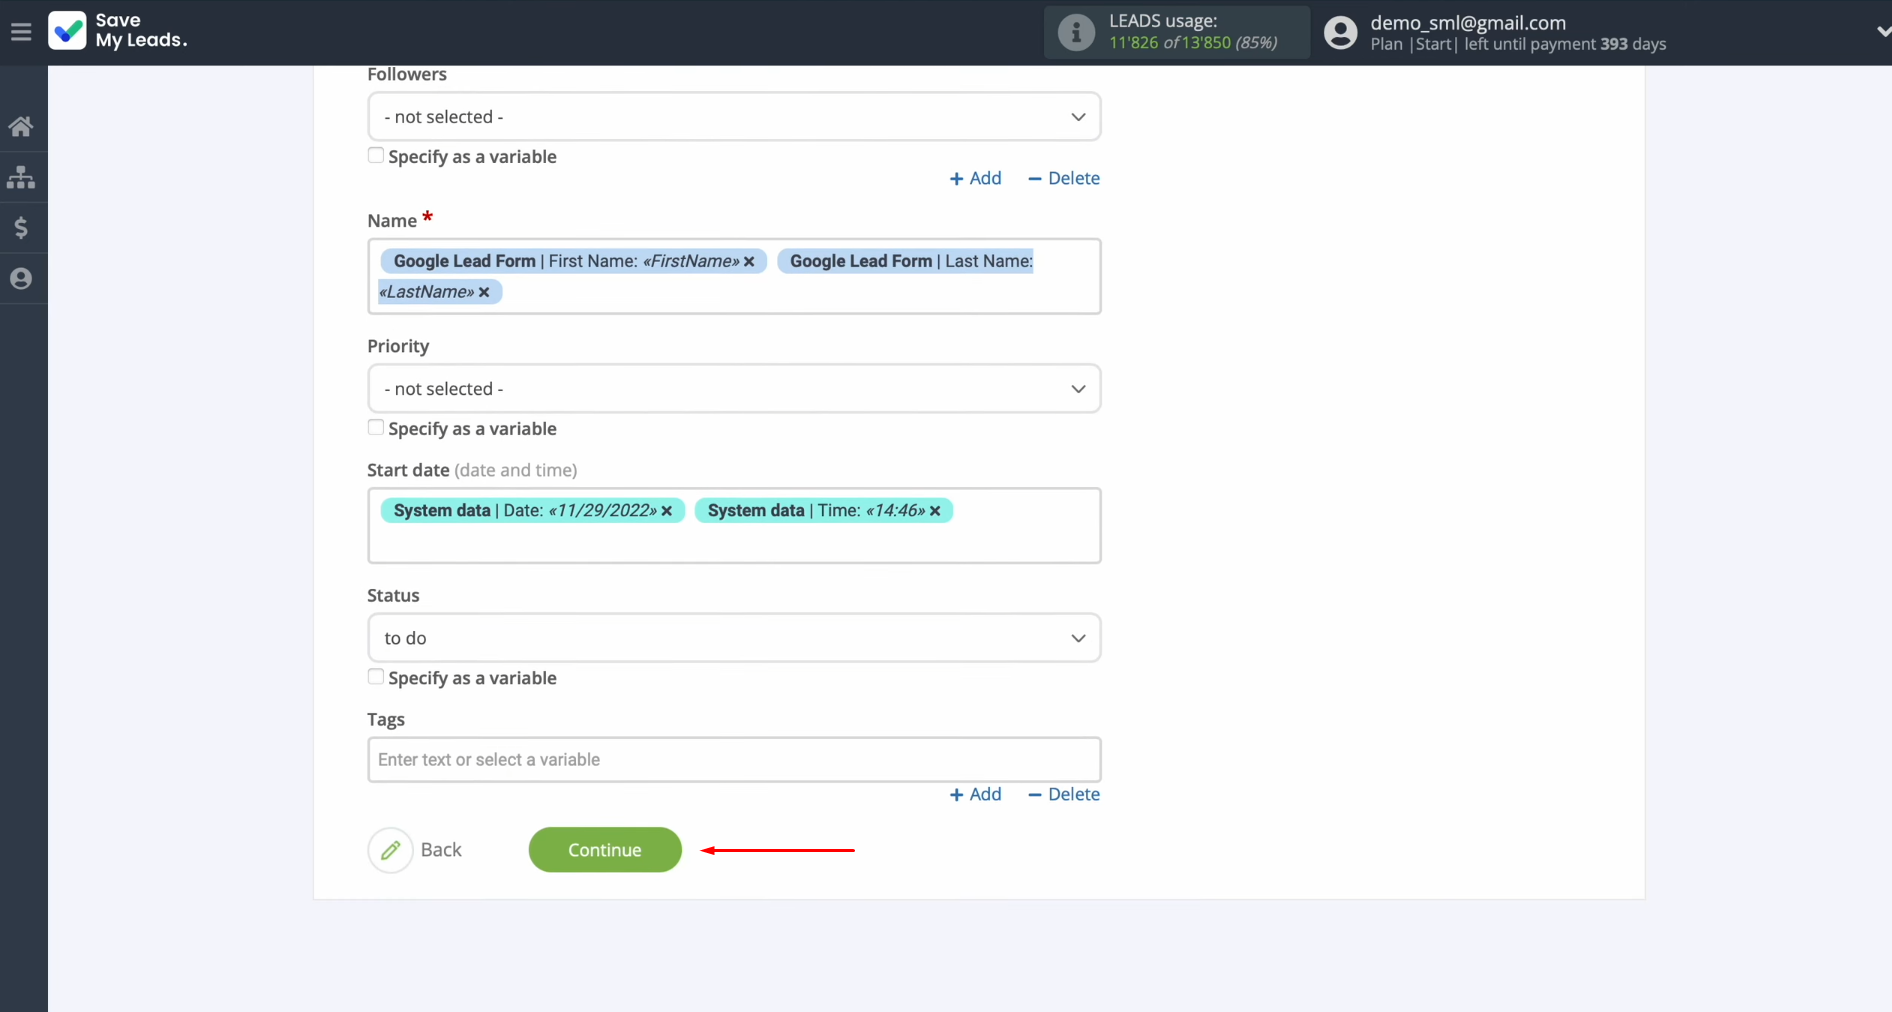
Step 7: Map the ClickUp fields to the
variables captured in the Google Lead Form. Click on each field and select the
relevant variable from the drop-down menu. If the default mapping works for
you, you can leave it as is.
Step 8: After completing these
configurations, click “Continue.”
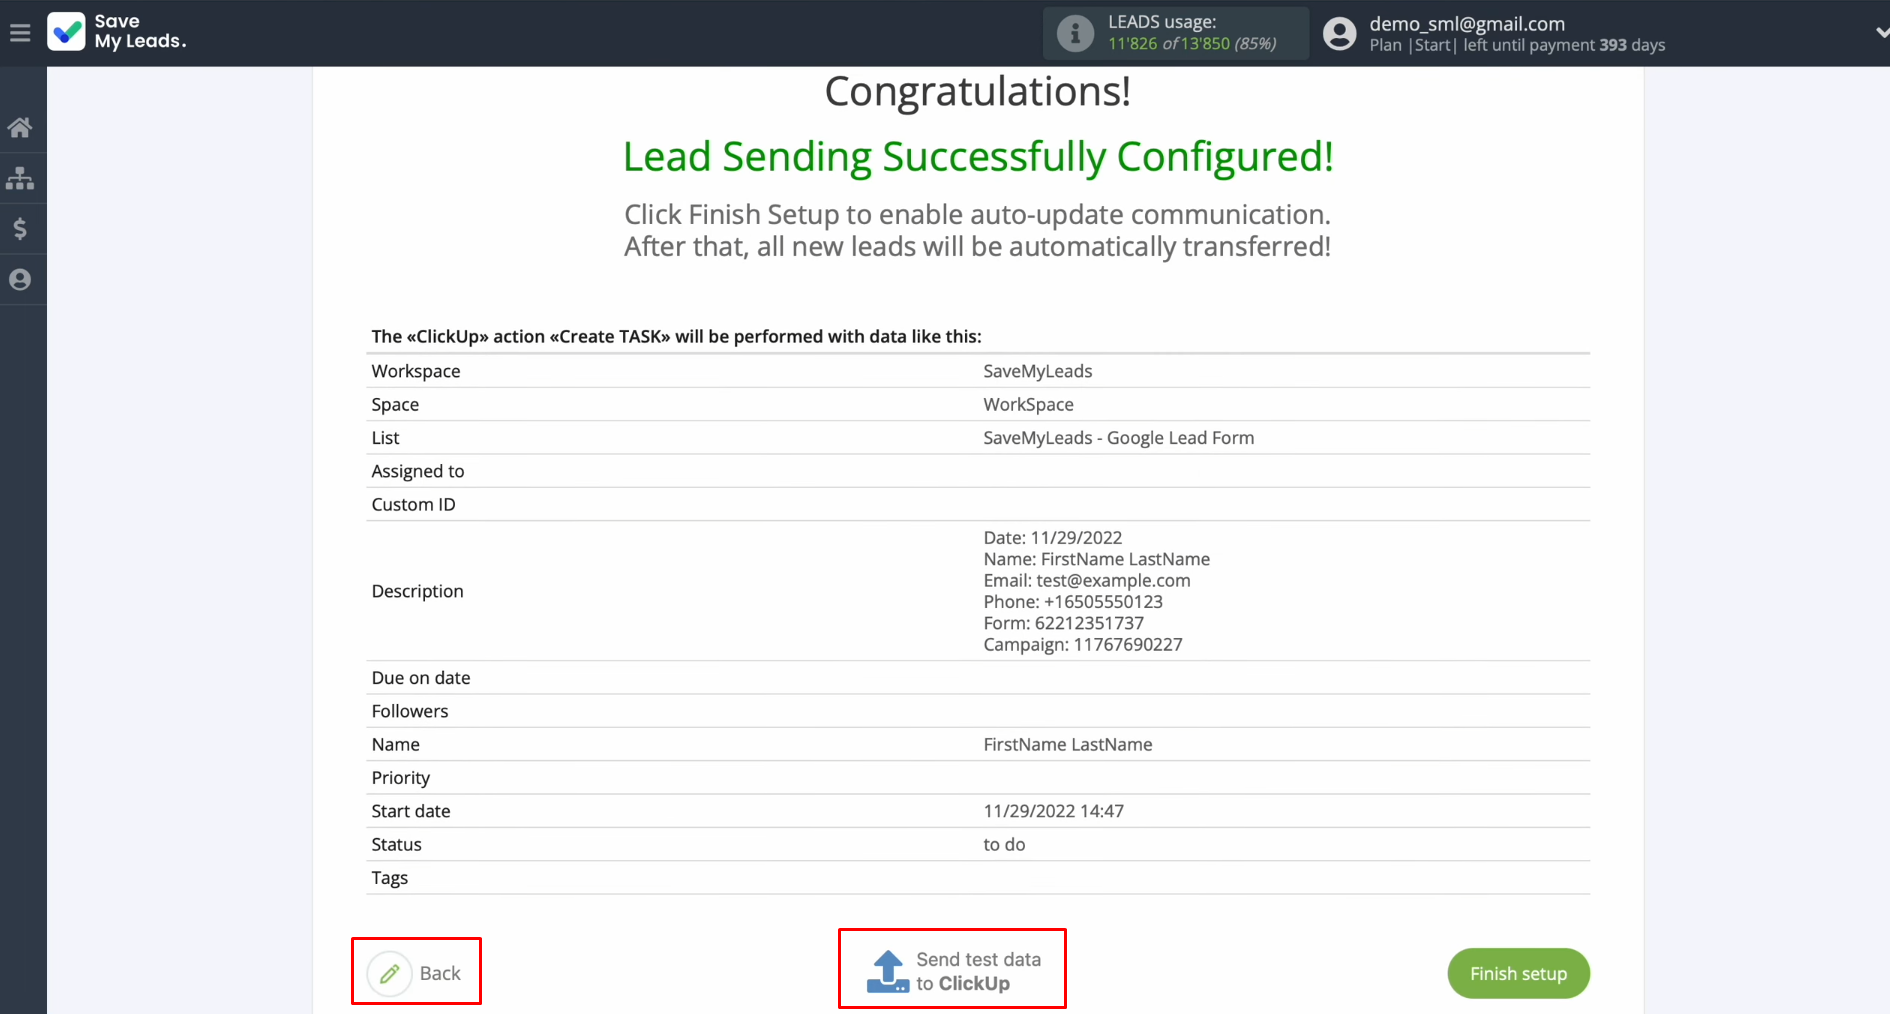
Step 9: A preview of the data that will be
sent to ClickUp for each new lead will now be displayed. If any adjustments are
needed, click “Back” to return to the
previous step. To test your configuration, click “Send Test Data” to send a sample task to ClickUp.
Step 10: Once the test is successfully
completed, open ClickUp to verify the result and ensure that the data has been
transferred as expected.
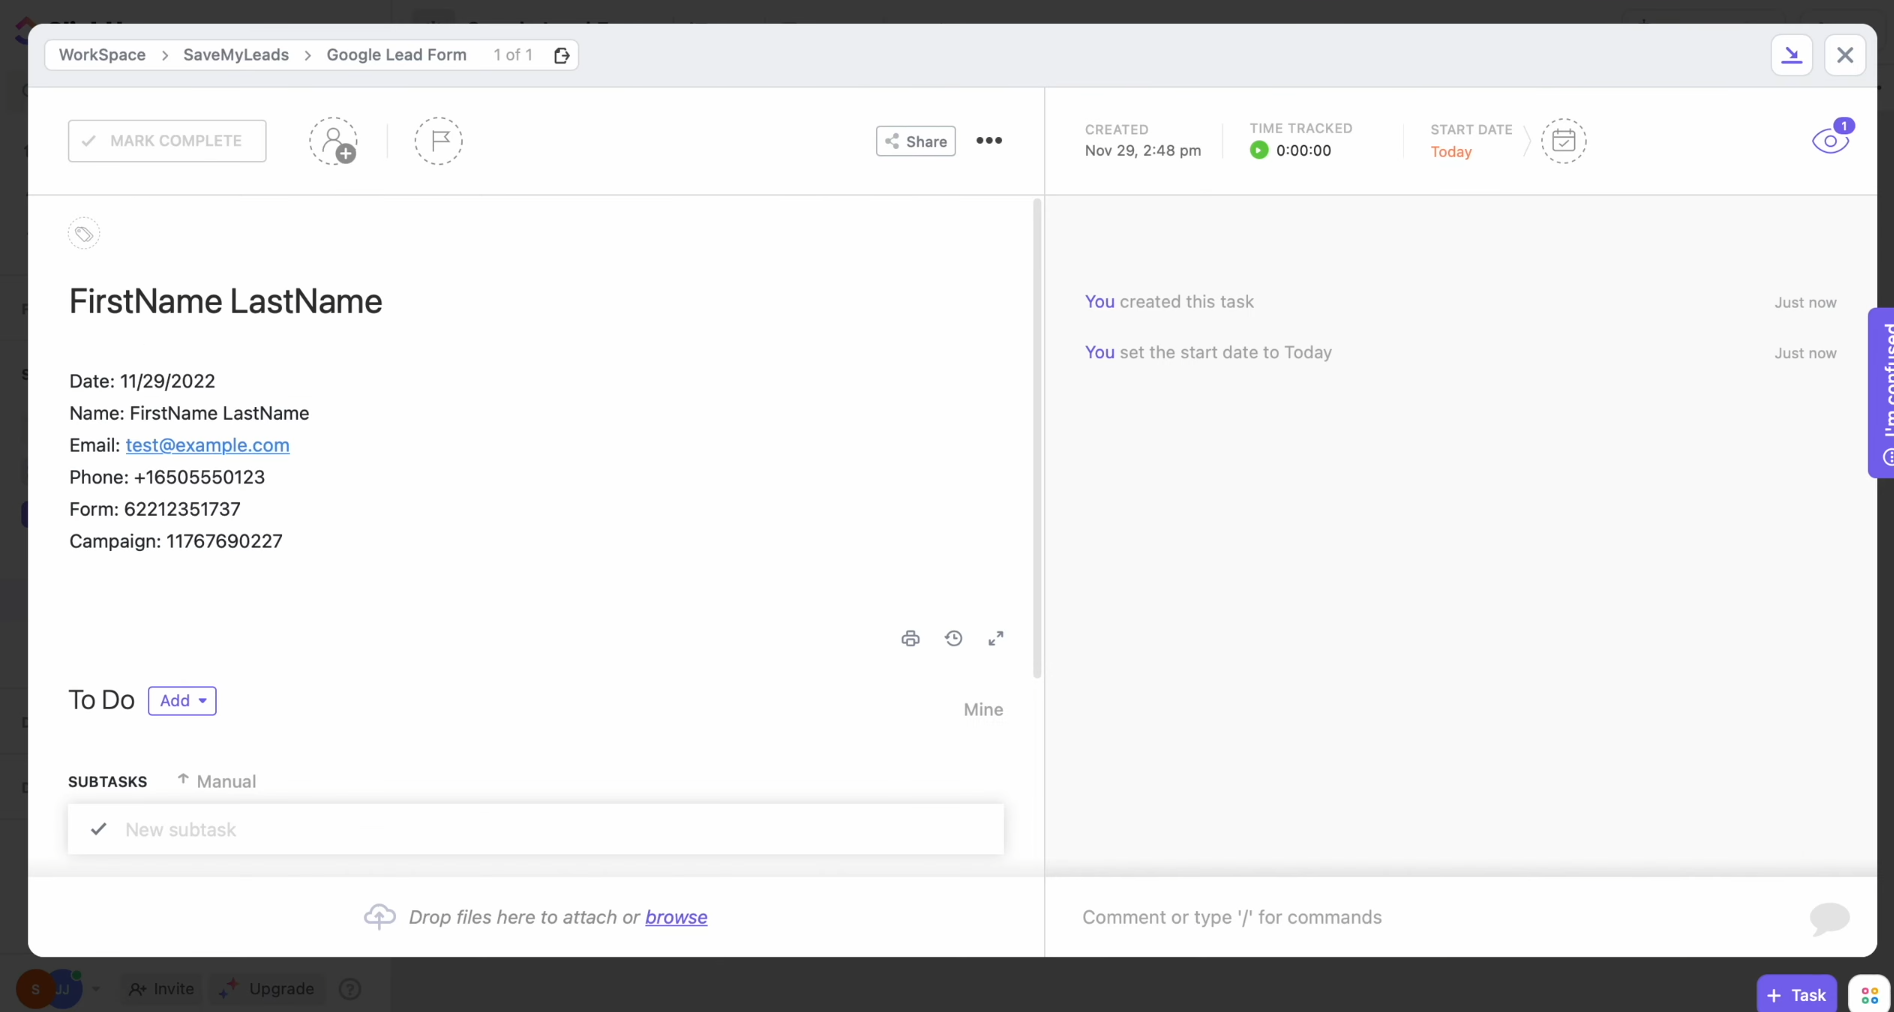
Then, return to the
SaveMyLeads interface and proceed with the remaining setup steps.
Enabling Auto-Update
Activate the auto-update feature by clicking “Finish setup.” This ensures that every new lead submitted through Google Lead Form is automatically transferred to ClickUp and converted into a new task.
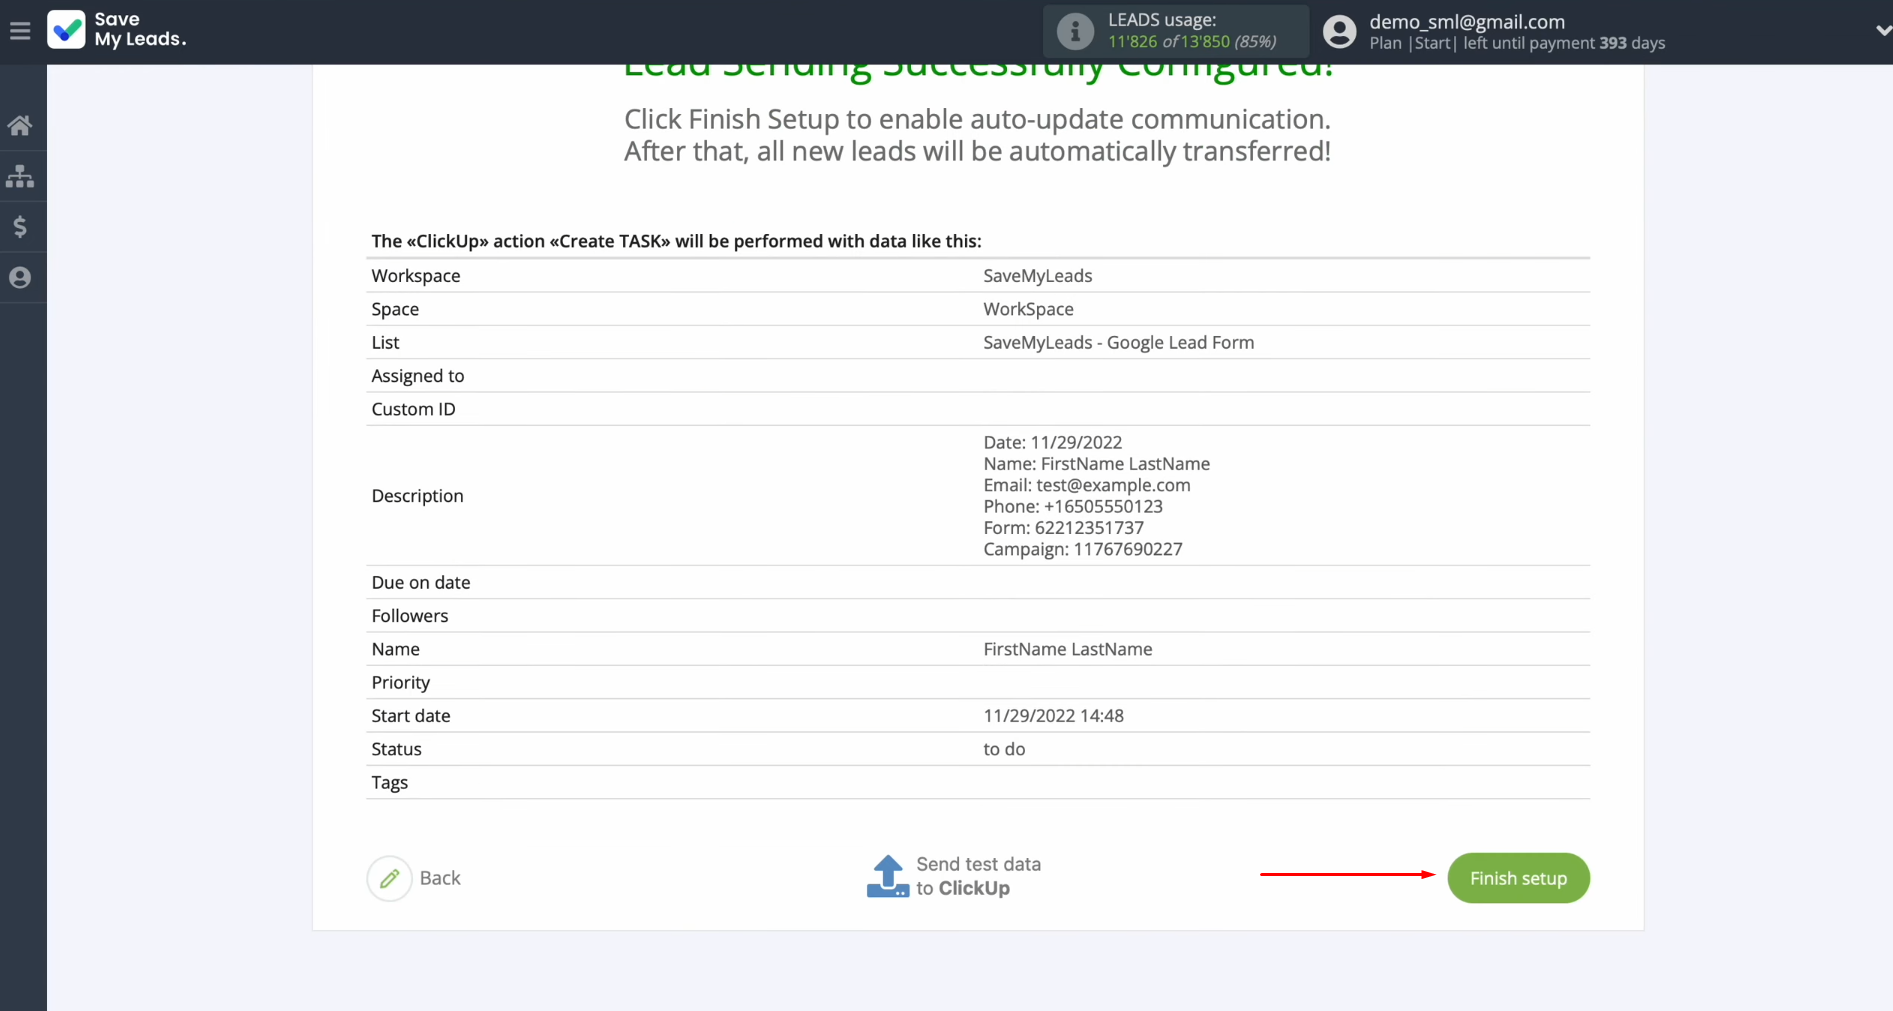
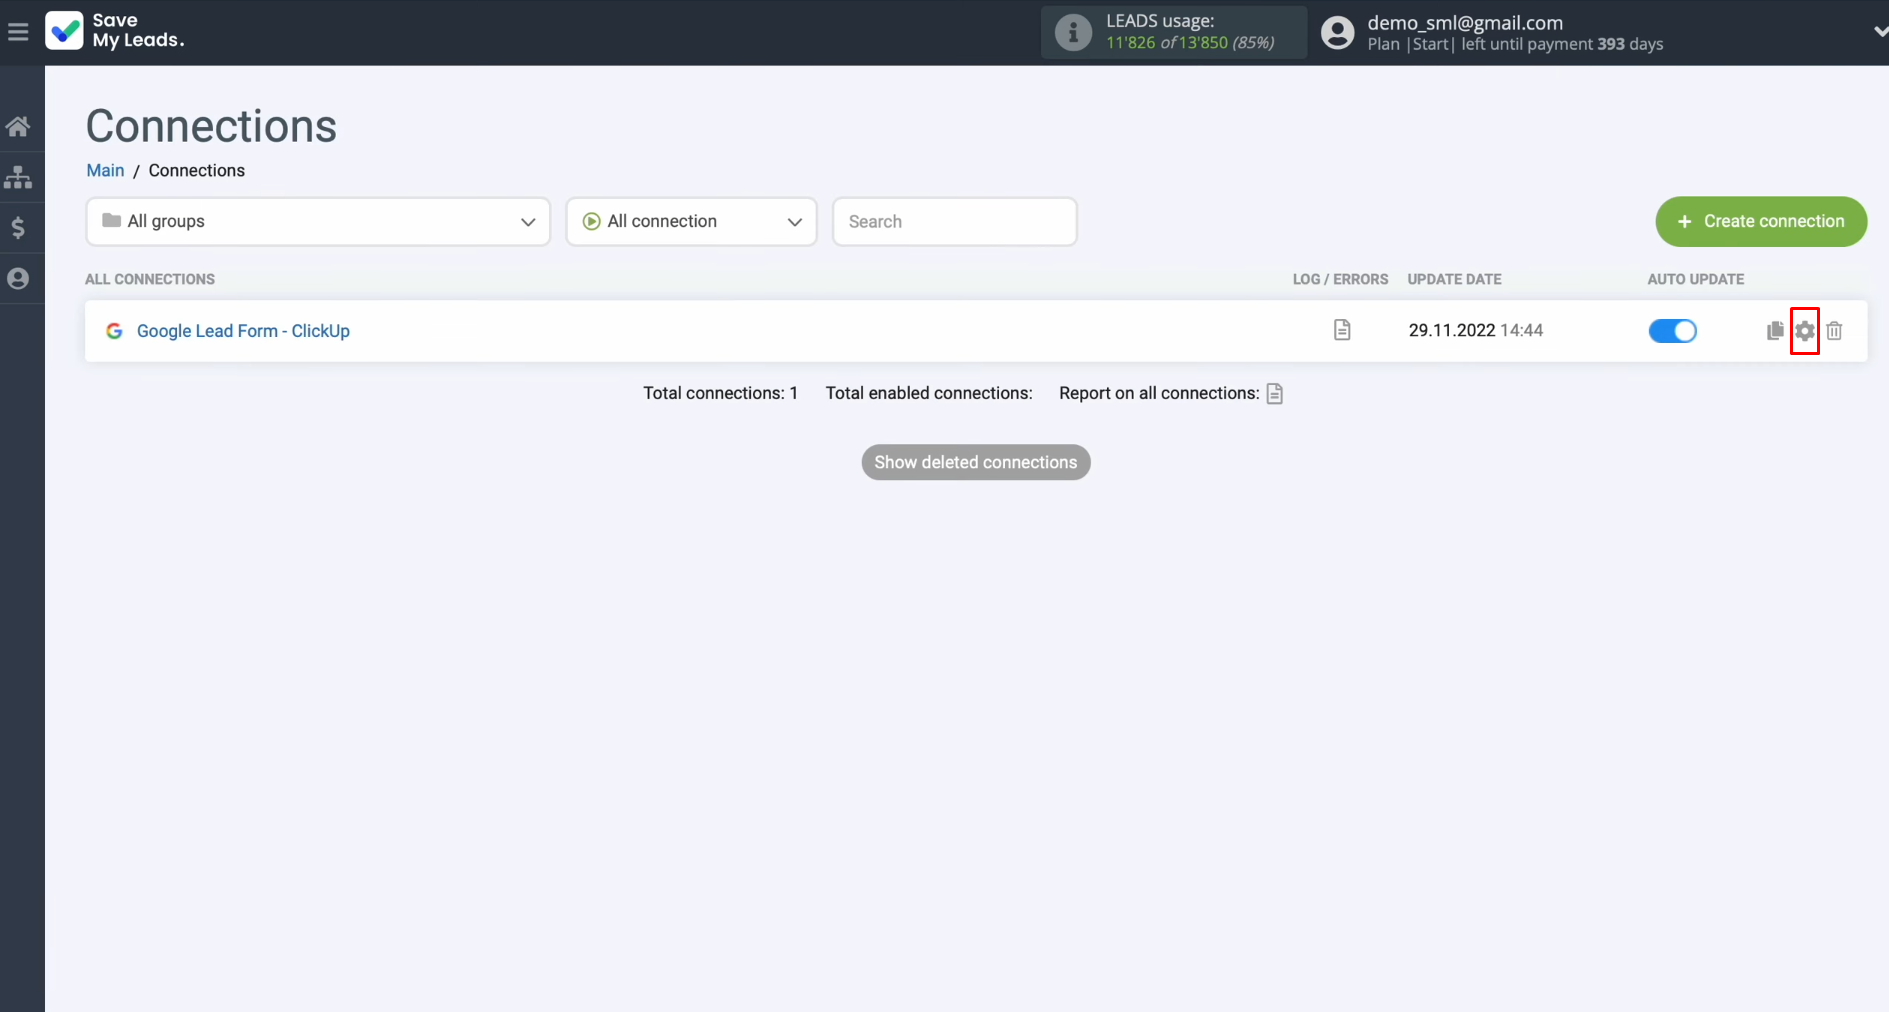
To rename the connection, access
its settings by clicking the gear icon.
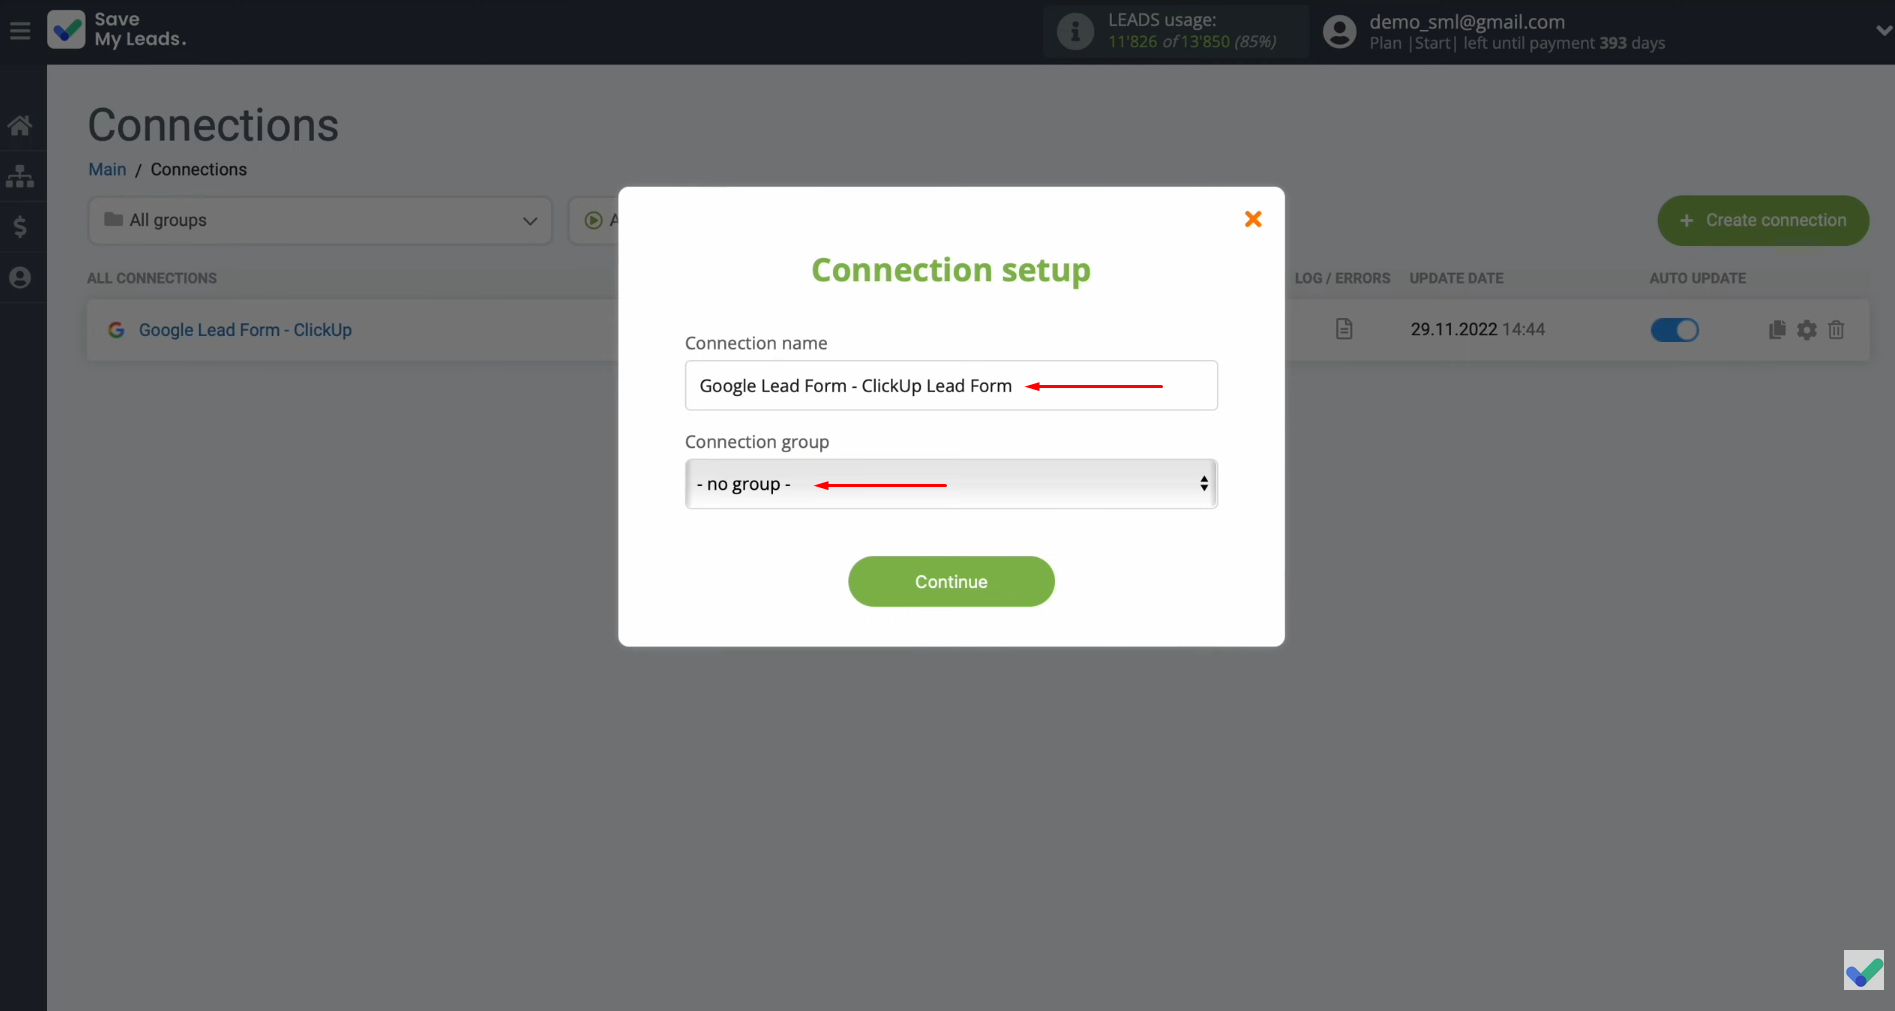
In the settings menu, you can
update the connection name or organize it by assigning it to a specific group.
Once you’ve made the desired changes, click “Continue” to
save them.
Congratulations! The integration setup
is now complete, and your systems are ready to work together seamlessly.
Finalizing Your Integration Journey
Once you’ve successfully set up Google Leads and ClickUp integration and activated automatic updates, you’ve established a connection between these two platforms, ensuring consistent data synchronization. Chances are, you’re already seeing the benefits of this seamless data transfer in action.
With ClickUp and Google Leads integration, the hassle of manually transferring lead information is a thing of the past. This automation ensures that routine tasks are handled efficiently, allowing you to focus on areas that truly matter. SaveMyLeads acts as your trusted partner, automating repetitive processes to streamline operations, saving time and ensuring your workflows run smoothly.
Now, you can channel your energy into enhancing customer experiences, crafting innovative business strategies, and driving growth. With SaveMyLeads, your business is primed to reach new levels of efficiency and success.
Step-by-Step Guides for Setting Up Integrations:
