If you do not have your own website, you can organize sales without the extra cost of creating it using the Facebook store. From our article, you will learn who needs a virtual storefront on a social network and how to add shop to Facebook page.
What is a Facebook Shop for?
Today, many companies are trying to be presented simultaneously on several platforms on the Internet, because it is there that the lion's share of potential customers lives. The social network Facebook is one of the places chosen by users where they communicate, read and watch content. People registered in this social network, on average, devote to communication in it from 40 minutes daily. Some of that time is spent shopping. This is the main reason why selling on Facebook is a good idea.
The store on the Facebook social network is a kind of virtual storefront, extremely easy to use. Technically, it looks like a separate tab on the business page, where all the products are collected. It is easy to set up: the process of adding and deleting trade items, filling in and editing cards is fast and easy. The convenience for a potential clients lies in the fact that they do not need to leave the social network on a computer or from the official application on a mobile device in search of the desired product. Another important and pleasant point: you don’t have to pay to connect the store function.
Who needs
For whom the Facebook shop page will be especially useful:
- For those who do not have their own online store. In some cases, it is impossible to make such a site (for example, if the entrepreneur cannot afford these costs).
- Those whose target audience literally “lives” on Facebook.
- Those who own an interesting and attractive business page for users on this social network.
Who doesn't need
Not everyone who sells goods needs to open a store on Facebook. When it's definitely not needed:
- If a non-cash payment for a product (service) is not provided.
- If there is no target audience on Facebook.
Controversial opinion: some believe that if there is a successfully operating online store, it is undesirable to open an additional one on Facebook. The main argument is that duplicating products is not only pointless, but also harmful: such a tactic will lead to “scattering” traffic across different platforms and, accordingly, scatter the attention of potential customers. They are convinced that in such a situation it is better to launch an advertising campaign on a social network in order to drive traffic to an online store. Others, on the contrary, are convinced that the Facebook store is another channel that provides additional traffic to the existing online store and thus increases sales.
How to add a shop to Facebook page
A full-fledged online store on Facebook with the option of paying for goods within the social network cannot be launched, unless, of course, you are located in the United States. This opportunity is available only to those who live in the territory of the United States of America. There you can really place an order and pay for it directly on the page on the social network. In other countries, a Facebook store is a kind of electronic catalog where you can find out the cost and size of discounts, get acquainted with the assortment presented, and the purchase itself is made on the website of the online store, where the user is redirected from the social network. Facebook Showcase is an effective tool for promoting an existing online store, not just another business.
Creating a business page
Opening your store on Facebook is available to any user registered here. The first step is to create a business page. If you already have it, just skip this step.
Action algorithm:
1. Go to the menu (located on the top panel) and click "Create". Then choose "Page".
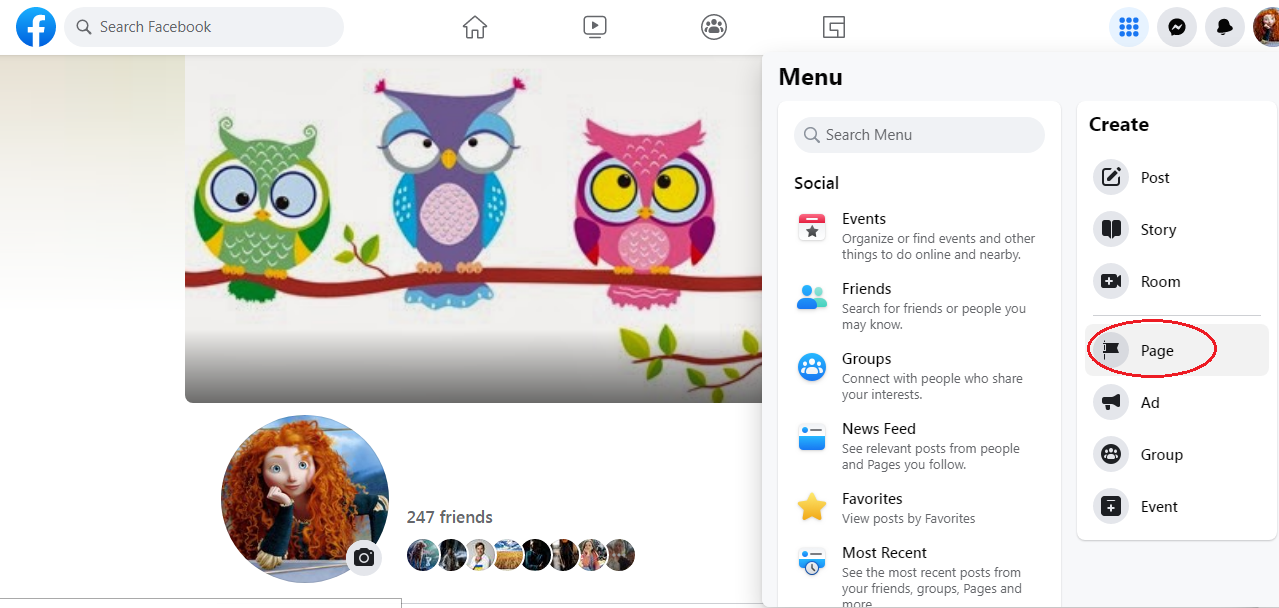
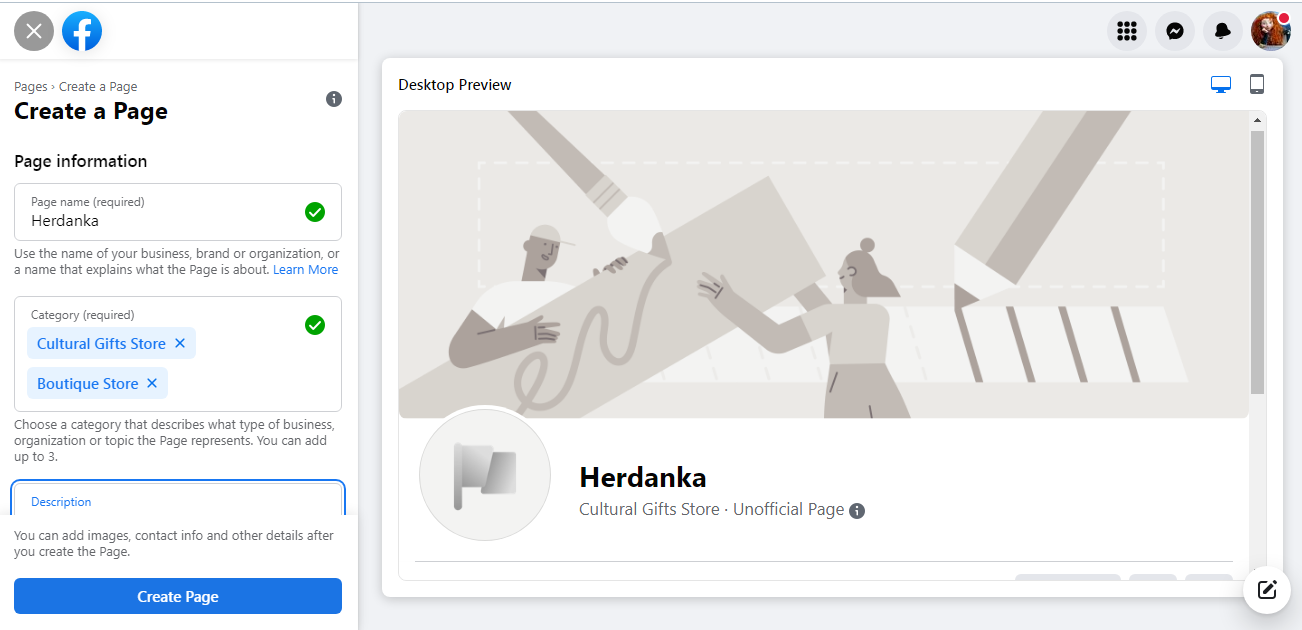
2. Fill in the left information block about the page. Write its name, indicate the areas to which your activity belongs, and make a short description of the store. Then click the "Create Page" button at the bottom.
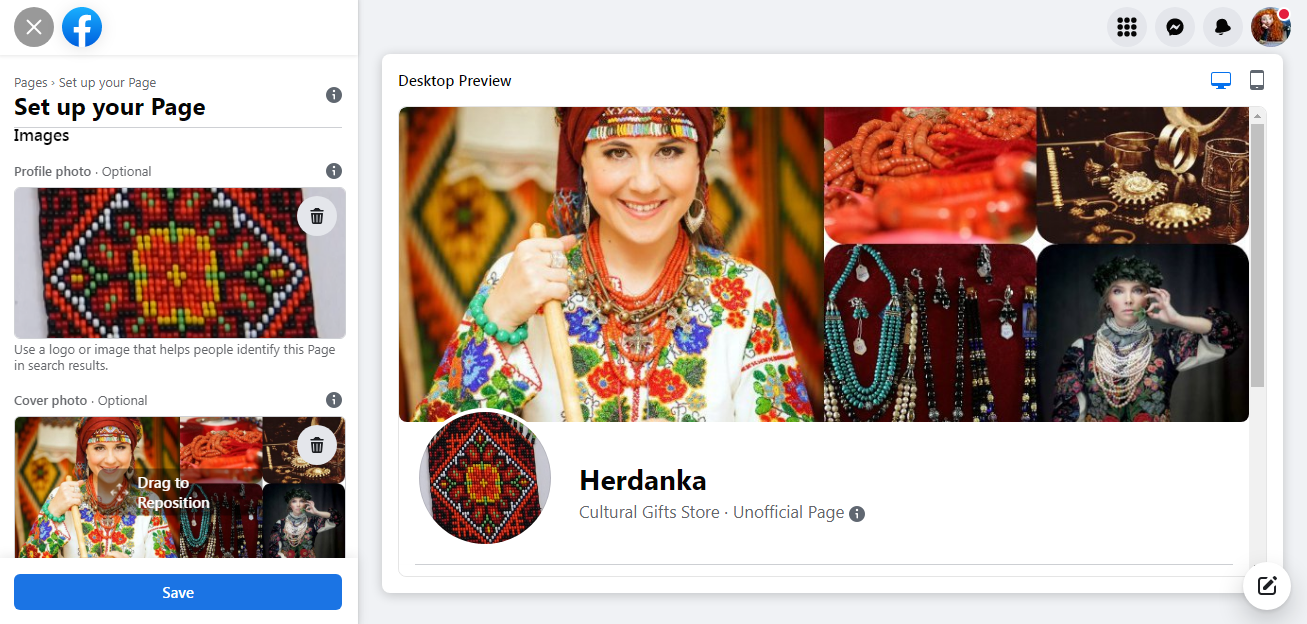
3. The left block has been supplemented with new categories that also need to be filled in. Put a company logo design and make a business page cover. After that, do not forget to click the "Save" button.
4. Scroll down the created business page and fill in the missing categories in the "About" block by clicking "Edit Page Info".
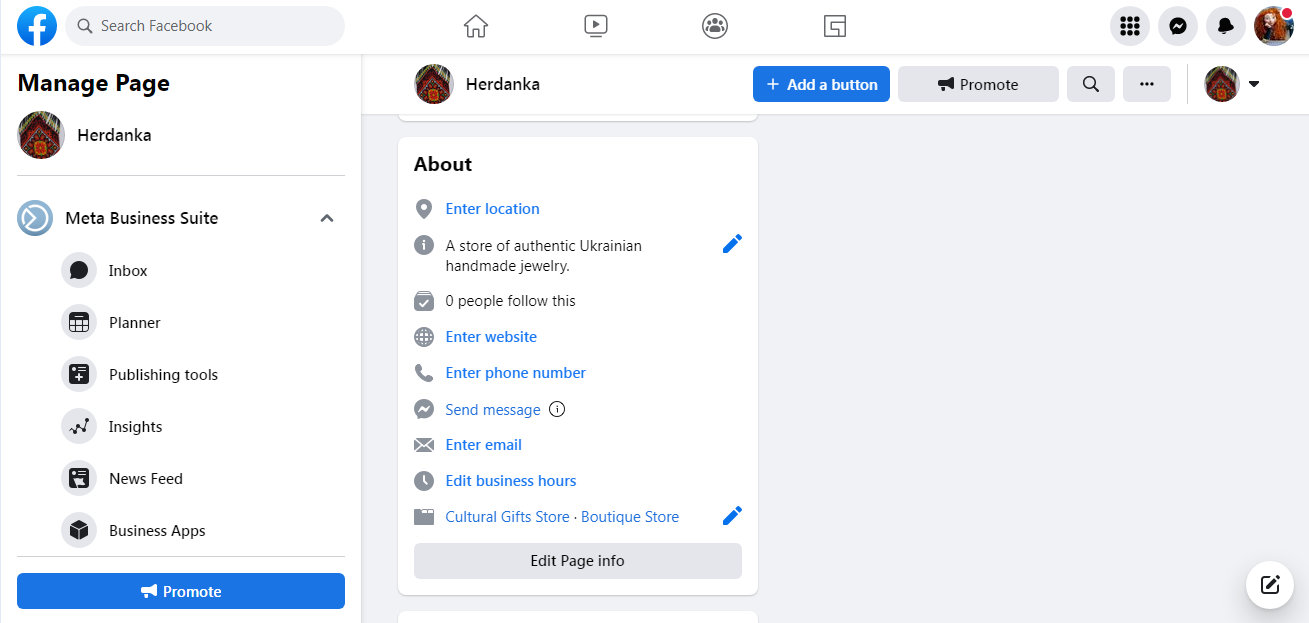
Indicate contacts, geolocation, working hours, temporary notifications about changes in work due to COVID-19 and others (currency, privacy policy, additional information, accounts in other social networks).
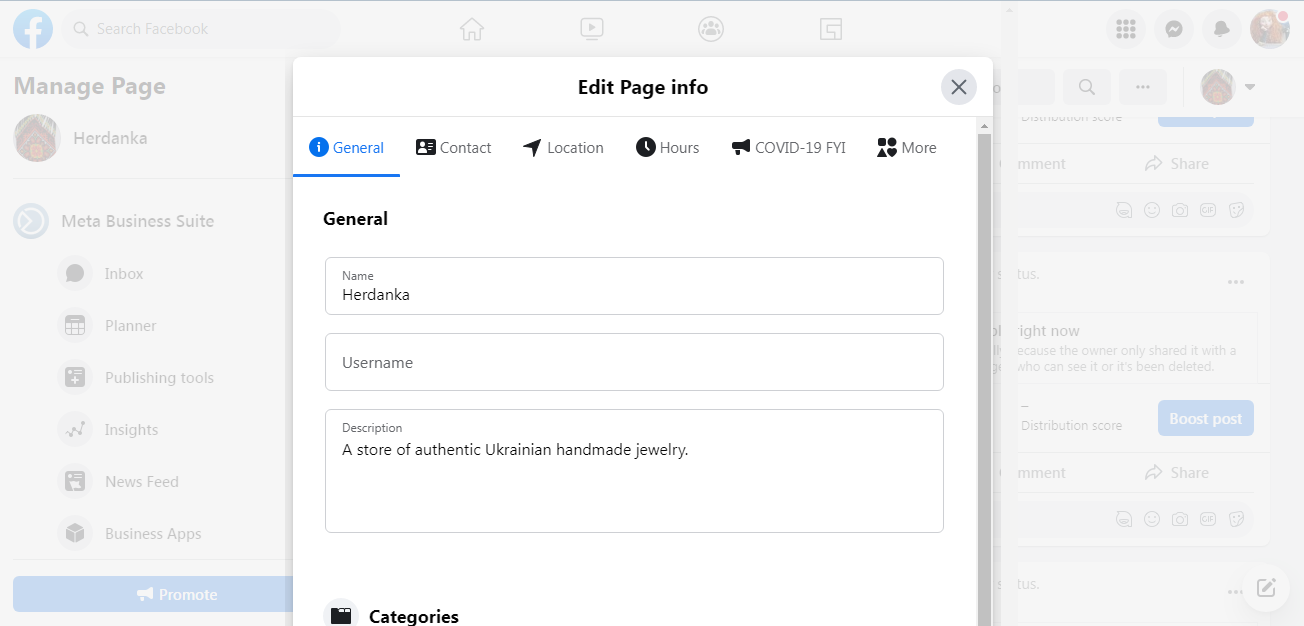
The business page is ready, but it still needs to be properly configured. It is not necessary to do this right now. You can start creating a store already at this stage.
How to add a Store tab
To add the "Shop" menu section to an already created business page, follow these steps:
1. Click on the "Settings" section (located in the left block at the very bottom).
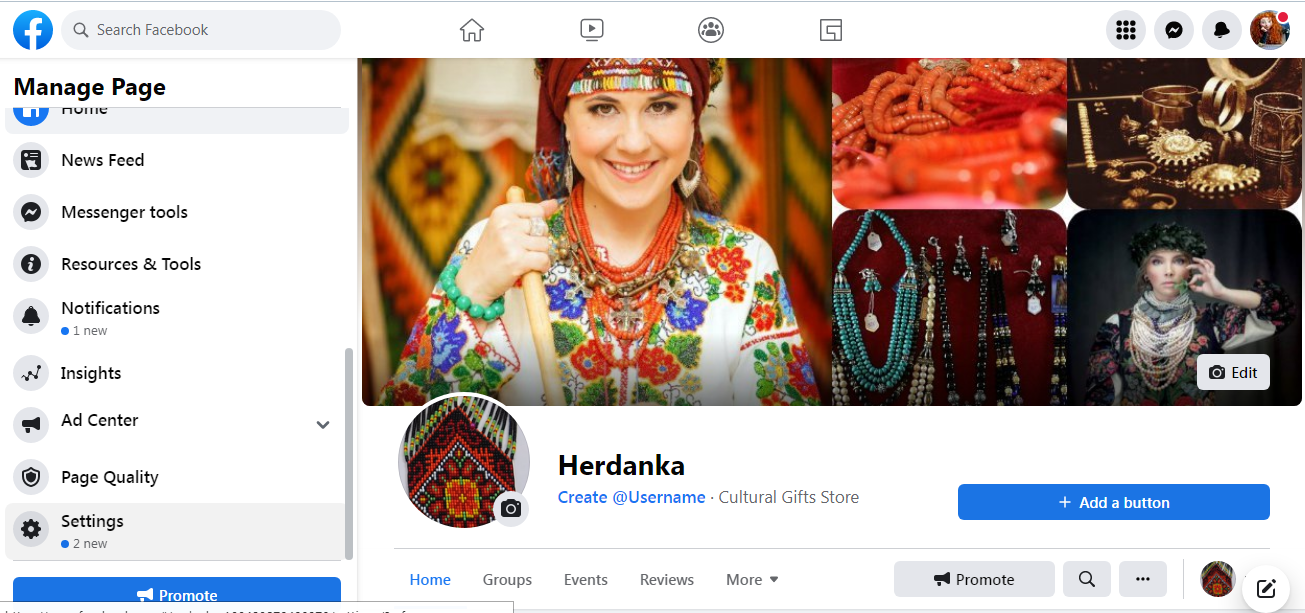
2. Open the "Templates and Tabs" category.
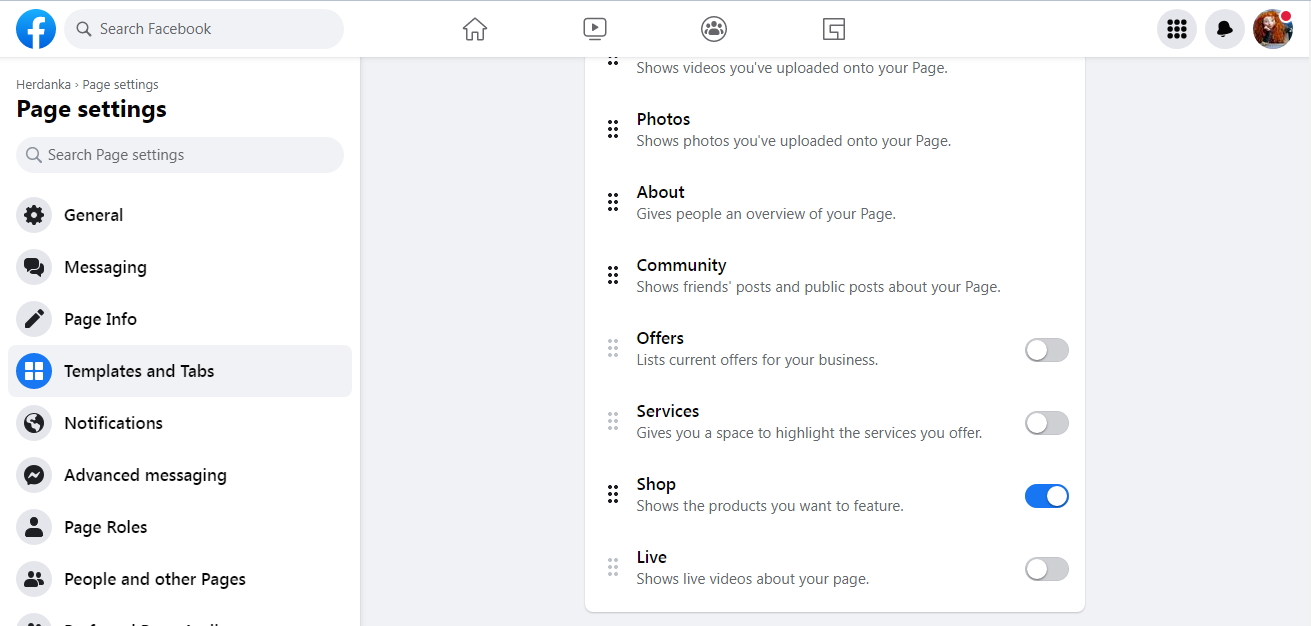
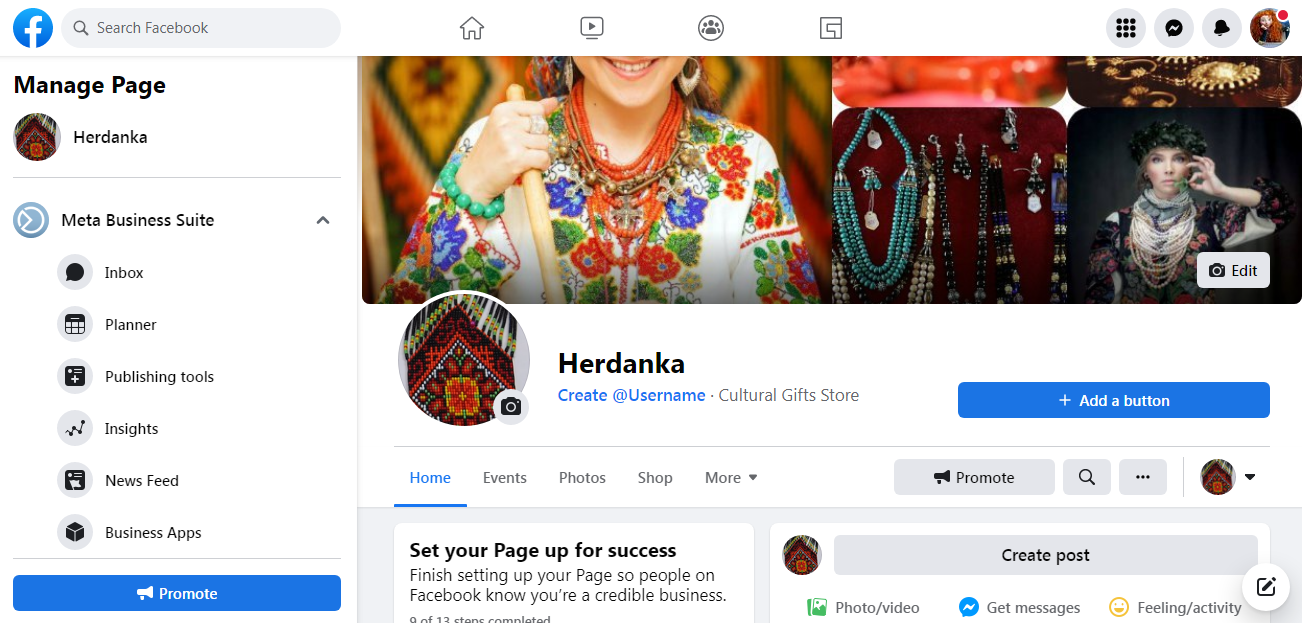
3. Move the slider next to the "Shop" tab to the active position. When you return to the main page, the tab will be in the "More" section of the menu.
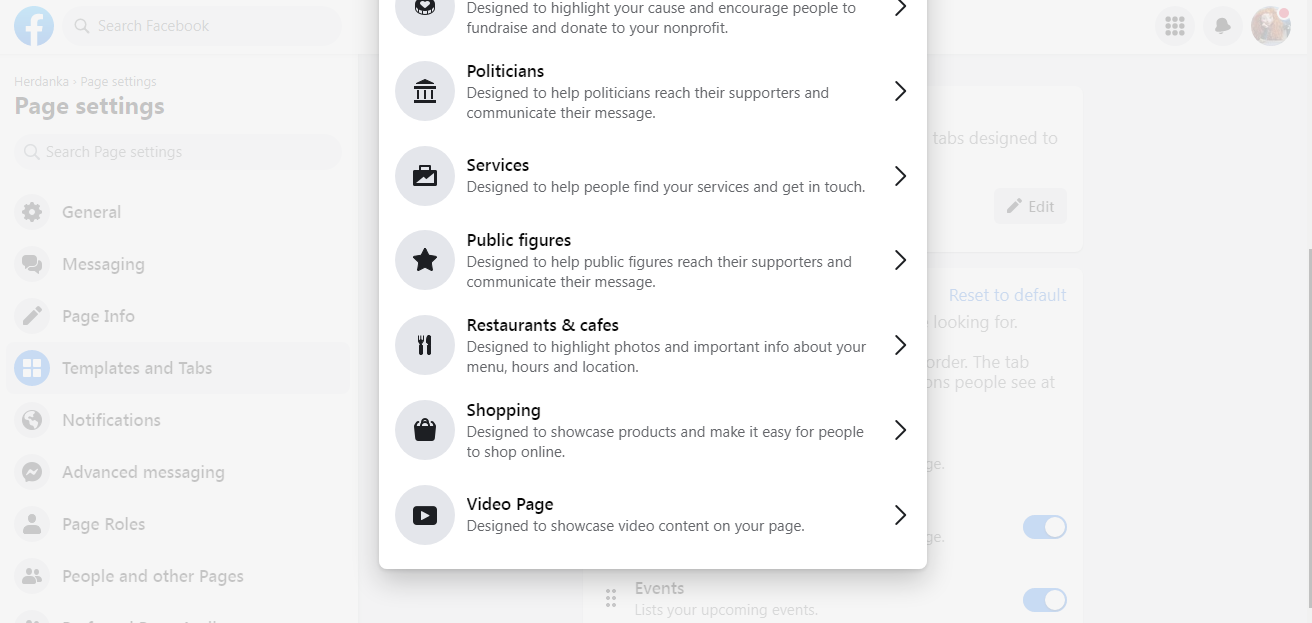
4. Click the "Edit" button next to "Current template".
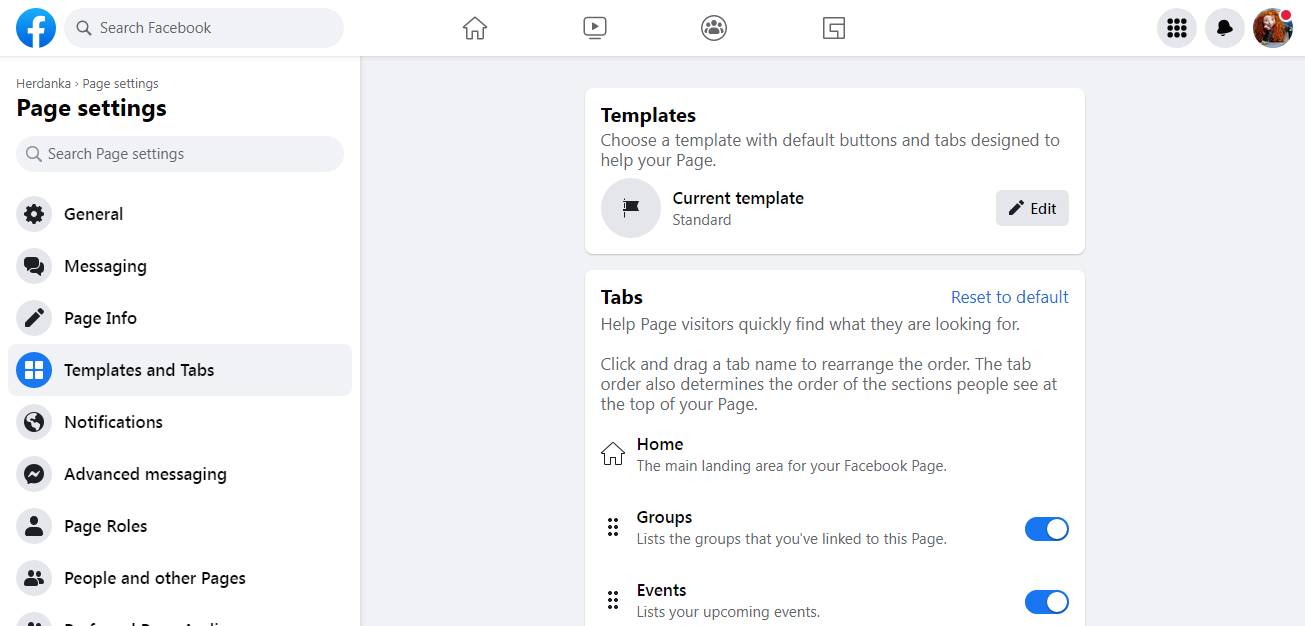
5. Change template from «Standard» to «Shopping».
6. On the preview that appears, you will see that the location of the menu categories on the business page will change. Confirm your action by clicking the "Apply template" button.
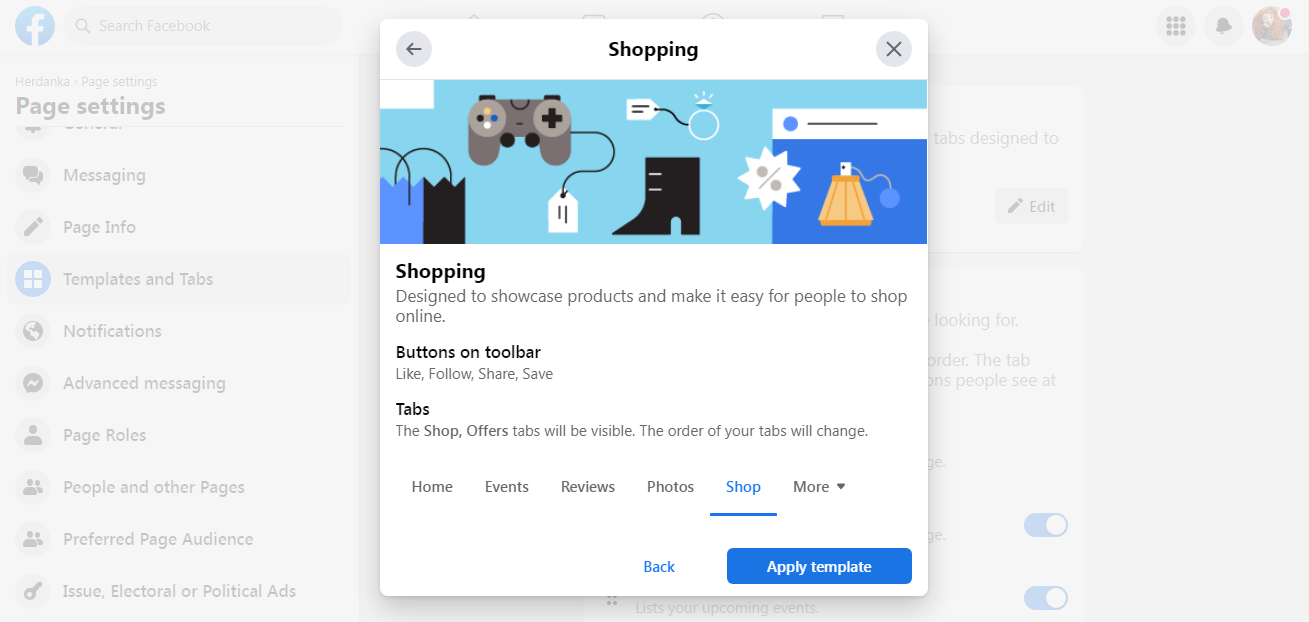
Note: in order for the Shop tab to come out of the More drop-down list and stand alone in a prominent place, you will have to sacrifice one of the existing tabs. You can remove it by moving the slider opposite it in "Templates and Tabs".
Store setup
The store “attached” to the business page must be configured:
1. Click on the "Shop" tab. A pop-up window will open asking you to go to "Commerce Manager". Click to go.
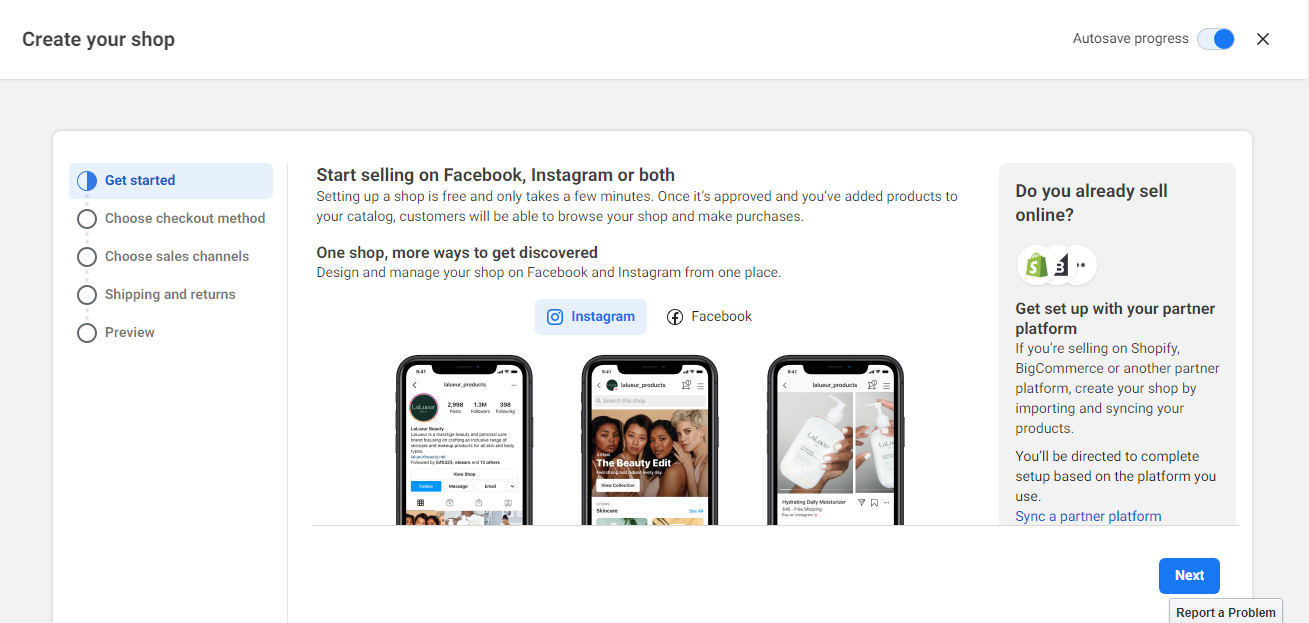
2. In a new window, you will read that setting up a store is free and only takes a few minutes. As soon as the system approves it and you fill the catalog with goods, buyers will be able to enter it and make purchases. Here you need to click the "Next" button.
3. Select the option to redirect the buyer at checkout. If you have an online store, choose "Checkout on another website". If it's not there, then "Checkout with Facebook or Instagram" will do. Click next.
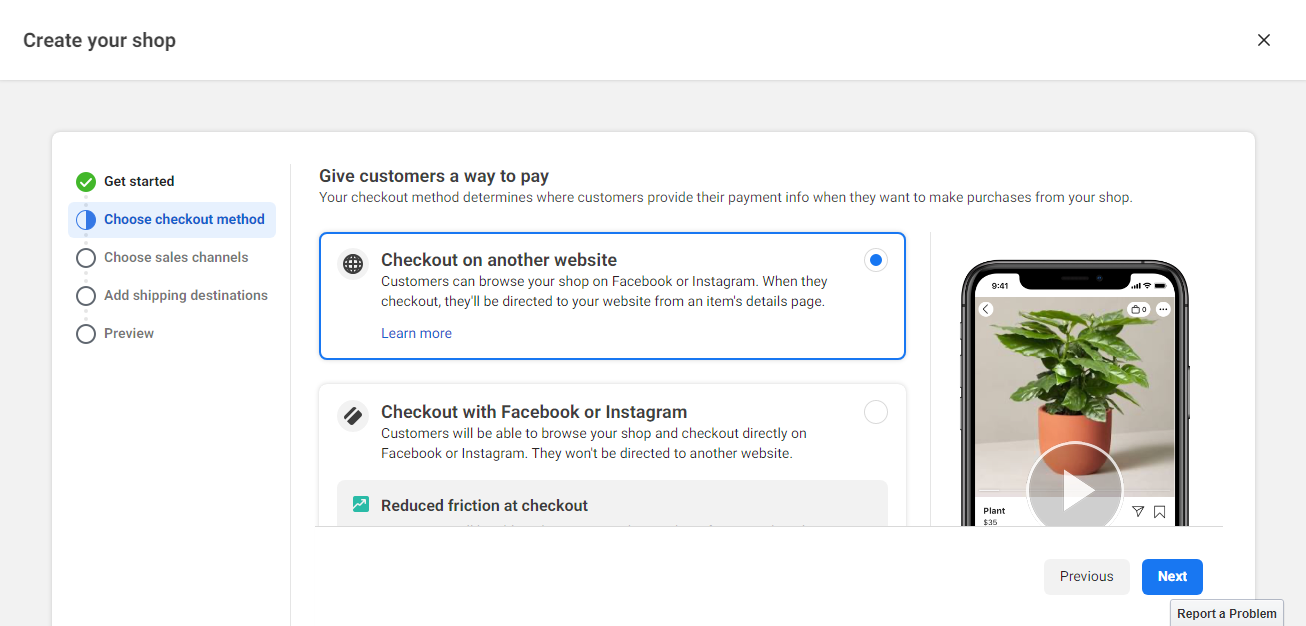
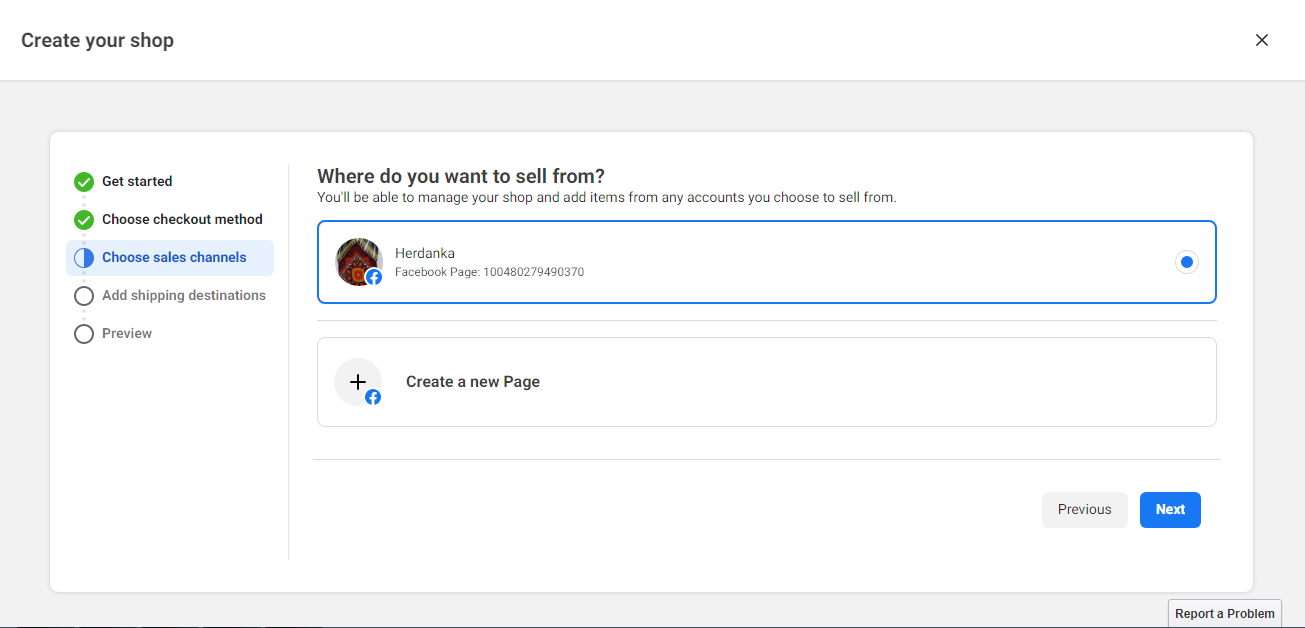
4. Select sales channels. Here you can add other pages from which trading will be conducted. If there are no other pages, check the box next to your only one. Click next.
5. Connect your business account to Commerce Manager. Create an account that you will use to manage your store in Commerce Manager.
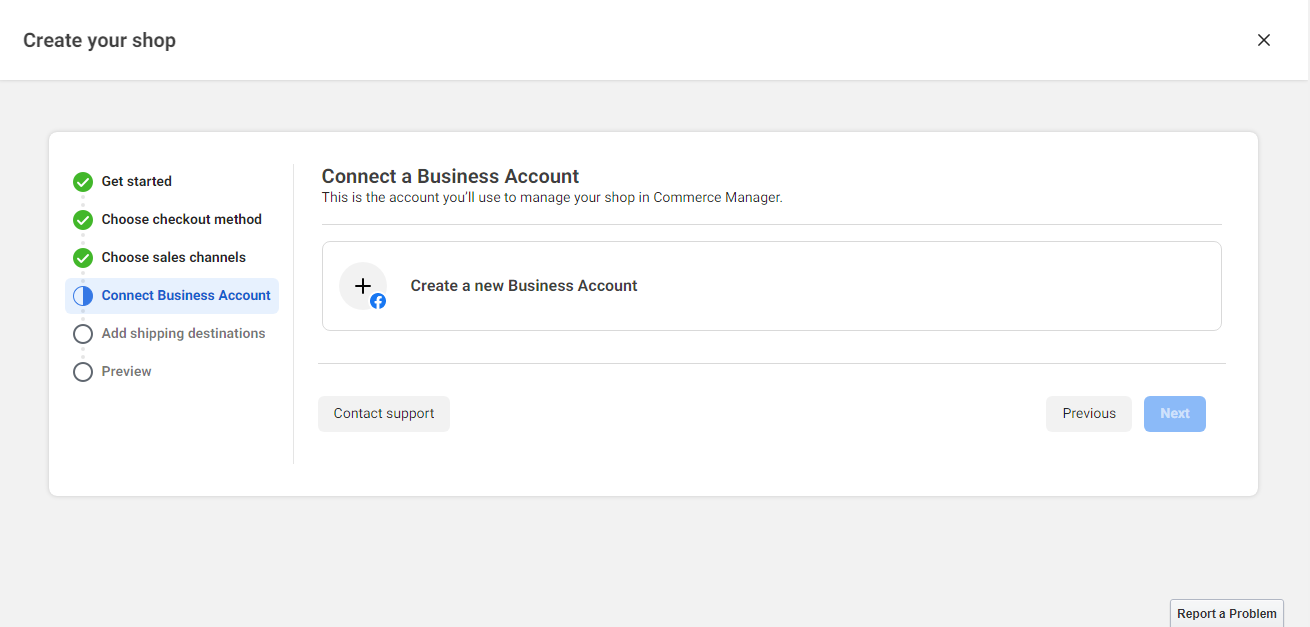
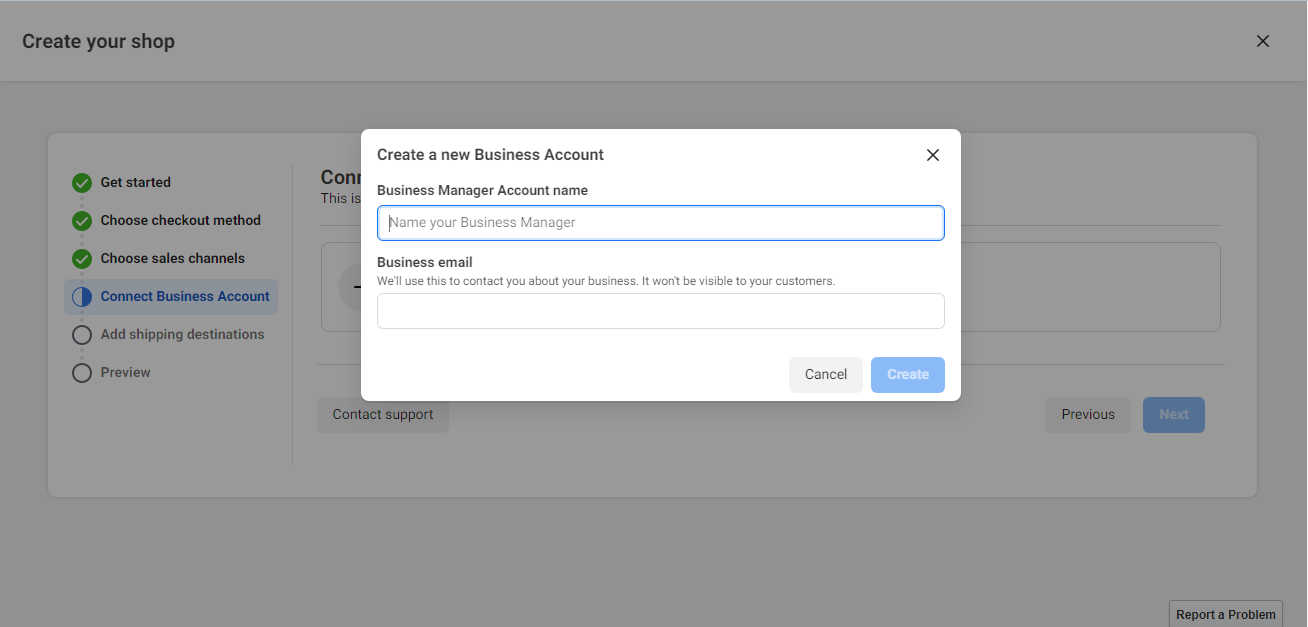
Give it a name and enter an email address. Click the "Create" button.
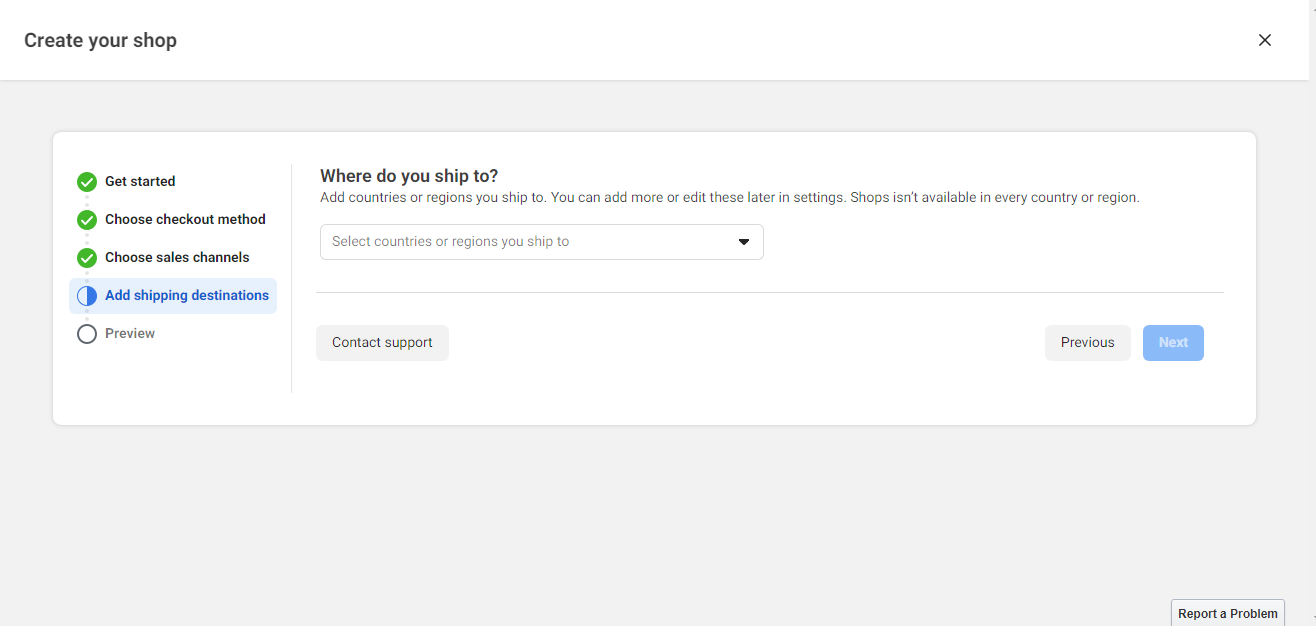
6. Mark the countries and regions where you will deliver the completed orders. This section can be edited later if necessary. Select a few countries to start with and click Next.
7. Review the preview, check the box to confirm that you accept the "Seller Agreement" and click "Finish setup".
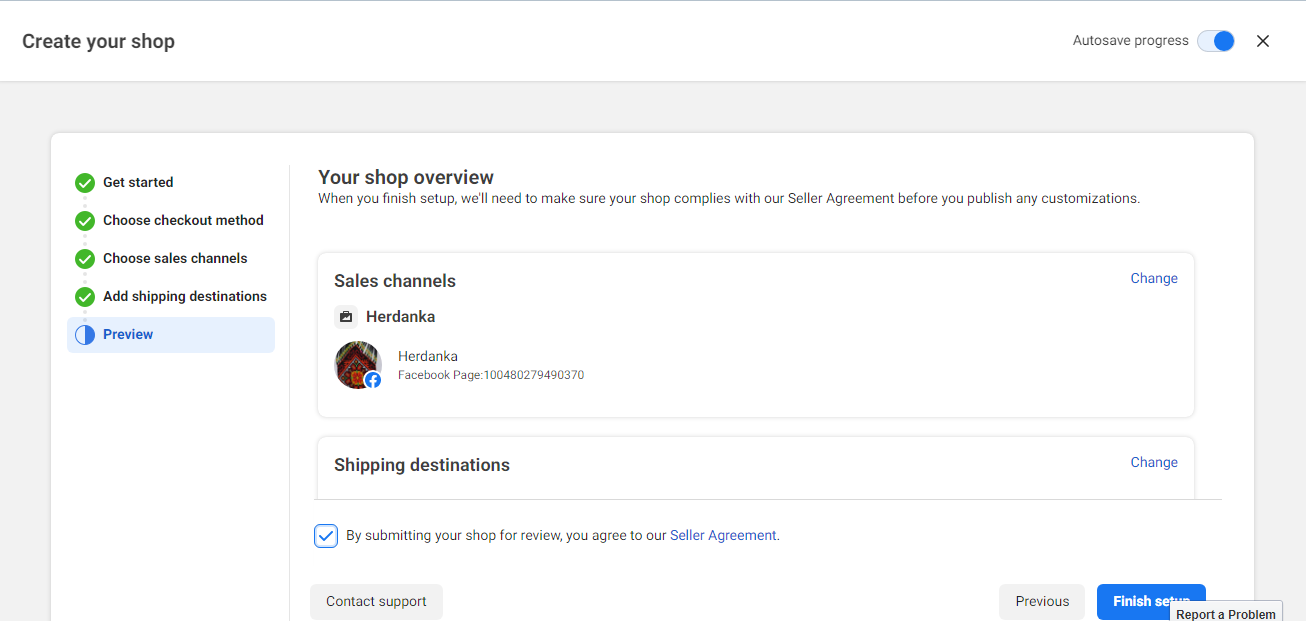
The configured store is sent for moderation, which can last up to a month. As a rule, the process takes 3-4 days.
Loading goods
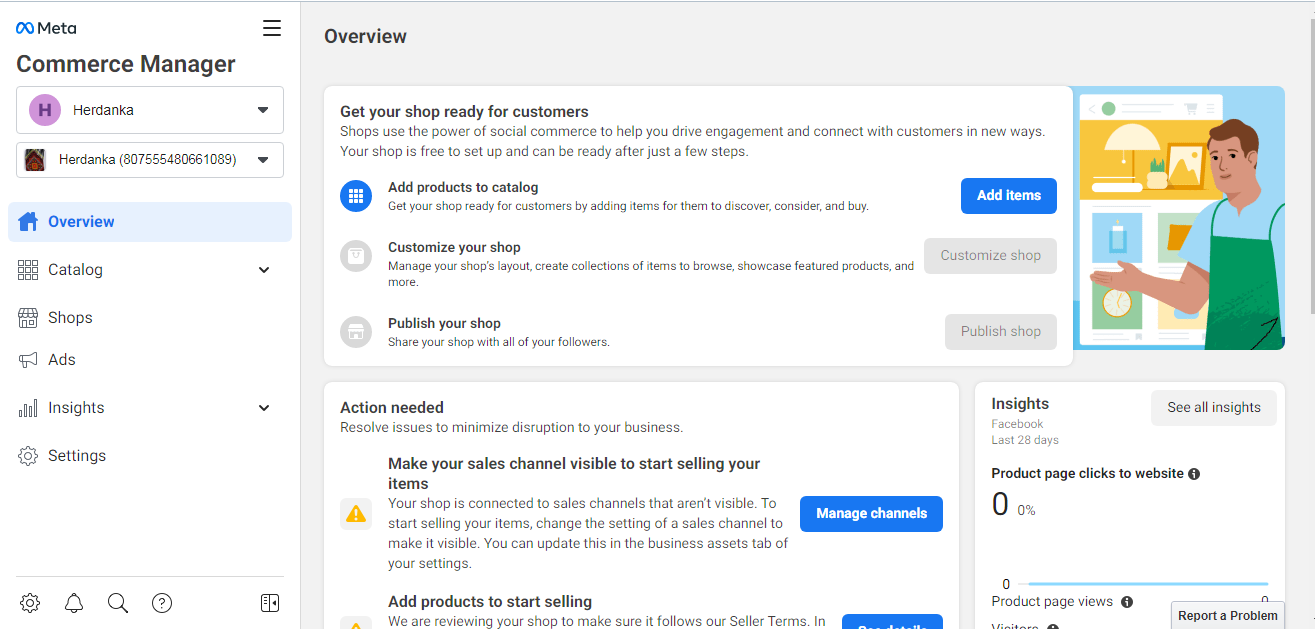
After clicking "Finish setup" within a minute, you will be transferred to the "Commerce Manager" cabinet. You can create a catalog and fill it with goods until the moderation of the store is completed. If this did not happen or you have no time to create a catalog now, you can enter the “Commerce Manager” cabinet by clicking on the “Shop” tab on your business page. To start adding items, click the "Add items" button.
There are 3 ways to add products to the store:


1. Manual. Loading goods manually one by one or in sets of several units using the Facebook toolkit.
2. Data feed. Adding products via XML, TSV, CSV or Google Sheets files. You need to put a link to the file that is stored on the server, and when the feed information is updated, the Facebook system will automatically pull up the latest data.
3. Pixel. Products are uploaded via Facebook Pixel, if it is already installed on the site of your online store.
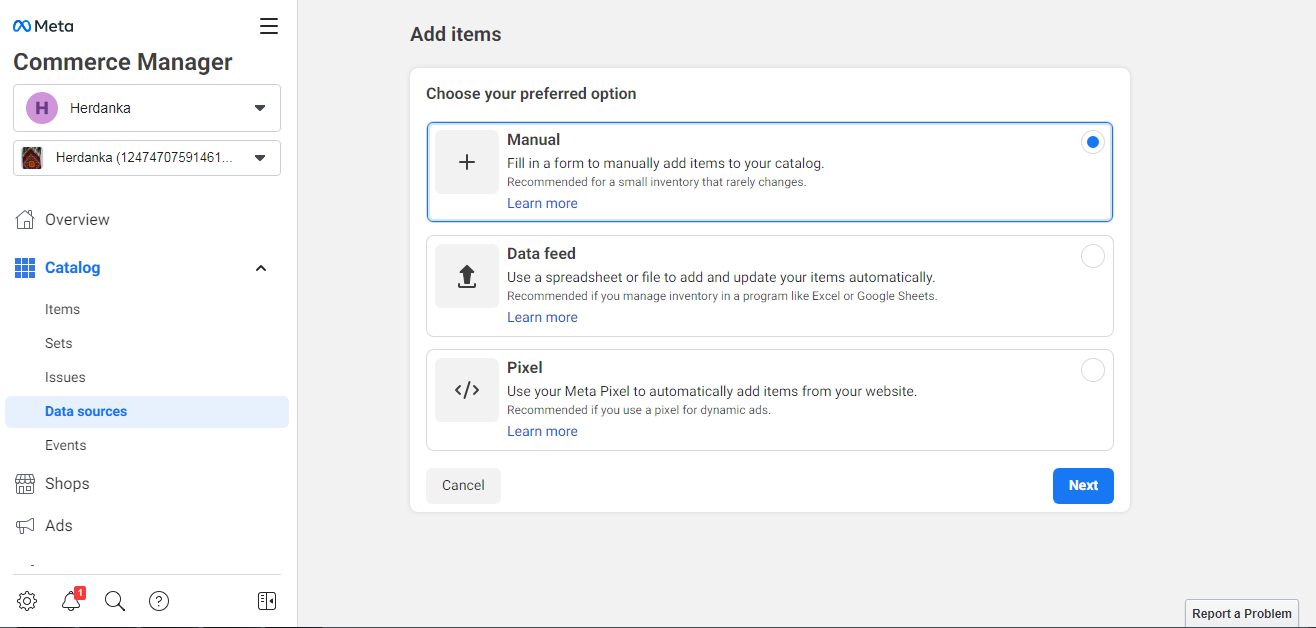
Let's illustrate the process of adding products using the manual method. On the page for choosing a download method, check the box next to "Manual" and click the "Next" button. You will need to enter the following data:
- photo (file size should not exceed 8 MB, dimensions - at least 500x500 pixels);
- the name of the product (no more than 150 characters) and its description (no more than 9999 characters);
- a link to the online store where the added product is displayed;
- cost and promotional price (if any);
- product category (select from the drop-down list);
- condition (new, refurbished, used with specification of condition: like new, good, fine);
- status (active or archived) and availability (available or not available);
- trade mark or brand name;
- content ID – it is useful for organizing advertising campaigns.
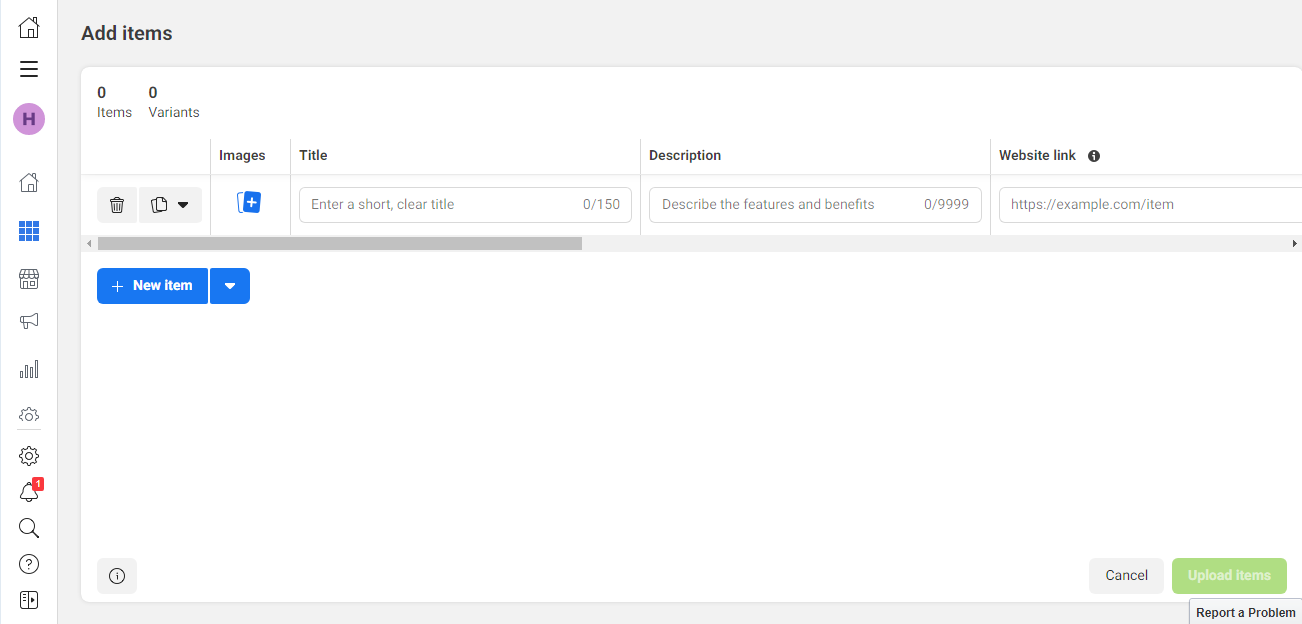
If one product has several variations (for example, color or size), click the "Add variant" button. The system will duplicate your product with one more line, where all the characteristics you specified will be saved. You will only need to change one characteristic (color or size) and attach a new photo. To upload a new item to the catalog, click on "New item". When you add the last item, don't forget to click the "Upload Items" button.
Goods management
You can manage the goods uploaded to the store from the "Catalog" tab - in it you need to select the "Items" section. Here you can deactivate outdated products, correct them, delete them permanently and upload new ones. To make changes, you just need to click on the selected product in the list.
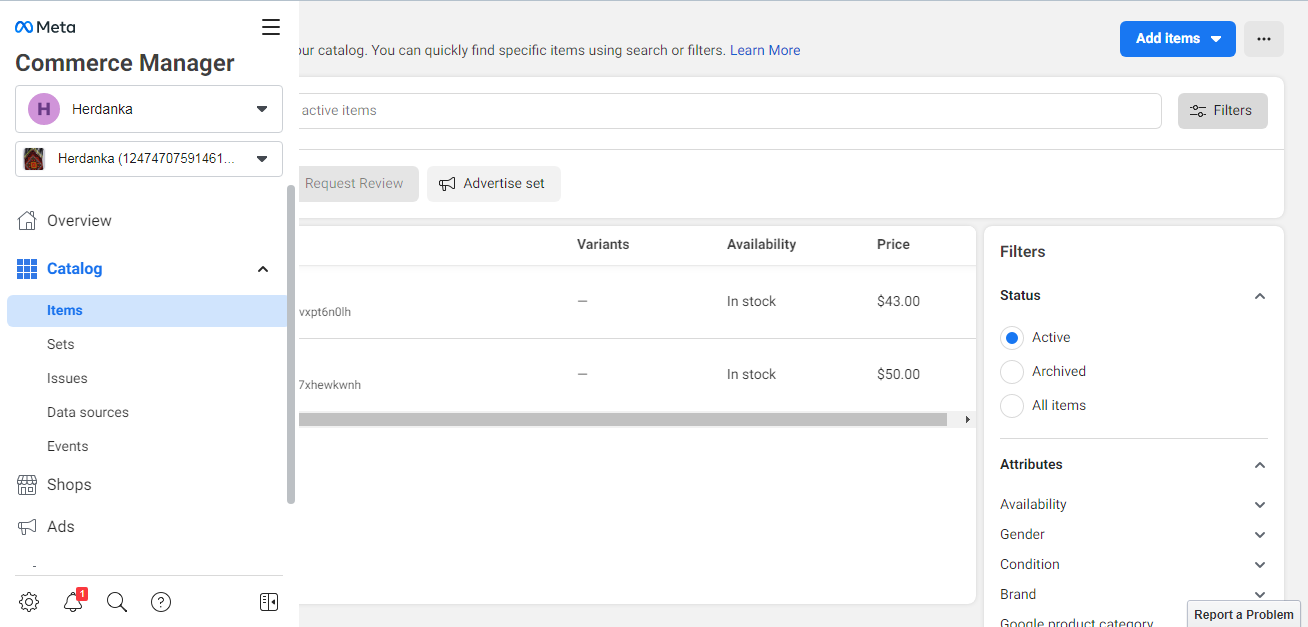
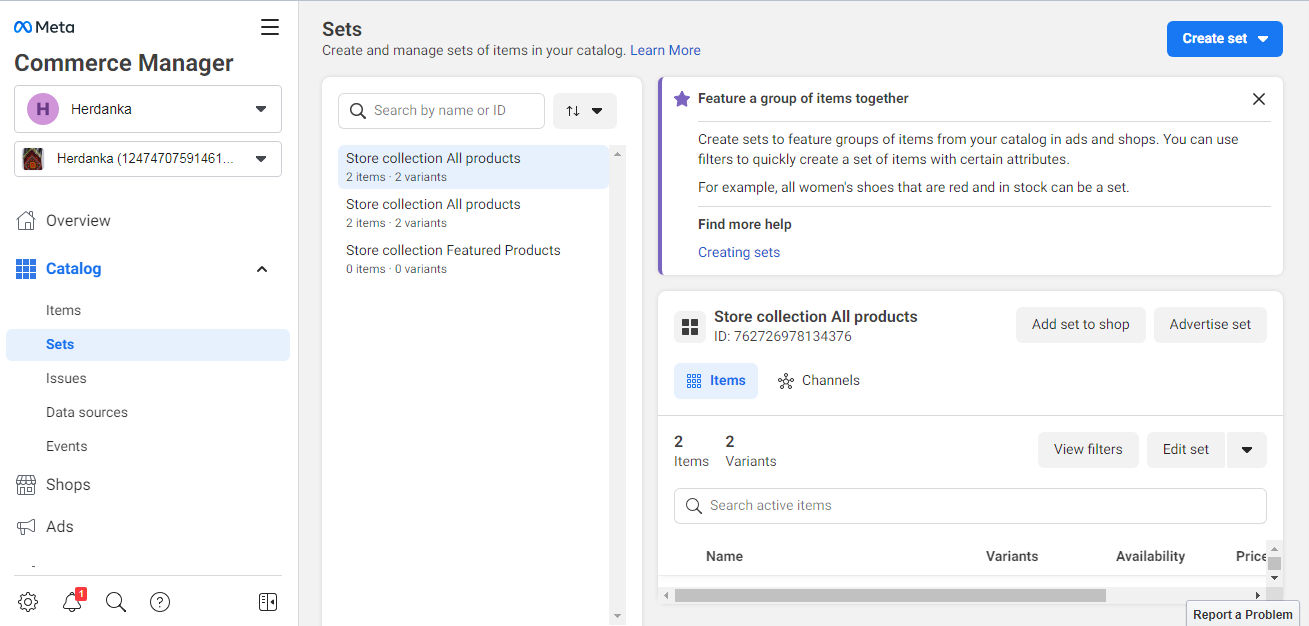
For convenience, products can be grouped into sets. To create such a set, you need to open the "Catalog" tab, select the "Sets" section and click "Create set". Check the items you want to combine into a set. Give it a name and click on the "Create" button.
Is it possible to change the currency
In the process of setting up the store, you must specify the currency in which payment for goods will be made. The list of monetary units is arranged in alphabetical order – by the names of the states.
An important point: you cannot change the currency after completing the store setup. So think carefully before choosing it. Otherwise, you will have to delete everything and create a store from scratch.
Store opening
In your Commerce Manager account, you can track the review status of your store. Once completed, you'll be able to click the 'Publish Shop' button and users will see your store.
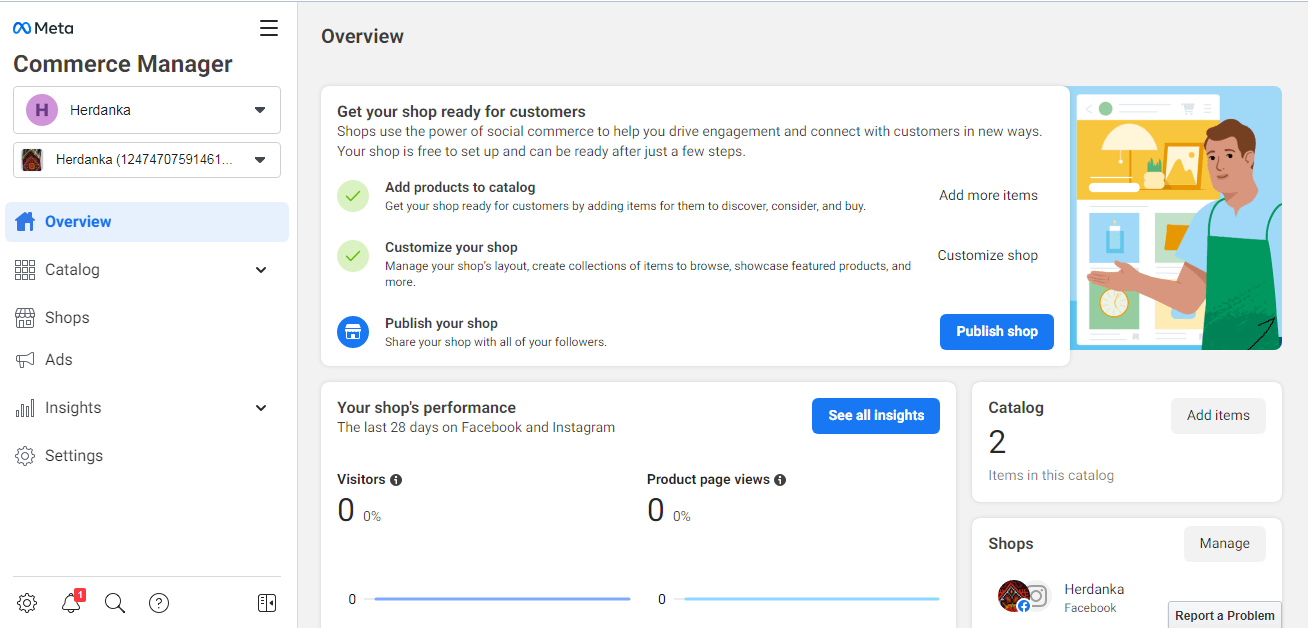
After a positive store verification result, you can add a "Shop on website" button to your business page, which will lead visitors to your online store.
How to add shop button on Facebook page:
1. Log in to your business page.
2. Click on «Add a button» .
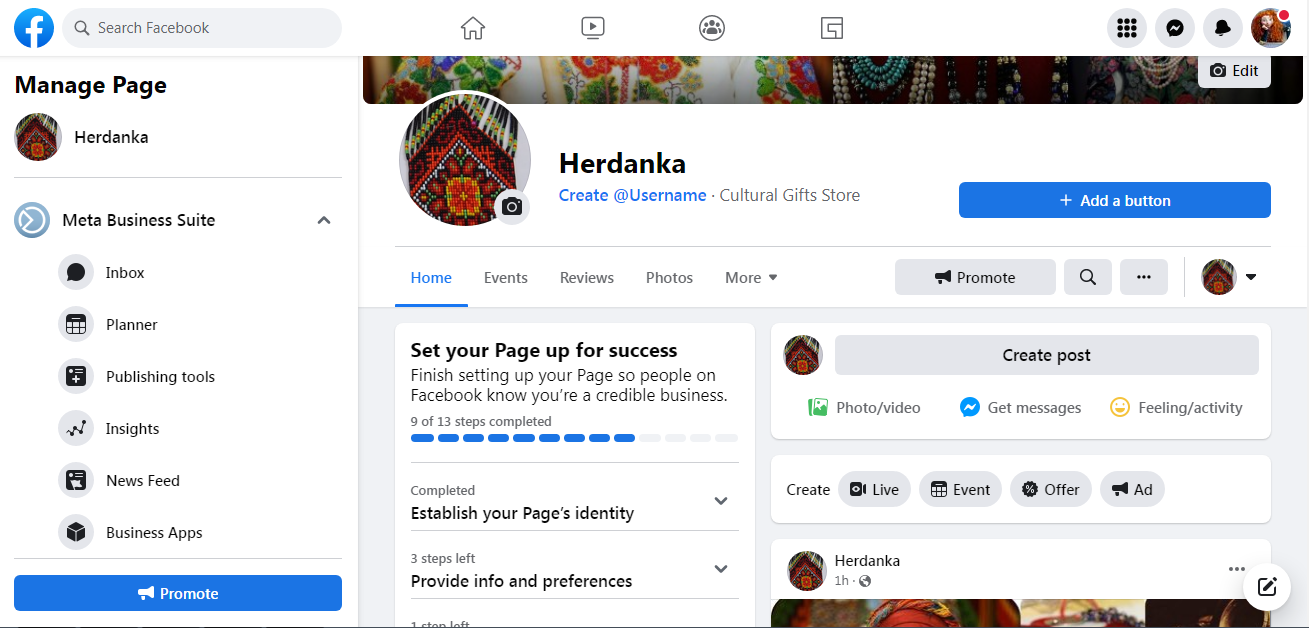
3. Select "Shop on website" from the list.
After the opening of the store, visitors will be able to look into it and get acquainted with the range of goods. To do this, they just need to open the “Shop” tab - and a catalog will open in front of them. Clicking on the image of any product will open a page dedicated to it, which contains detailed information about it and a link that allows you to go to the online store to place an order. For ease of navigation through the catalog, visitors will be able to use filters by cost, discounts and product availability.
How to remove shop from Facebook page
To delete a store, follow these steps:
- Login to the store from your business page;
- Click on the "Settings" button;
- Select the very last item from the list - "Delete shop".
The system will ask you to confirm your decision. Unless you change your mind, the store will disappear entirely. The "Shop" tab will no longer be shown in the page menu and all products that you uploaded to the catalog will be deleted.
Advantages and disadvantages of a Facebook store
The main reasons why you should still open a shop on Facebook:
- Flexibility of settings. In the process of creating a store, it is possible to combine goods by category, publish messages about promotions, discounts and sales.
- Access to analytics of a number of indicators (the number of views, clicks and purchases made) for each section.
- No restrictions on the number of added products.
- Any products from the store can be tagged in posts on Facebook pages and run advertising campaigns for them.
Difficulties with moderation are called a significant drawback. In some cases, you need to try different versions of product descriptions for several days, change photos, and so on, in order to get a positive verdict from the system. In addition, after the next update of Facebook, sometimes products are displayed incorrectly. Unfortunately, this cannot be influenced.
Summing up
A Facebook store is an additional sales channel, as well as another source of traffic for an existing online store. It is a convenient option not only for large hyped stores, where online sales have long been put on stream, but also for private entrepreneurs who focus mainly on selling goods offline. The potential client also receives its benefit - access to complete information about the product of interest to him without the need to collect it from various third-party sources.
Personalized responses to new clients from Facebook/Instagram. Receiving data on new orders in real time. Prompt delivery of information to all employees who are involved in lead processing. All this can be done automatically. With the SaveMyLeads service, you will be able to easily create integrations for Facebook Lead Ads and implement automation. Set up the integration once and let it do the chores every day.
