Meta Corporation is steadily pursuing a course of developing and improving user experience. The introduction of the Meta AI online assistant on Facebook is one of the progressive directions in this strategy. On the one hand, the presence of such an assistant increases the convenience and comfort for platform users. On the other hand, the risks associated with the confidentiality of data are growing. In this article, we will tell you about solutions that will help you limit the work of AI algorithms when using this social network.
What Meta AI on Facebook Is and Why Some Users Want to Turn It Off
Meta Corporation has integrated artificial intelligence technologies into the functionality of its flagship products—Facebook, Instagram, WhatsApp, and Facebook Messenger. The most well-known among these solutions is the Meta AI online assistant, available to most Facebook users via the web interface or mobile app. It helps them find public and recommended posts and answers questions. The service also creates summaries of content on a given topic and generates texts and images based on queries.
Despite its apparent convenience, this option poses certain risks to the privacy of Facebook users' personal data and other resources within the Meta ecosystem. The corporation collects all the information it receives during the interaction of users with online assistants and other AI tools. It then uses this data to train and retrain new and existing LLMs (large language models).


Meta also has the right to share personal data collected from its users with third parties. For example, the company announced its decision to make its flagship LLM, LLaMA, available to U.S. government agencies and contractors working on national security applications.
For these and other reasons, many people want to know how to turn off Meta AI on Facebook. Unfortunately, at the time of writing, users cannot fully stop Meta AI suggestions on Facebook or opt out of other platform options involving artificial intelligence. However, there are some ways that can minimize interaction with AI algorithms, thereby preventing the collection and transfer of your personal data. Below you will learn how to use these techniques.
Adjusting Facebook Settings to Limit Meta AI
Although the social network interface does not allow removing the AI assistant from Facebook, you can disable it for the search option for a certain or unlimited period of time. To do this, follow these steps:
- Open the Facebook website or app and tap the blue arrow icon to open the chat window or search bar.
- In the new window, click on the blue icon with the letter I, then select the period for which you want to disable the AI assistant.
- Available options range from 15 minutes to Until I change it.
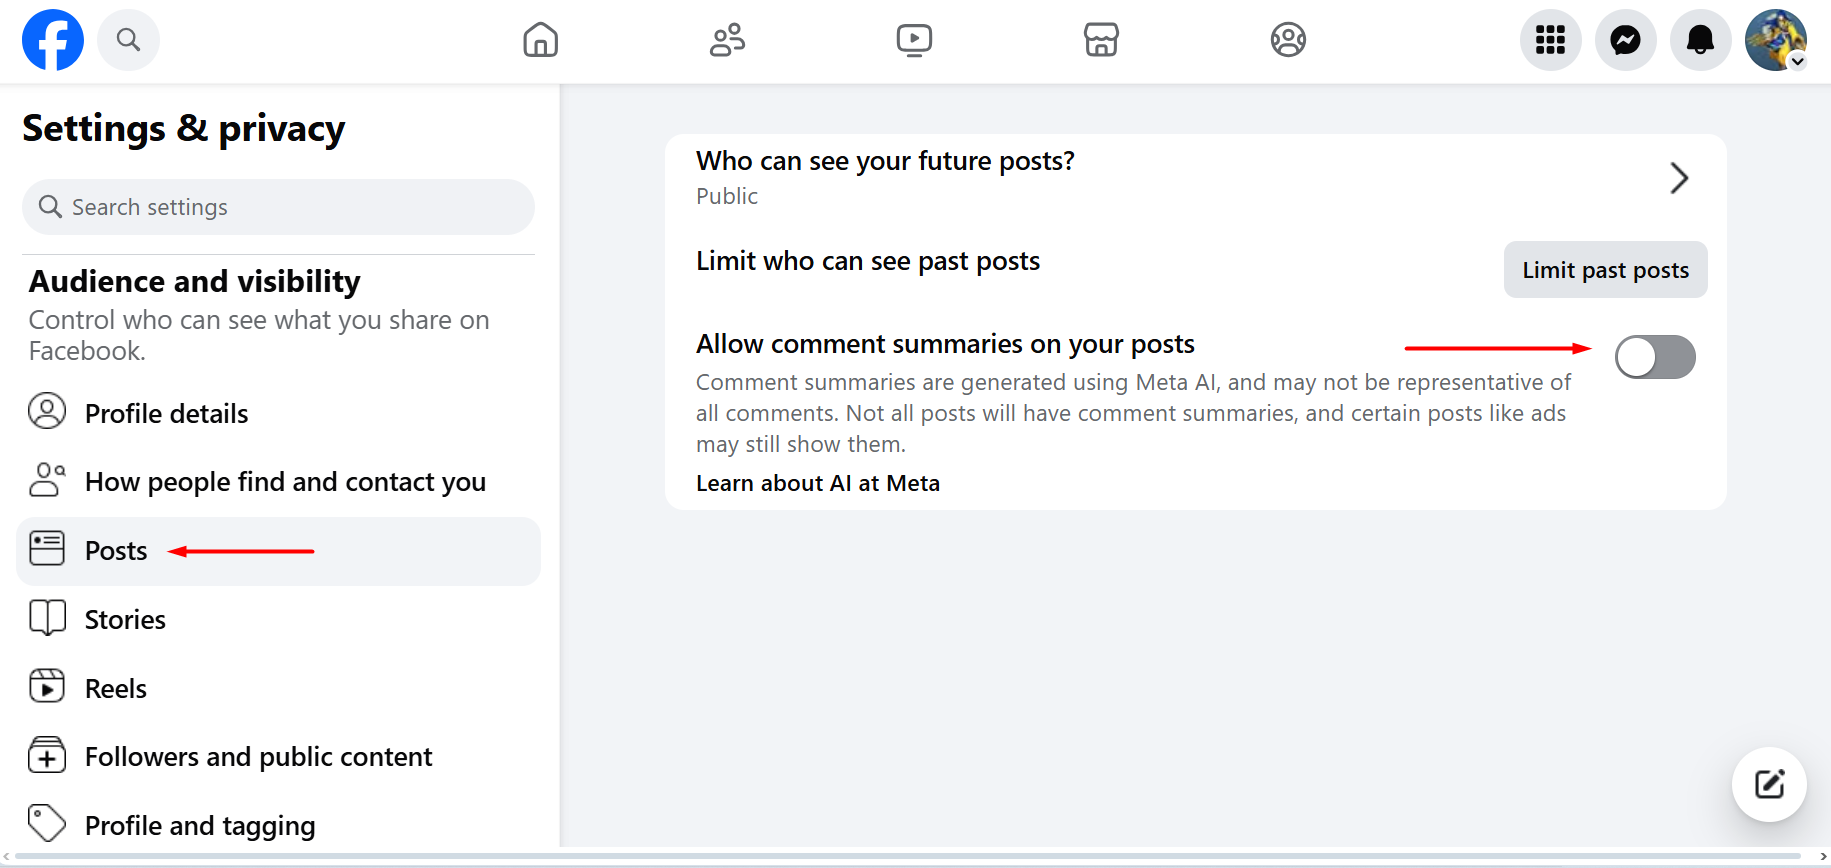
You can also disable the option to generate AI-generated summaries for comments under your Facebook posts. The following operations will help you here:
- Open the Facebook website or app and click on the button with your profile picture in the upper right part of the interface.
- From the menu that opens, go to the Settings & privacy section, and then to Settings.
- On the next page, you will see a list of options on the left side of the interface. Scroll down to the Audience and visibility section and click on Posts.
- Turn off the Allow comment summaries on your posts option. This will prevent Meta's AI algorithms from processing and analyzing comments on your posts.

Source: Facebook (Meta), illustrative screenshot.
Alternative Methods to Reduce Meta AI Interactions
In this part of the article, you will learn about some alternative methods that will help you manage Facebook AI settings control. They will also help you minimize interaction with Meta AI algorithms, preventing the collection and processing of your personal data.
In particular, you can send a request to Meta not to share with third parties your personal information obtained when interacting with the platform's AI functions. To do this, you should do the following:
- Open the Facebook website or app, then go to Settings & Privacy > Privacy Center.
- On the next page, open the Other policies and articles section in the left menu, and then navigate to the How Meta uses information for generative AI models and features subsection.
- Please review the information in this section.
- If you wish, you can fill out the form Data Subject Rights for Third Party Information Used for AI at Meta.
Final Thoughts
By embedding AI models into the interfaces of Facebook, Instagram, and other platforms, Meta collects personal data from users. This information is then transferred to third parties.
Now, users are unable to fully disable Meta AI in Facebook. However, they can limit their interaction with the system's AI algorithms. For example, they can disable the AI assistant built into the search bar or prevent AI algorithms from generating summaries of comments on their posts.
In addition, you can contact Meta with a request not to transfer your personal data collected through the AI functions of Facebook or other platforms to third parties. Nonetheless, submitting a request does not guarantee approval. The corporation reviews each request individually and makes decisions based on the laws of the user's country of residence.
FAQ
Can I completely turn off Meta AI on Facebook?
How can I disable the AI assistant in Facebook’s search bar?
Is it possible to stop AI from generating comment summaries on my posts?
Can I request Meta not to share my AI interaction data with third parties?
Will submitting a request to Meta fully protect my privacy?
Personalized responses to new clients from Facebook/Instagram. Receiving data on new orders in real time. Prompt delivery of information to all employees who are involved in lead processing. All this can be done automatically. With the SaveMyLeads service, you will be able to easily create integrations for Facebook Lead Ads and implement automation. Set up the integration once and let it do the chores every day.
