Prompt feedback is a necessary attribute of high-quality interaction with customers. In this article, we will show you how to set up automatic emails to new leads from Facebook using the MSG91 service.
Content:
1. How to set up Facebook and MSG91 integration
2. Create a connection and connect Facebook Ads
3. Connect MSG91
4. Check the connection and turn on auto-update
5. Conclusion
Facebook is the most popular social network in the world. The impressive reach makes FB one of the main marketing tools. It is difficult to find an effective business that does not use Facebook advertising opportunities. FB advertising and lead forms allow you to promote a company or product, as well as increase your customer base.
Often, orders through social networks are emotional in nature, so the user's interest in a product or service can quickly decline. It is important to establish communication with the client as soon as possible. One of the easiest and most effective ways is to send an email, for example, with information about the acceptance of the order and the delivery date.
The MSG91 cloud service offers a whole range of tools for customer service and interaction with them. Using this platform, you can implement email newsletters. The MSG91 service offers a wide range of templates as well as analytics tools. If you create an integration between the Facebook advertising account and the MSG91 platform, you can provide automatic email distribution for each new lead from the social network.
How to set up Facebook and MSG91 integration
Automation of routine processes greatly simplifies the work of marketers and sales managers. To set up the integration of Facebook Ads and the MSG91 service, you can use the services of IT specialists. However, there is a simpler and more cost-effective solution — the SaveMyLeads online connector.
The SaveMyLeads service helps you set up integration between the two systems in just a few minutes. No special knowledge or skills are required to create a connection and automate an email newsletters. The online connector checks for changes in the data source (Facebook) by passing information and triggering certain actions in the receiving system (MSG91). Thus, an email will be sent to each new lead from FB. Next, we will detail how to set up such an automated process.
Create a connection and connect Facebook Ads
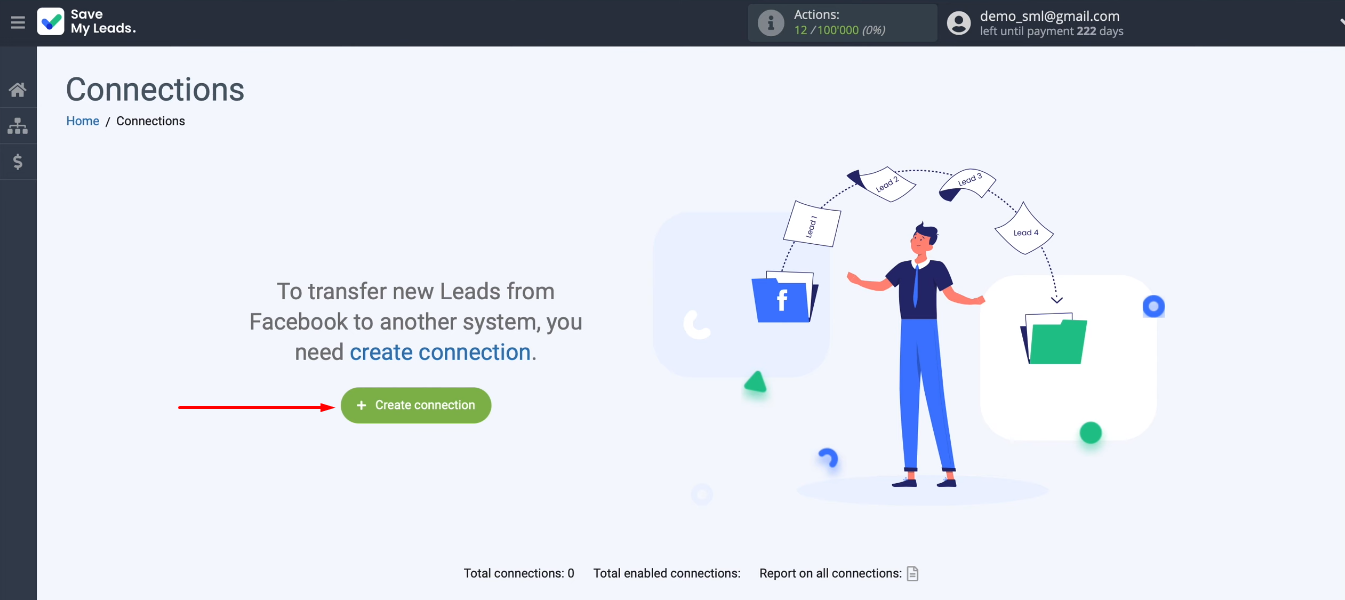
Register on the SaveMyLeads website and create a new connection in your personal account.
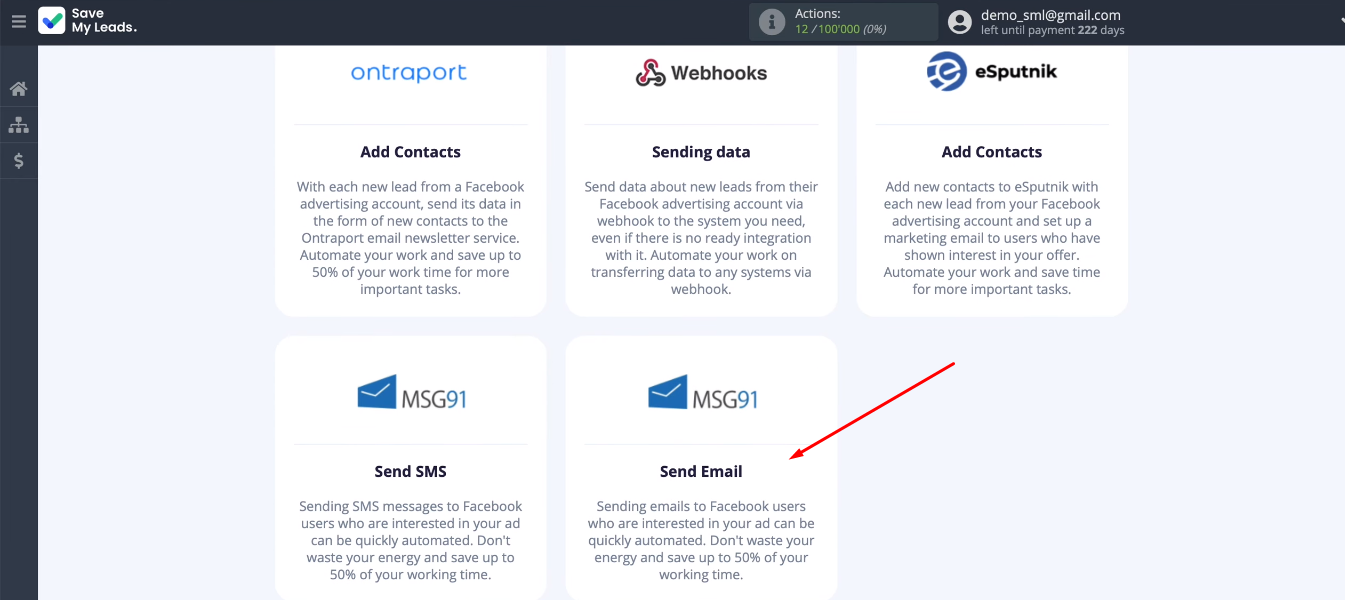
Select the appropriate template from ready-made solutions. For our task — MSG91 (Send Email).
Let's start setting up the data source. Connecting a Facebook account.
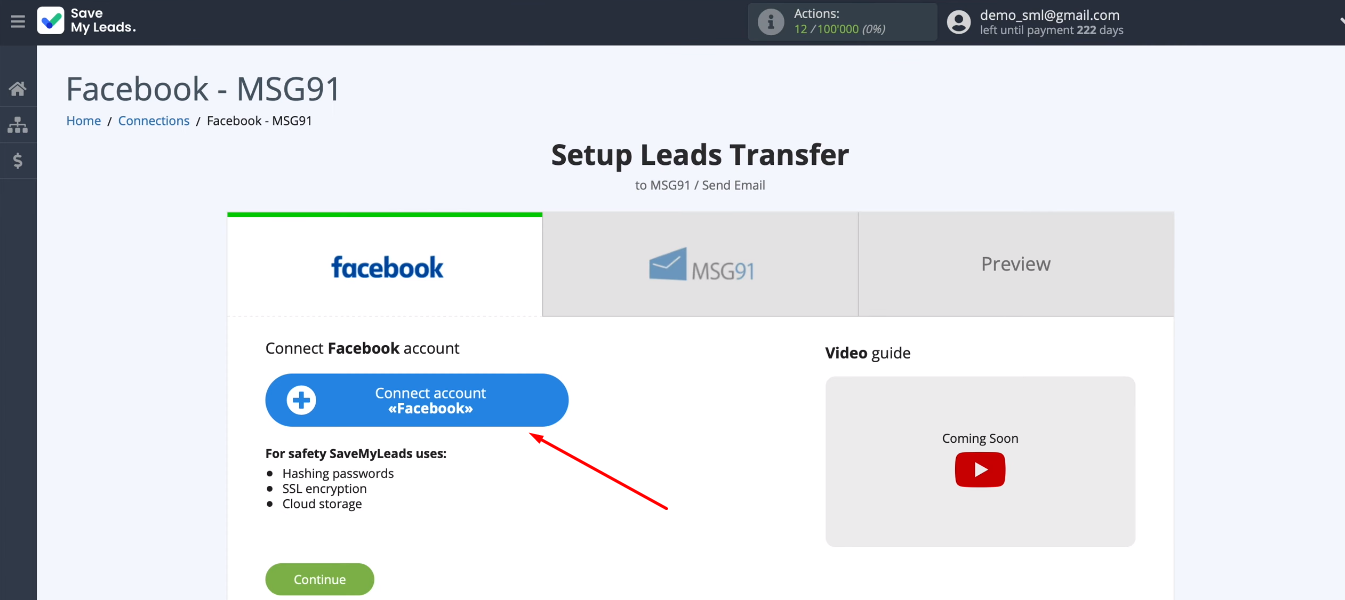
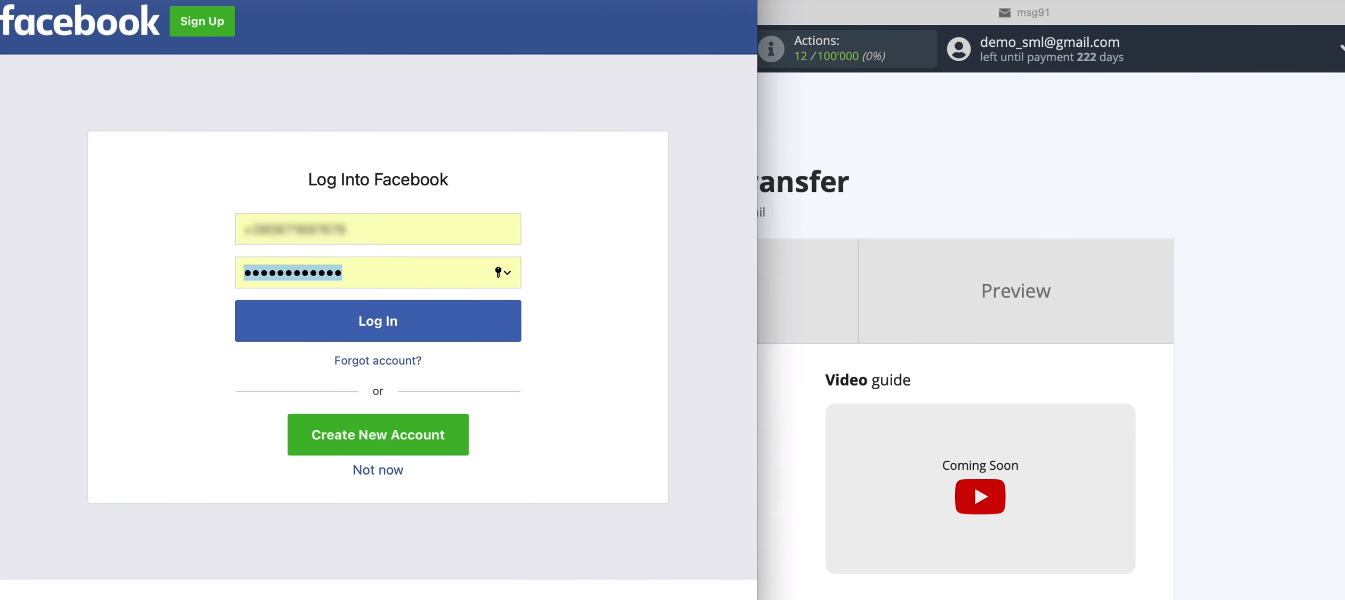
First, specify the username and password of FB.
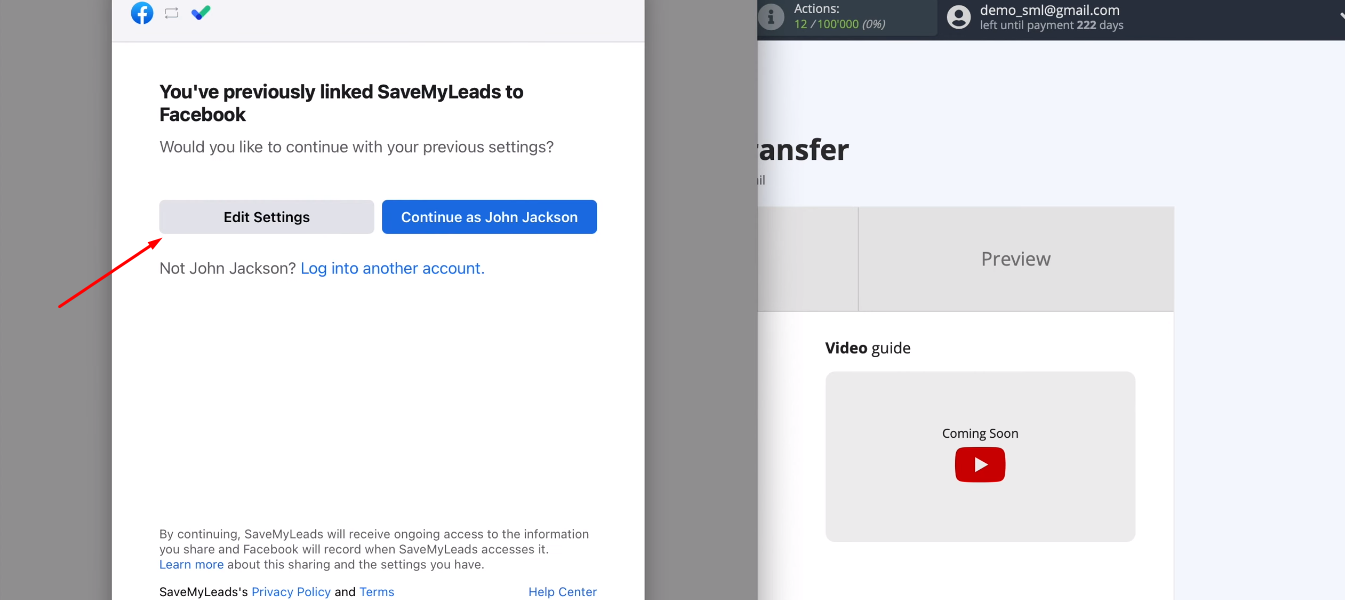
Then click "Edit Settings".
Select advertising pages with which we can work.
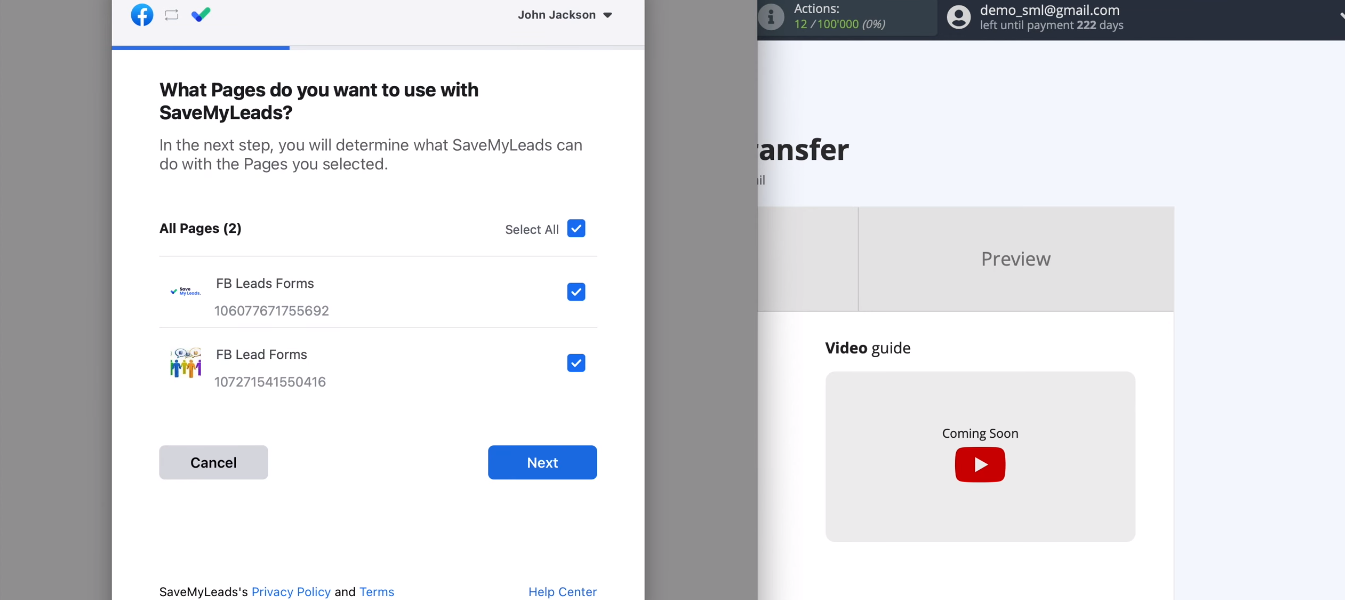
Leave all checkboxes enabled.
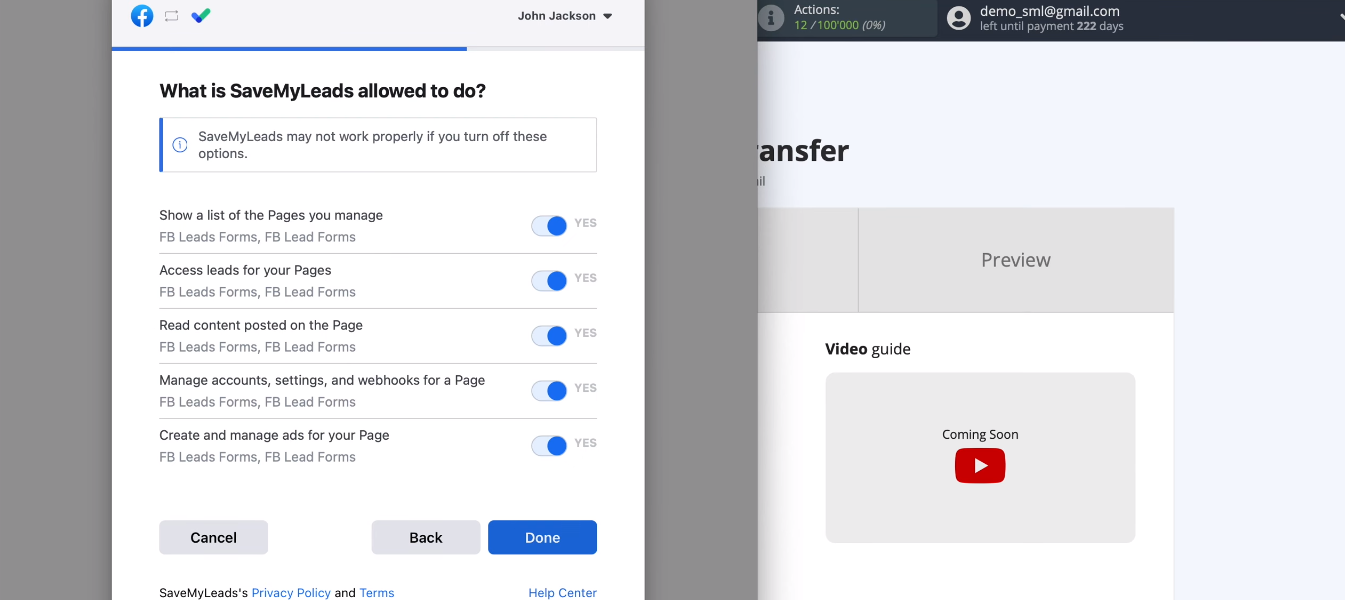
Then click "OK".
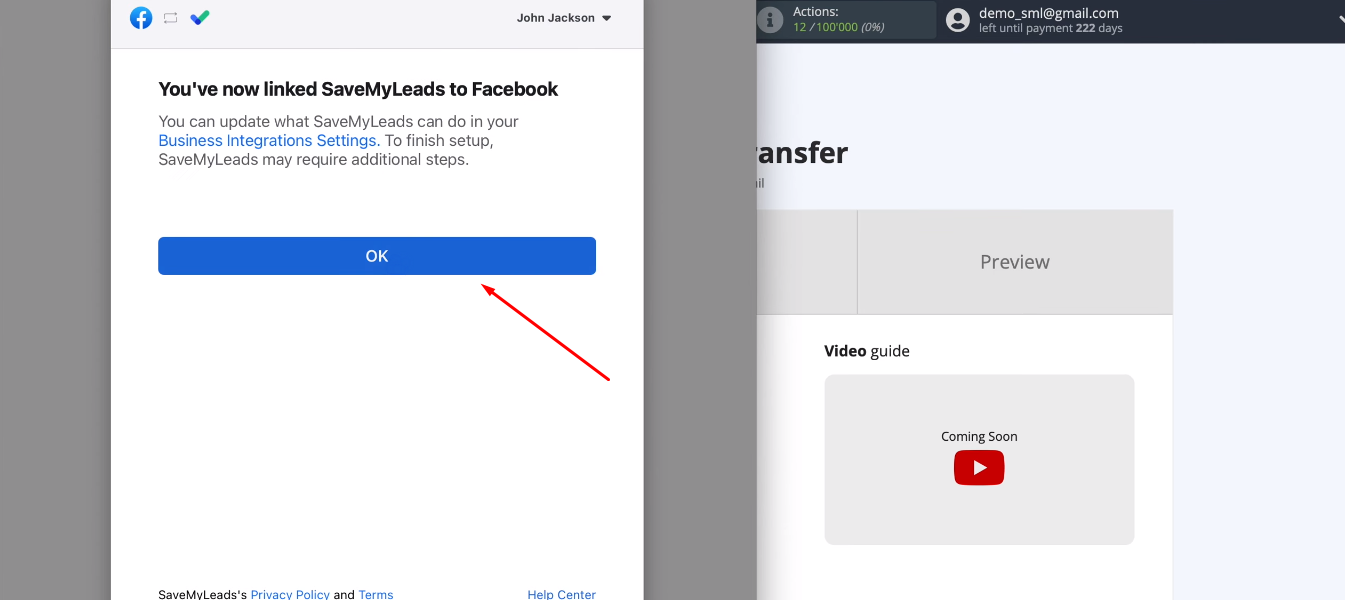
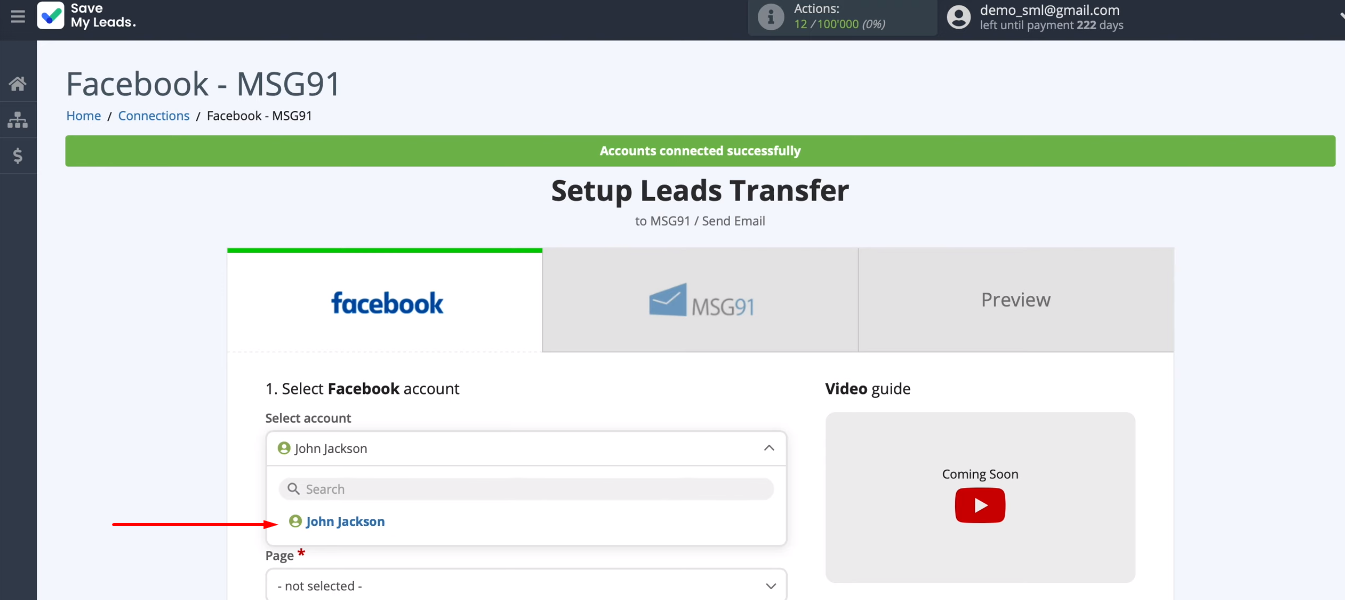
The connected account appears in the list. Now it can be selected.
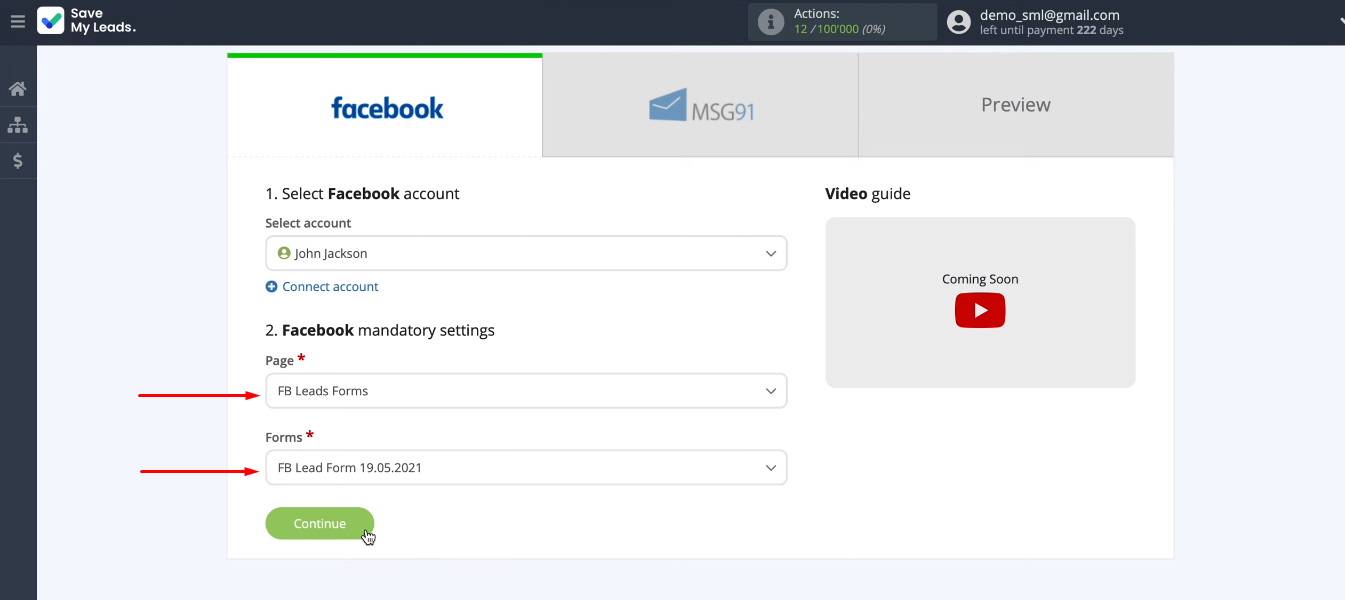
We need to specify the advertising page and the form with which the integration will work. If you want to work with multiple forms, then you need to create a separate connection for each of them.
Connect MSG91
Now let's set up the receiving system. Connect the MSG91 account.
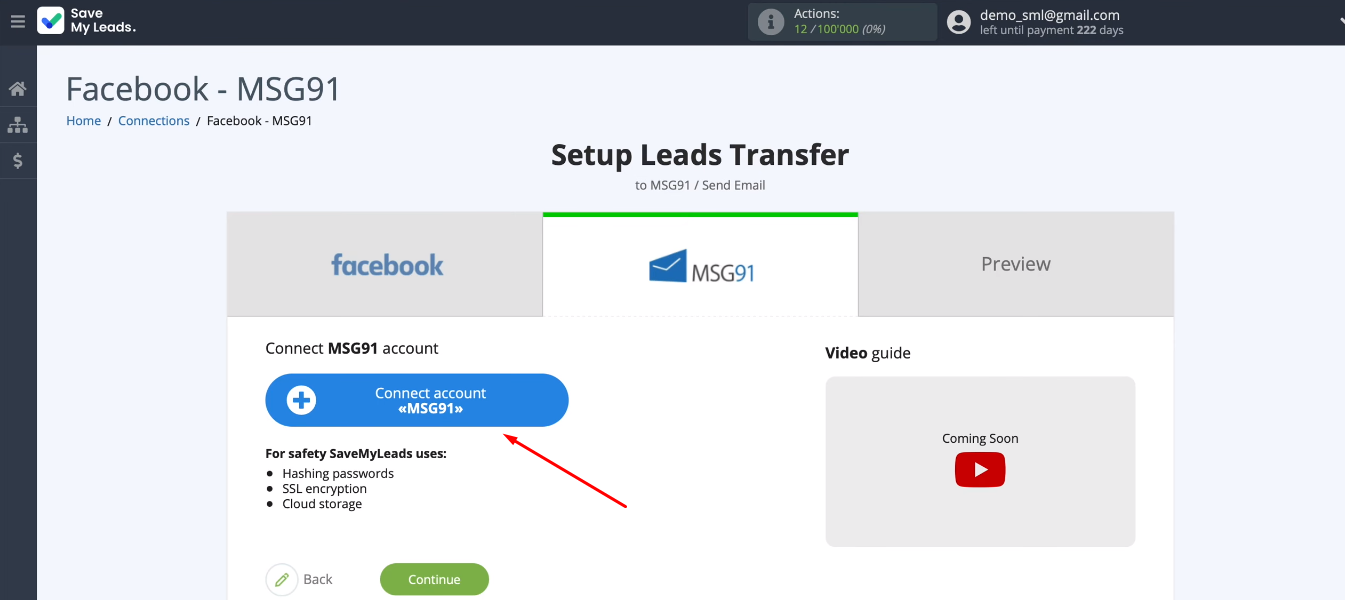
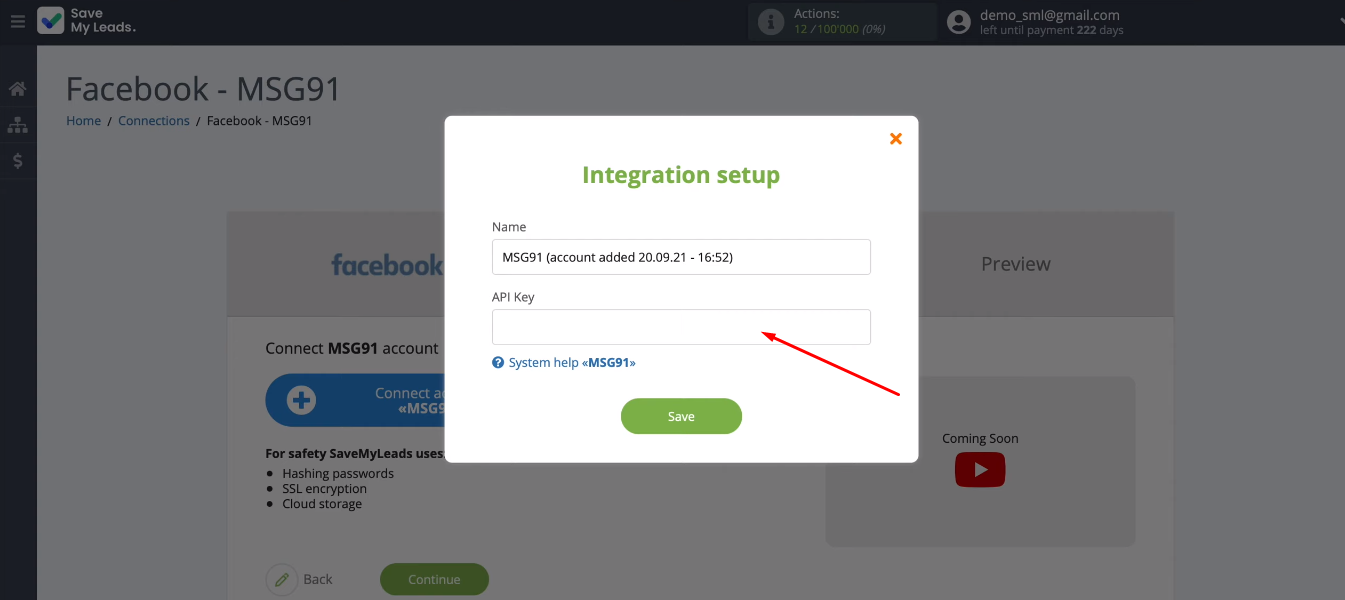
To connect MSG91 to the SaveMyLeads system, we need to fill in the “API Key” field.
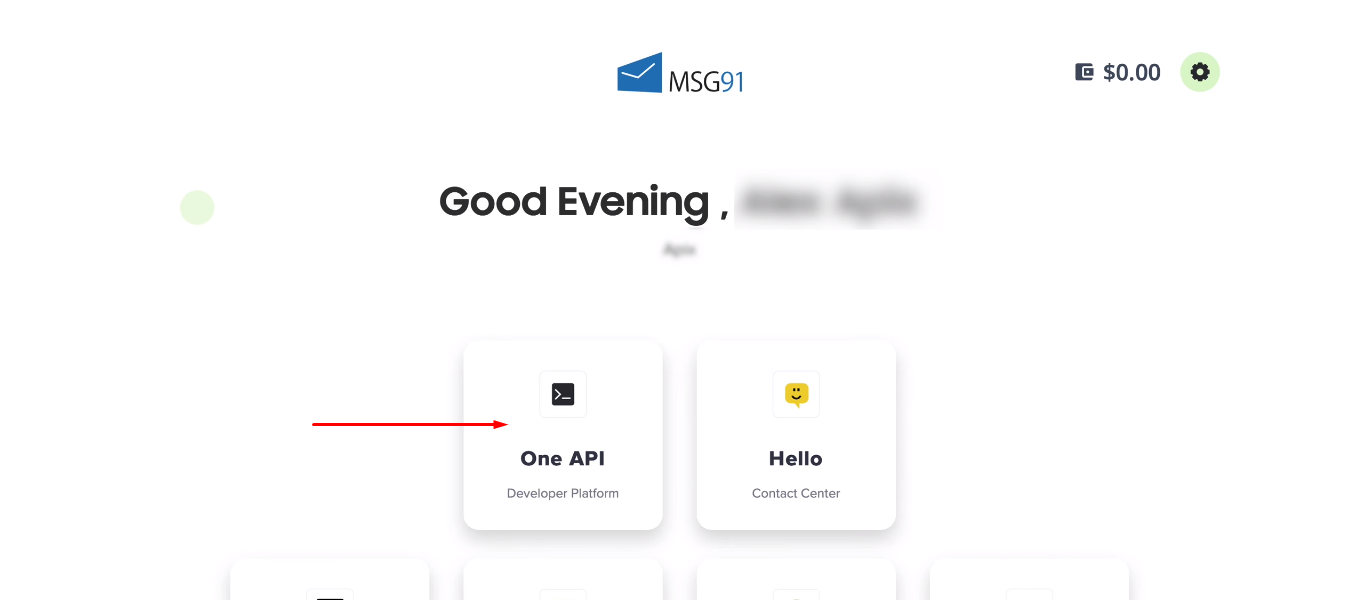
Go to the MSG91 service. We are interested in the "One API" section.
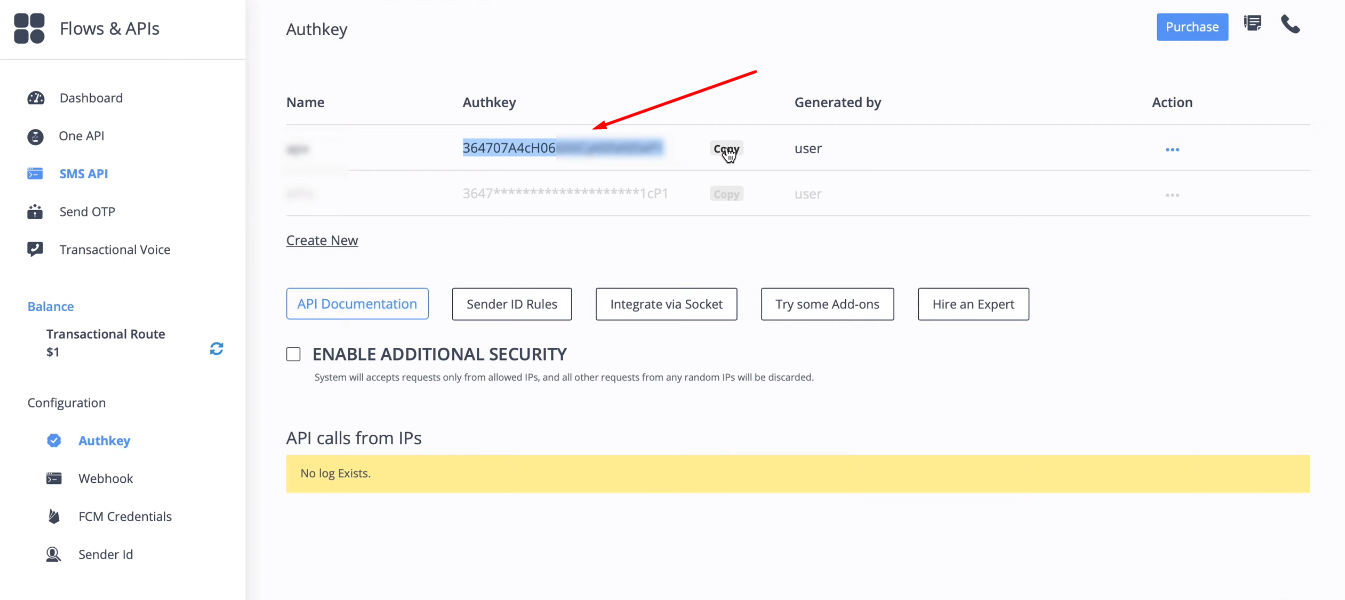
Now go to the “SMS API” section and copy the API key. If there is no active key in this section, then it must be created.
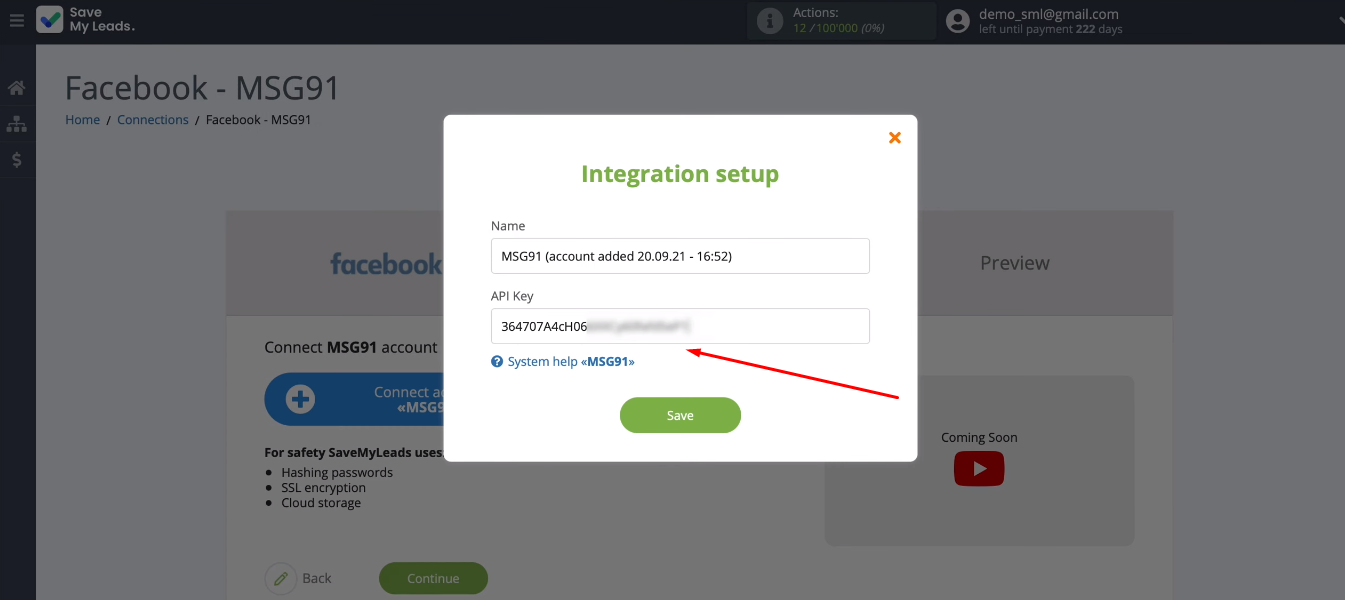
Return to the SaveMyLeads service, insert the API key into the field and save the connection.
Select a connected account.
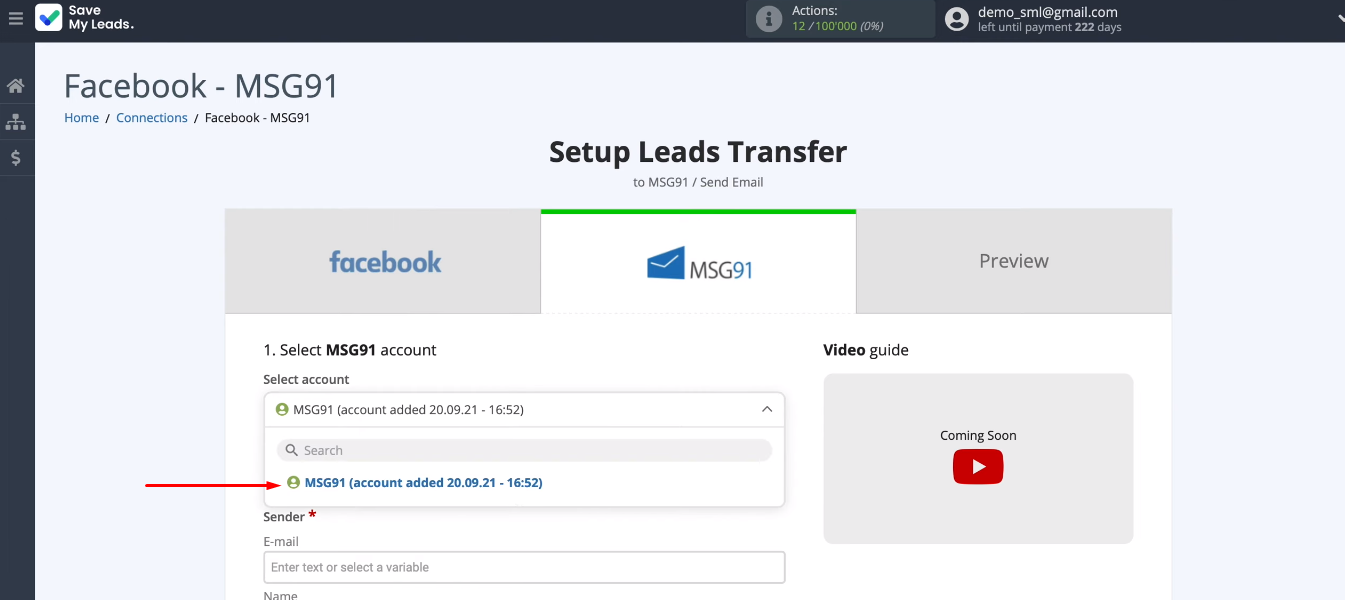
Now we configure the parameters for automatic email distribution. First, we need to fill in the “Sender” block. To get the sender's email, you need to contact MSG91 support. Fill in the fields “E-mail” and “Name”.
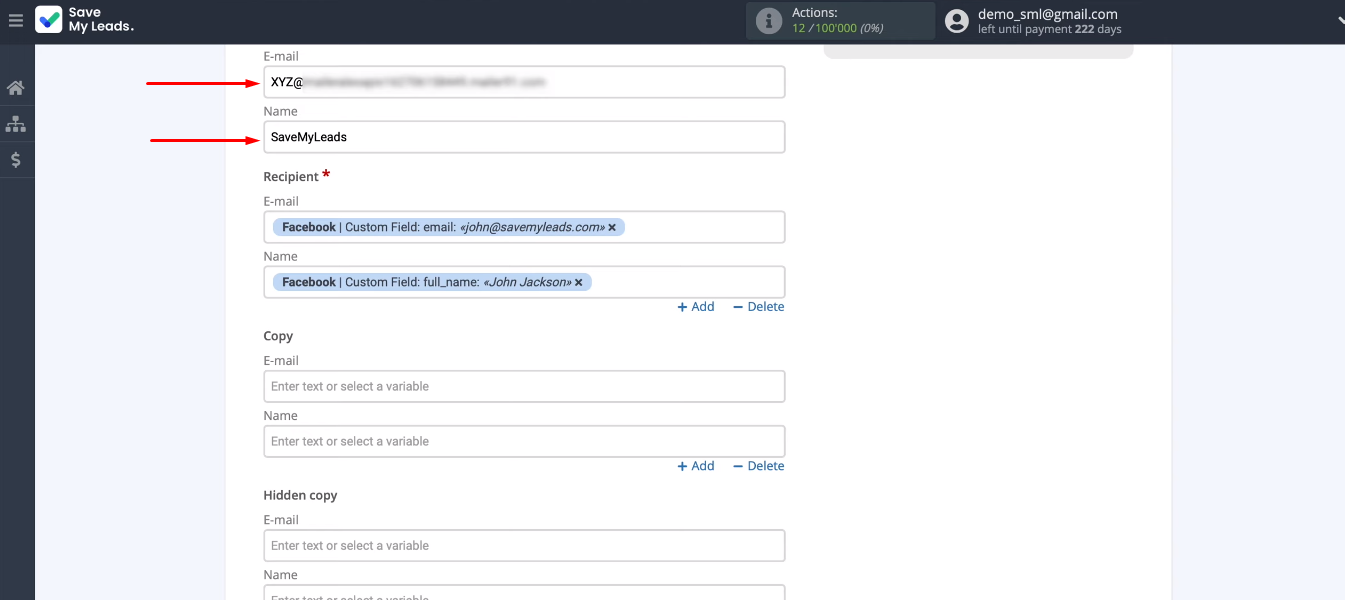
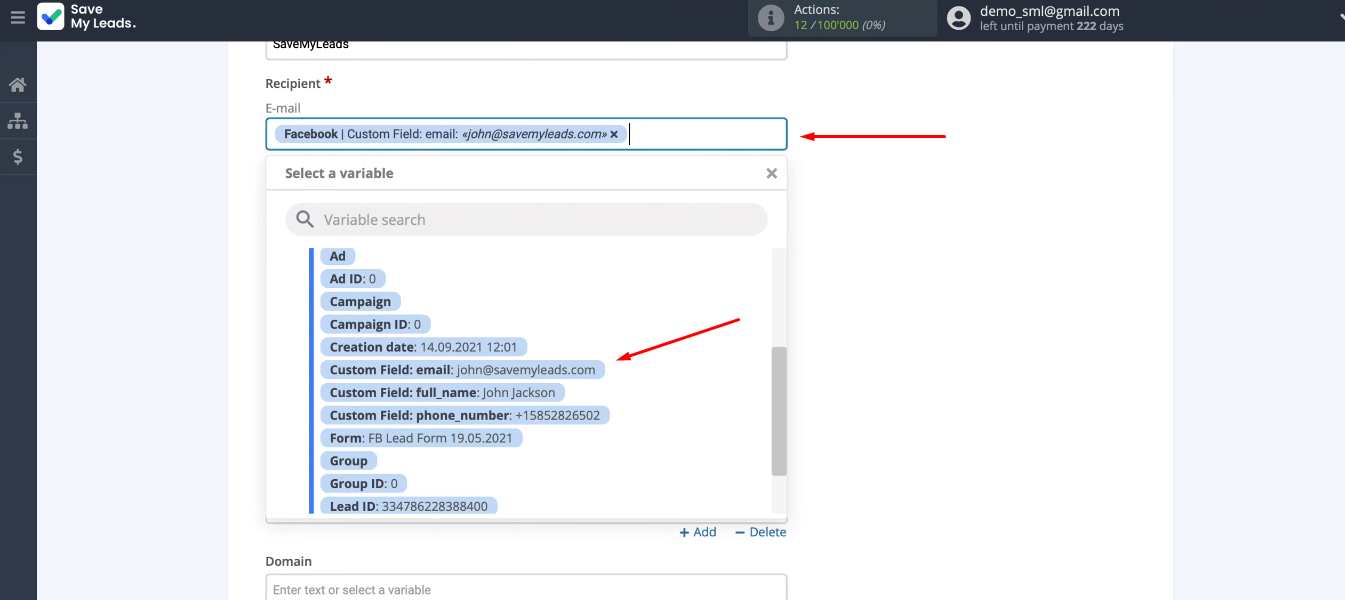
We need to define the recipient parameters (email and name). For this we use variables from Facebook.
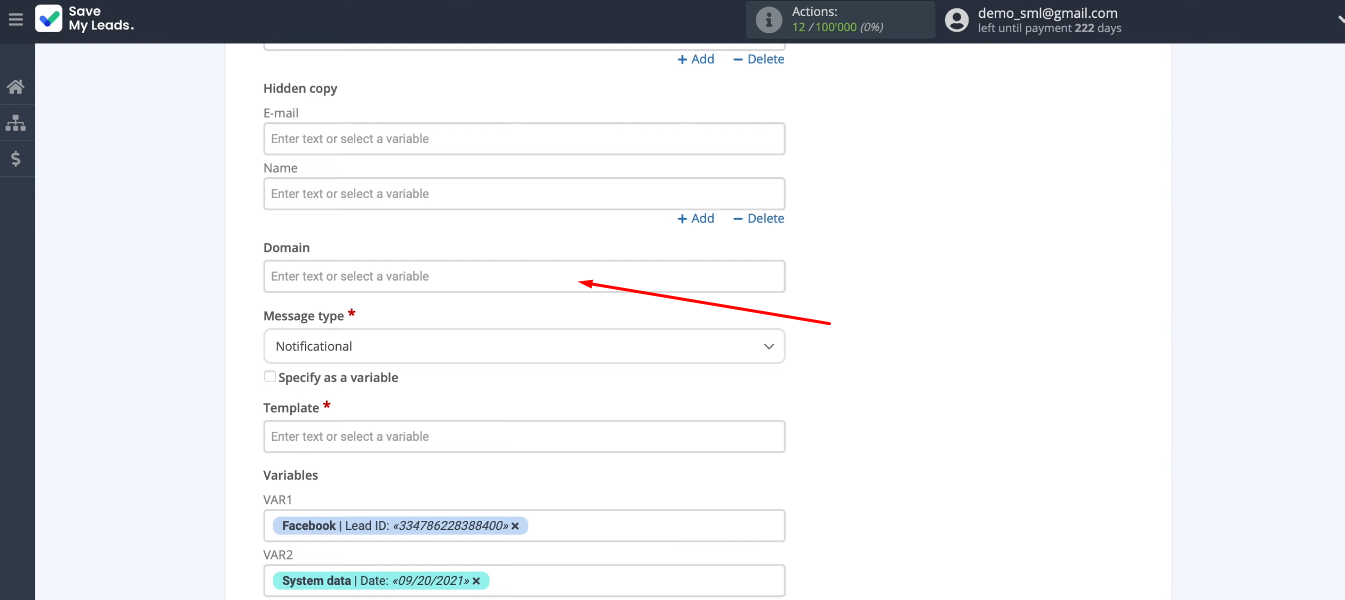
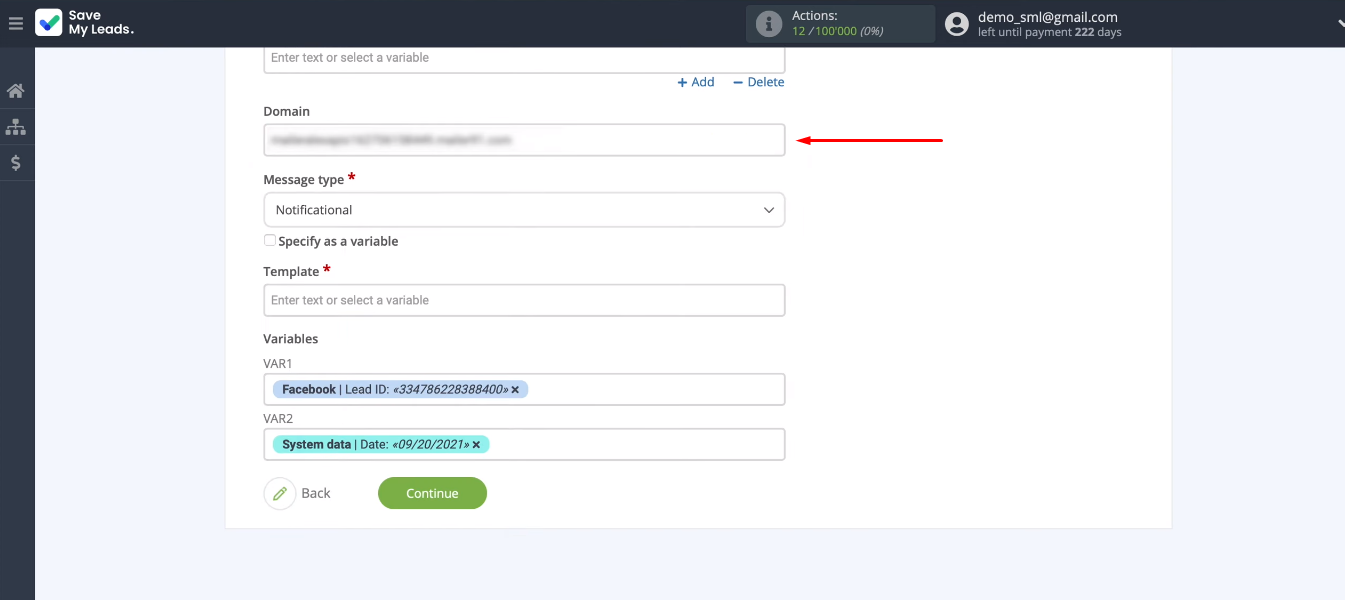
Next, we need to fill in the “Domain” field.
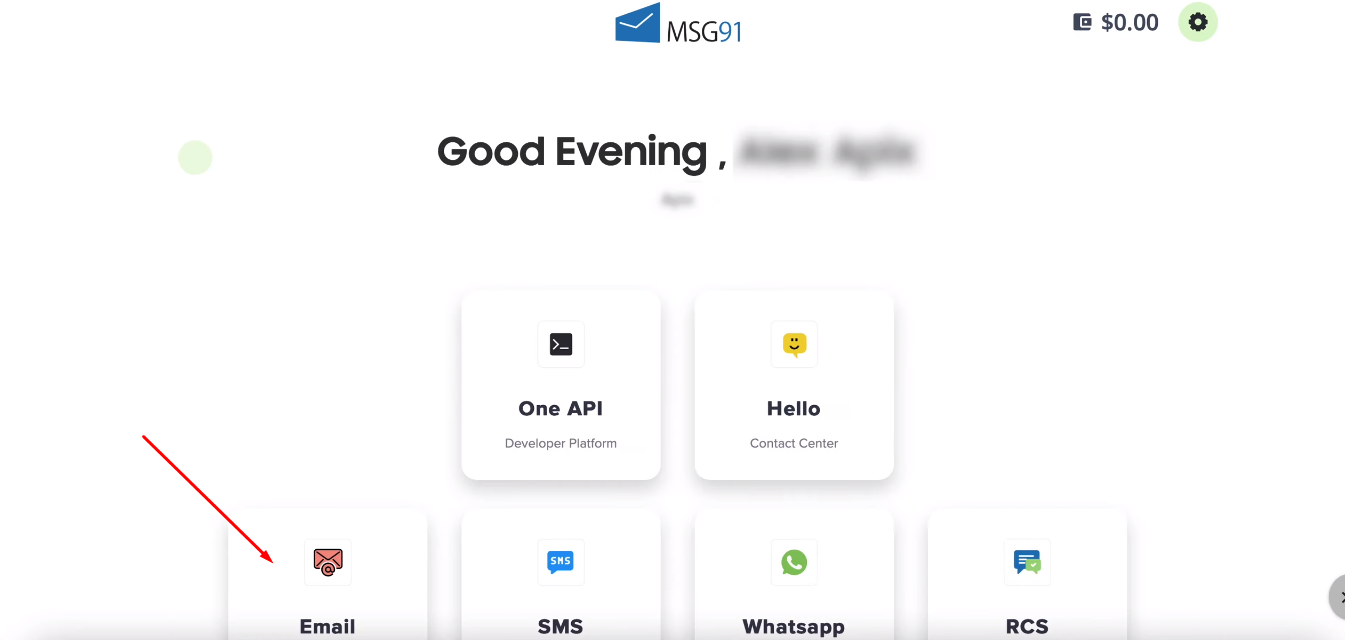
Go to the MSG91 system. We are interested in the “Email” section.
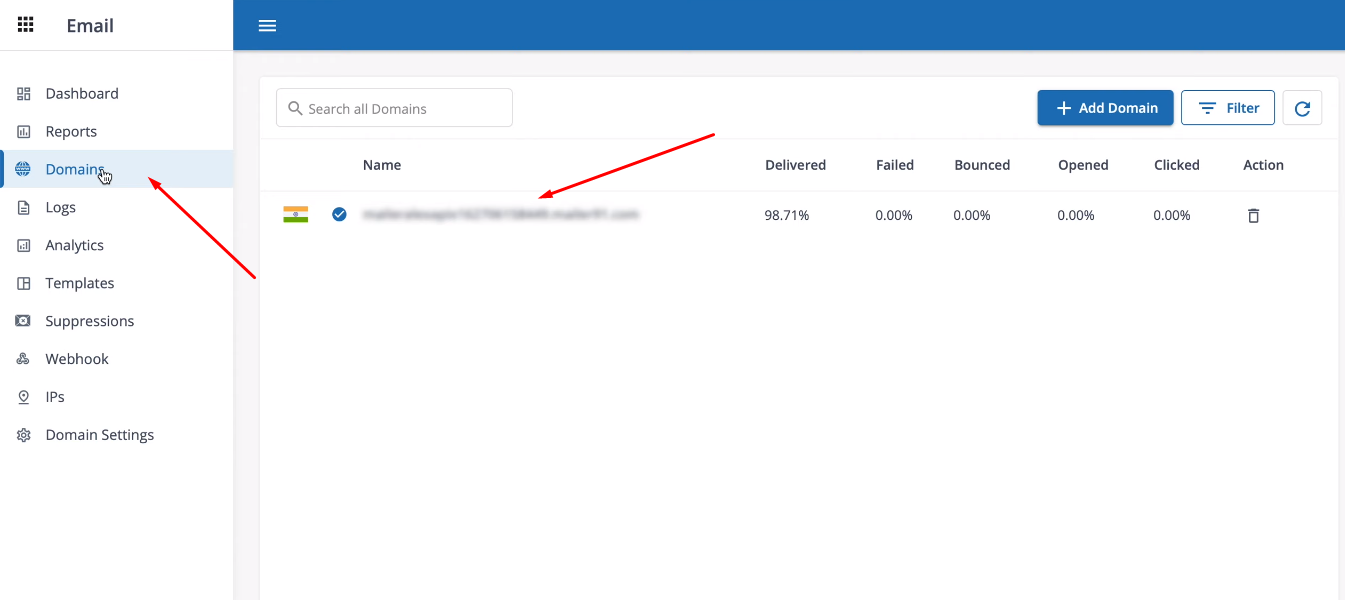
Go to the “Domains” section and copy the active domain.
Return to the SaveMyLeads system and paste the copied data into the “Domain” field.
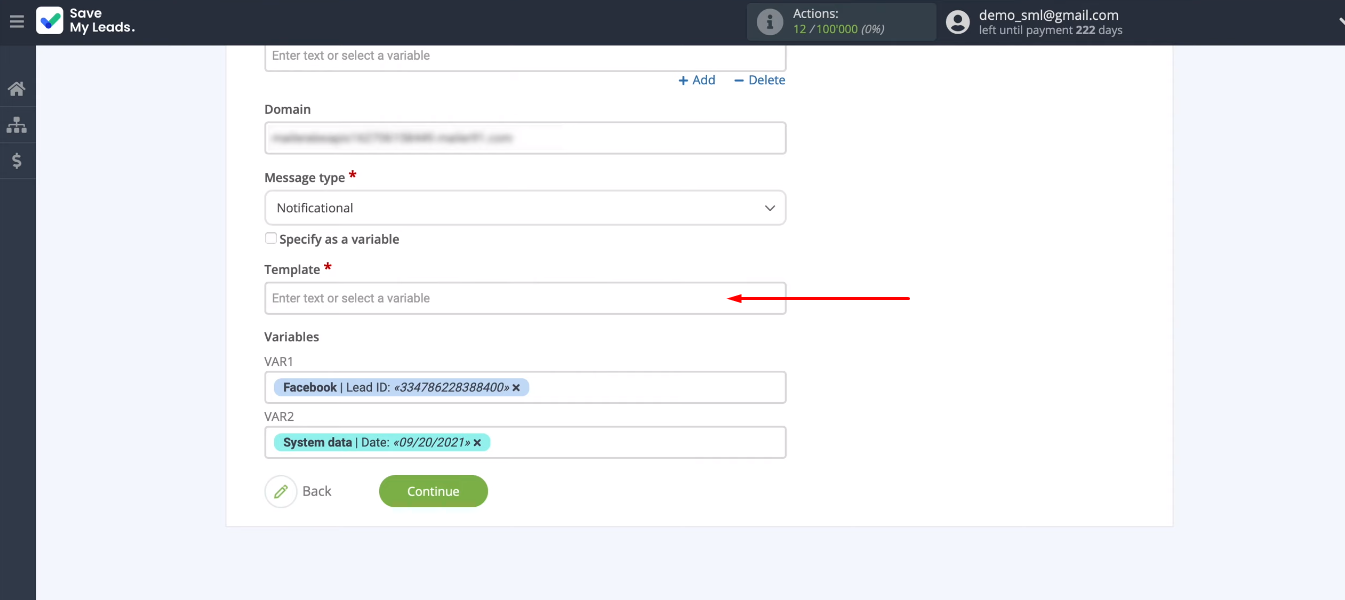
In the next step, we need to define a letter template.
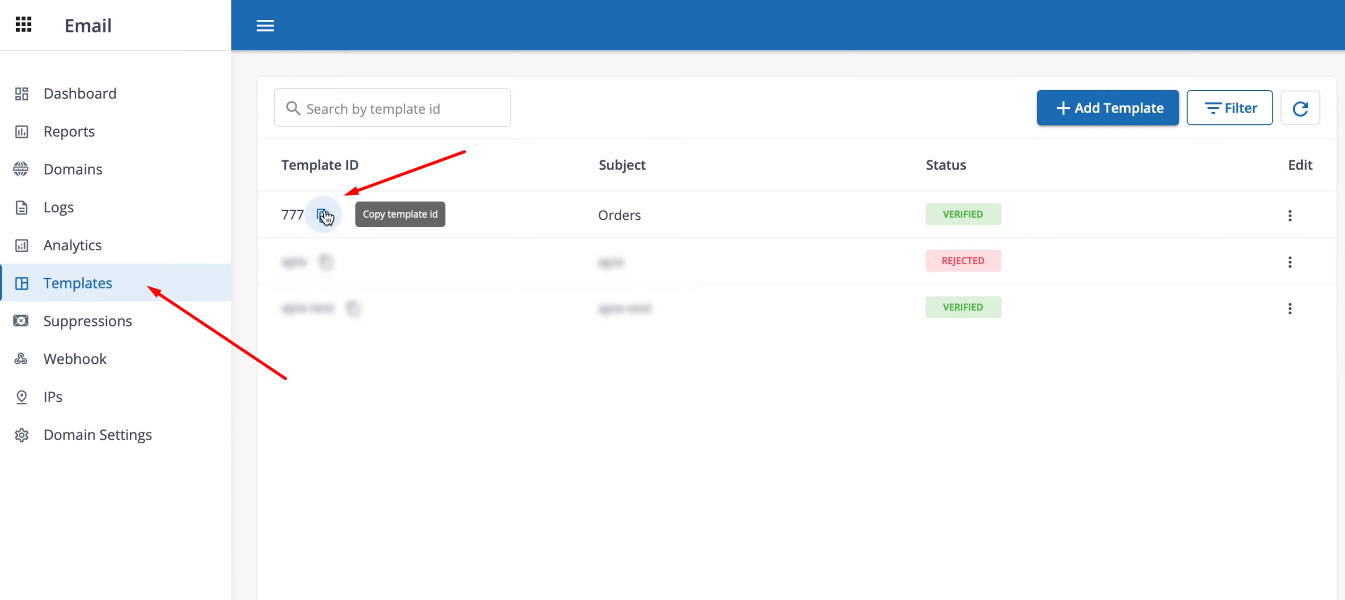
In the MSG91 system, in the “Templates” section, select a template and copy its ID.
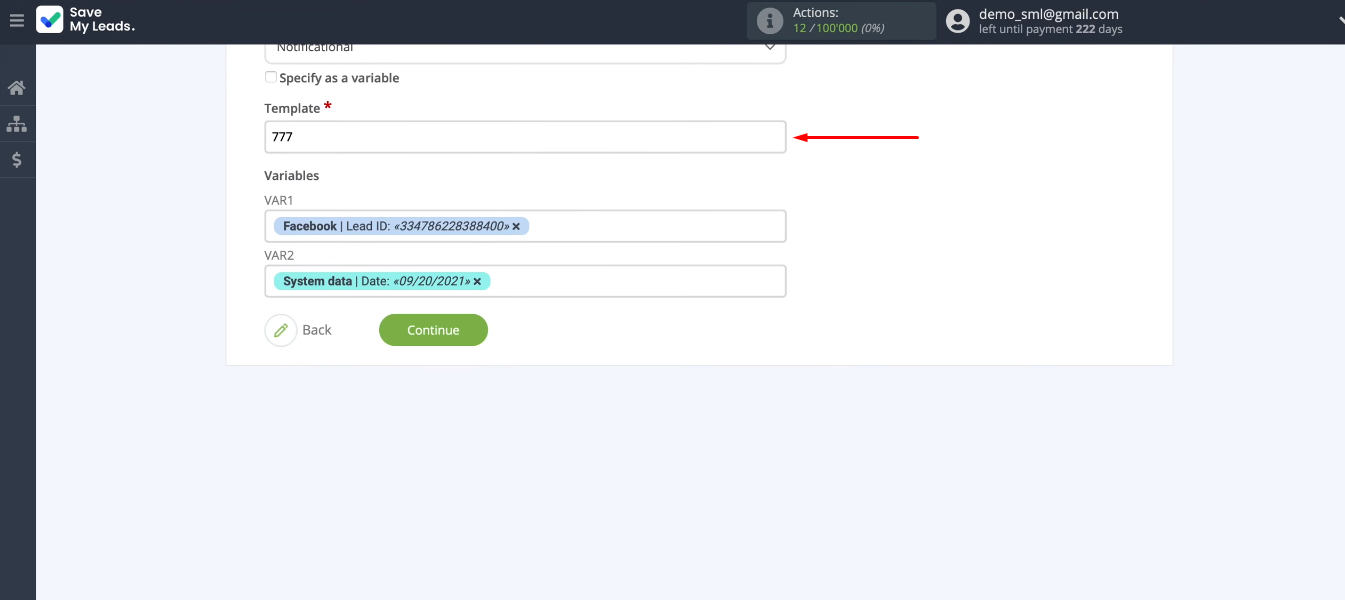
Return to the SaveMyLeads workspace and fill in the “Template” field.
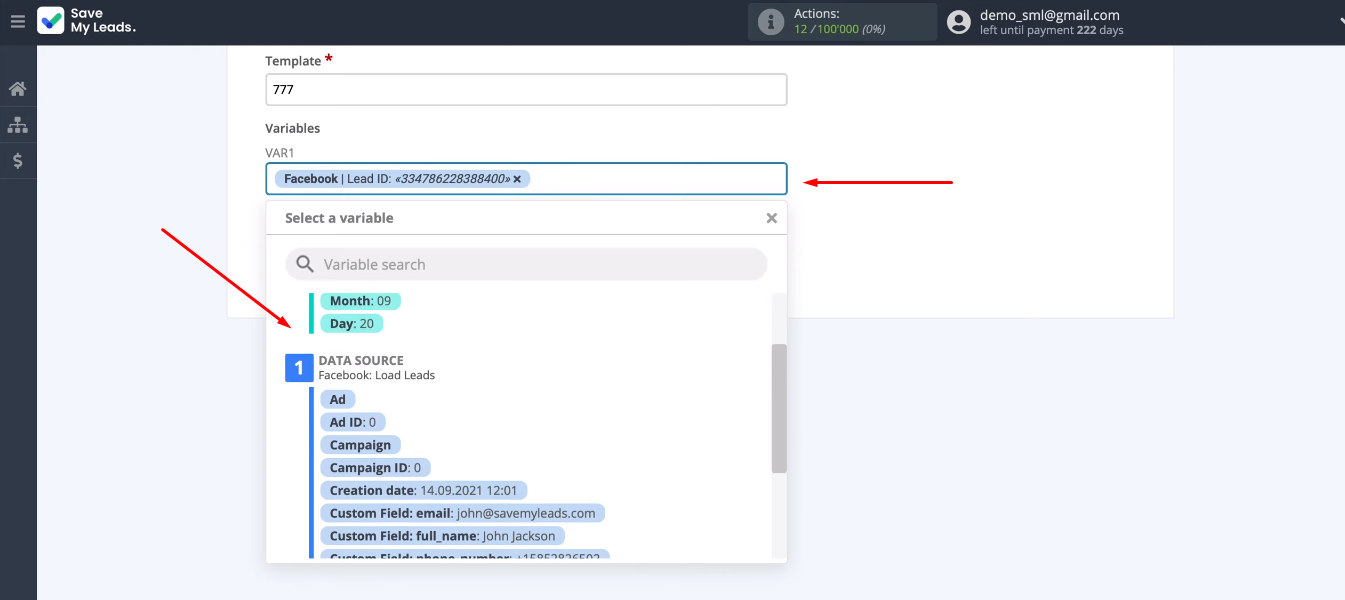
In our letter, several variables will be used (for example, order number and date). To determine the values of VAR1 and VAR2, we use system variables or variables from Facebook.
Check the connection and turn on auto-update
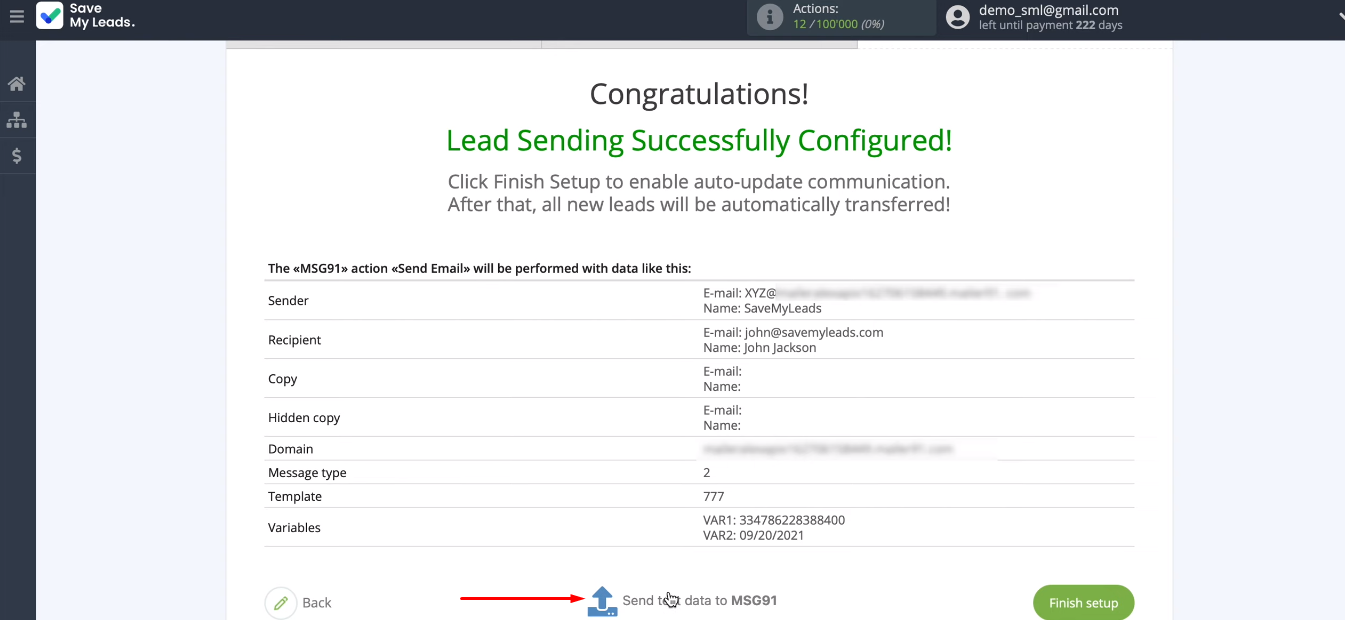
At the next stage, the system offers a test sample of data that will be transmitted to the MSG91 service. We need to check the connection, click “Send test data to MSG91”.
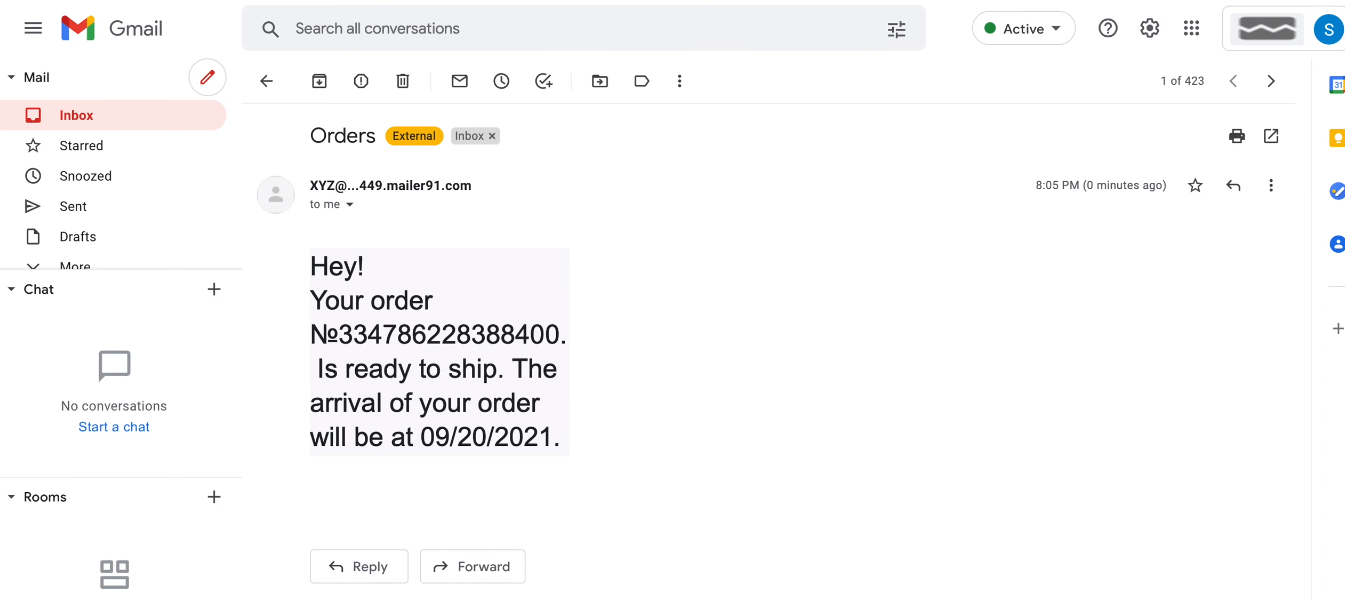
Check the letter that should come to the address of the test lead from Facebook.
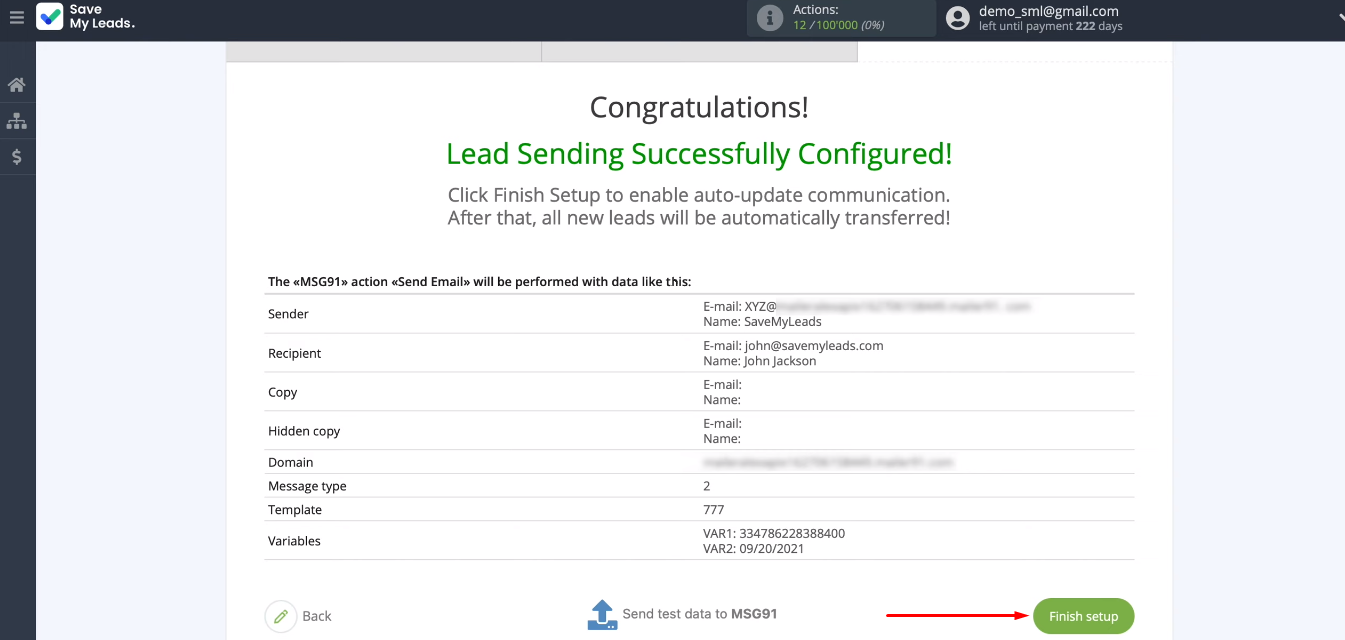
Return to the SaveMyLeads system and complete the integration setup. To enable communication, auto-update must be enabled. To do this, simply click the “Finish setup” button.
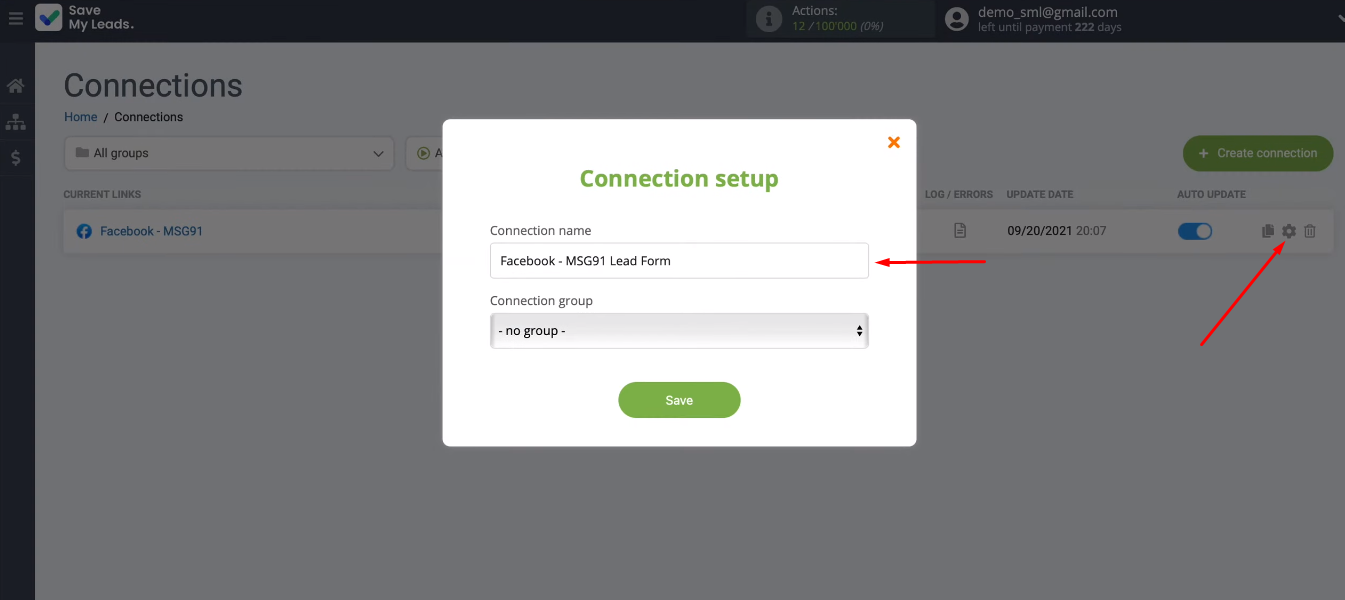
You can change the name of the integration if you wish. This is done through the communication settings menu.
Conclusion
The Facebook and MSG91 integration was created using the SaveMyLeads online connector. The connection between the two services is set up in about 10 minutes. Special knowledge and skills are not required. There is also no need to learn the nuances of the API and follow the updates.
- Automate the work with leads from the Facebook advertising account
- Empower with integrations and instant transfer of leads
- Don't spend money on developers or integrators
- Save time by automating routine tasks
The result of the integration is the automatic sending of letters to each new lead from Facebook. This contact with the client will be carried out promptly and without the participation of a marketer or sales manager. Automation of routine processes will allow employees to increase their efficiency and focus on more important tasks.
